What trim should I use?
I’m building a new custom home and I find myself asking, what trim should I use? I’ve looked at hundreds of home pics online, a bunch of magazines and even went to a molding manufacturer but I’m still not sure what I need, can you help?
One of the most nerve wracking things about building a new house is selecting the perfect trim. There are dozens of variables that go into making your decision like the size of the room, size of the home, overall style, your taste, ceiling height and your budget. Selecting trim for each room is one of the most important decisions you’ll make when building a new home. We’ve put together some basic rules for you with tips, advise and lots of pictures to make your decision a bit easier.
Trim a.k.a. Moldings
Trim, also known as molding is one of the best ways to add depth and beauty to any room. Baseboard, casing, crown molding, window, door and chair rail. Trim is a design element that adds depth, detail and richness to any room. Most people building a new home don’t give trim much thought. They don’t consider the size, style and material being used. How they flow together from room to room and how they match the overall style of the home. Do you want a colonial finish, a contemporary or modern one or something totally unique. If your building a new home you’ll be asking yourself what trim should I use. This article will try to help you with that.
Trim is sold in a wide variety of sizes, materials and styles. And that’s just the stock variety carried at a local Home Depot or Lowes. Custom trim layers different size and style trims together, creating a look impossible to achieve with one piece moldings. Trim is by far the best way to make any home stand out and look like a million bucks. For this you’ll not only need a great design but a custom home builder with the skill and experience required to install it.
Let’s look at some of the various trim elements below and try to answer the question. What trim should I use?
Interior Trim Types
Let’s take a look at the basic trim types, what they cost and where, when and how you should use them. Keep in mind for the rest of the article when we talk pricing it’s for pine trim. MDF would be a little cheaper while stain grade wood like oak or cherry would be a lot more expensive. All trims are sold by the linear foot not the square foot like most other building materials.
1. Base Moldings
Base trim is at the bottom of the wall where the wall and floor meet. Old fashioned base trim was made of 3 parts. A shoe (the small curved piece that sits on the floor and is nailed to the baseboard). The baseboard (the tall, flat piece). The cap (an ornamental piece that sits on top of the baseboard). Modern base moldings which you’ll find in the majority of homes are 2 parts. Part 1 is the baseboard which combines the baseboard and cap into one piece. Part 2 which is the shoe.
Base trim is pretty much a standard in every home you’ll go in. Other than in some ultra modern designs your gonna find base trim. Out of the hundreds of homes we’ve renovated or built I think we’ve not used it once. So if your building or remodeling a home your gonna have to choose a good base trim. The only questions are what style and what size?
It might appear like a small detail but your baseboards will alter the look and feel of the entire home. Baseboard moldings typically range from 3 1/4″ – 7″ which makes a huge difference in the look of the home.
The basic base molding found in the vast majority of homes is 3 1/4″ wide and sells for about $1.50 per ft. Wider 7″ trim is generally found in larger homes with big rooms and runs around $3.50 per linear foot.
Smaller shoe molding which goes on after the base trim costs about $.75 per linear ft.
What Size Base Molding Should I Use?
The general rule of thumb we like to use based on hundreds of new homes and renovations we’ve done goes as follows.
For a standard size home from a small ranch to a 2000 sq ft. 2 story home we would use the standard 3 1/4″ in bathrooms, bedrooms, closets, and utility rooms. In hallways, the kitchen, living room, dining room and the master bed and bath we upgrade to at least a 4 1/2″. As a basic rule of thumb use a wider trim in your money rooms where you and your guests will spend the majority of your time. You really don’t need fat trim in a laundry room or closet.
Anything over that would be an upgrade and should only be done if the home and or budget is appropriate. Use common sense because there’s no steadfast rule. If you have a small ranch don’t install a 7″ base, it’s for huge luxury homes. We install 7″ base on 5000+ sq. ft. homes that cost over a million to build.
You can do it if you really want to but you won’t see a return on your investment when you sell. Thicker trim is considered a high end option and you really only get a return on a high end home.
Another thing to remember is, you don’t need thick trim to look great. Bigger isn’t always better. Fancier isn’t always better either. And neither is the most expensive. Trim should be appropriate for the house and price point to look it’s best. If you want to upgrade then size up one size, maybe two, but don’t jump to the highest most expensive level or you’ll lose money at resale.
What Style Base Molding Should I Use?
When it comes to base molding style, or any trim style for that matter, it’s a matter of personal preference and the overall style of the home. That’s really the only pro tip I can give you. Make sure to match the trim style to the home. You want it all the fit together. And definitely make sure to match the various trim styles to one another. Nothing should stand out and look out of place.
If your home is modern use a modern trim not colonial, it won’t look right. Other than that pick what you like. Use resources like our website, Pinterest, Houzz, design blogs or interior design magazines if you need inspiration.
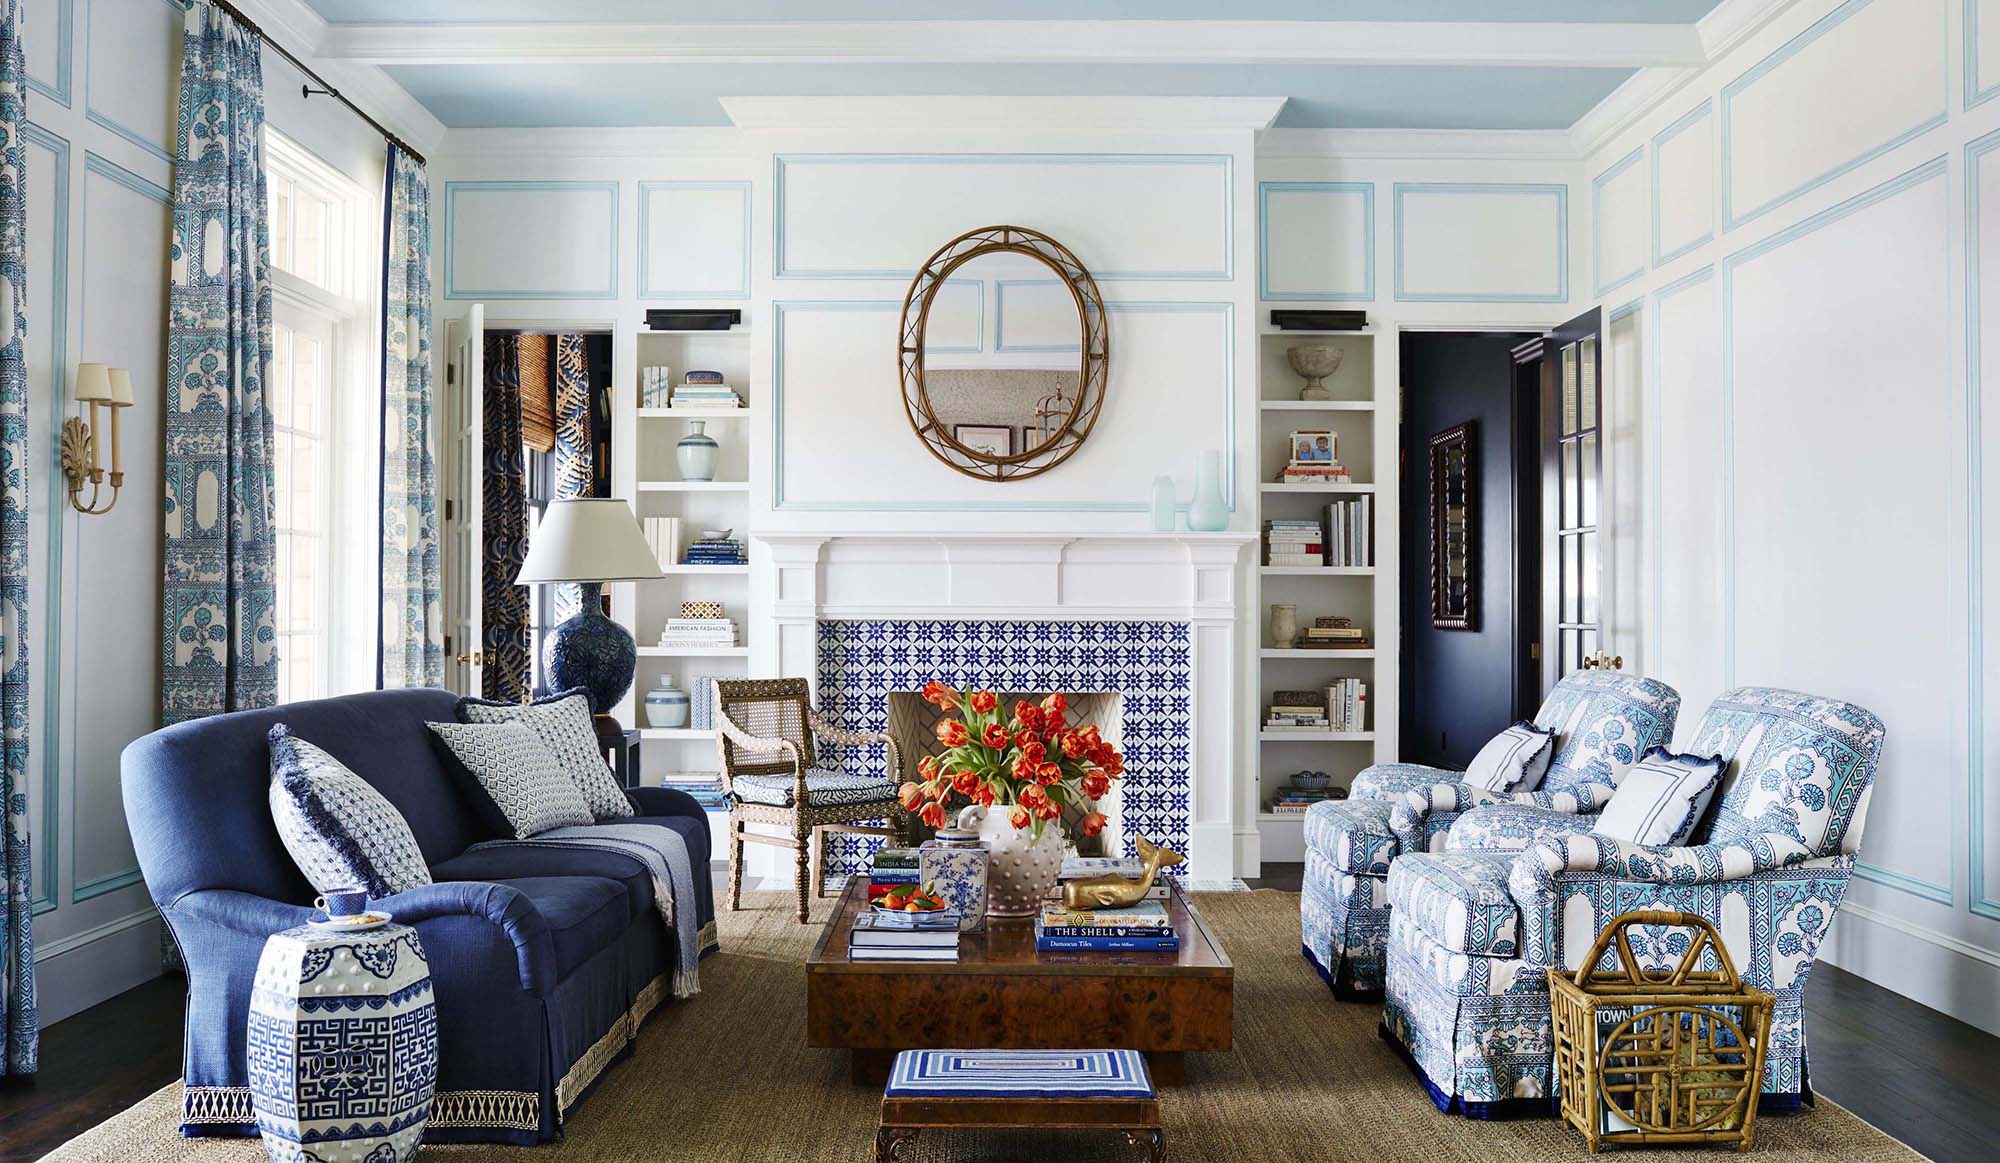
2. Wainscoting
Wainscoting is a way of finishing the lower area of the wall with something more ornate than sheet rock. Base trim is generally still included with wainscoting even if it’s something as simple a shoe molding. Wainscoting is custom built on site so styles are almost unlimited including simple wood panels, bead board, raised panels and horizontal wood paneling. The finish is generally all white with a semi gloss finish but it doesn’t have to be. We have many clients who’ve painted their wainscoting to match an overall color scheme in a room. Wainscoting can also be built out of oak or cherry and stained, a very expensive option for a particular style of high end luxury home.
Wainscoting is a beautiful way to finish the look of walls or stairs and works in any room of the house. Since it’s custom built it can be done in a nearly endless array of sizes and styles making a great option for just about any home. I really can’t think of any style or home that wainscoting wouldn’t be a great addition too. We install wainscoting in every spec home we build and install it in just about every home we build or remodel so if you have the budget I highly recommend it.
Absolutely you should consider wainscoting as an option when asking the simple yet complex question, what trim should I use?
How Much Does Wainscoting Cost?
This is hard to answer since wainscoting is custom built on site to whatever design you come up with. So first you’ll need a design. Looking at pictures online or in magazines works best, once you have a design you like meet with a trim contractor or break down the materials by ft. and price it out accordingly.
Most contractors charge between $1,000 – $5,000 to install wainscoting in a single room + materials, which of course varies based on room size and design. Doing the work yourself can save you a bundle if your handy and have the tools but this isn’t a DIY project for an amateur. You’ll need not only the skill but a good miter saw, tape measure, finish nail gun, a level and a compressor. To nail down how much it’ll cost for your project, measure your walls and then calculate how much trim and other supplies you’ll need based on your design.
Get Multiple Estimates From Qualified Trim Contractors
You should always get estimates and second opinions to determine a fair price if your hiring a contractor to build your wainscoting, which we recommend doing. Knowing the size of the rooms you want to install wainscoting in and the design will help get an accurate price for both time and material costs. Most things in construction have what we call a “going rate”. Which is the average price subcontractors charge for a given task.
The going rate varies by region so it’s hard to quote a price here. Your best bet is to get a couple estimates from good local contractors and pick the sub you like best. Some people say go with the estimate in the middle but choosing by price alone isn’t such a great idea. Pick the sub who’ll do the best work for around the average of your estimates. And don’t be afraid to negotiate and make a counter offer. Most guys will give you a better deal if you ask.
What Style Wainscoting Should I Use?
Clearly the most important factor in the cost of your project is the design of wainscoting you want to install and the size of the room or rooms you want to install it in. Even if doing a basic panel design, you’ll need flat boards for your panels, and if you want a beveled edge to these panels, you’ll need trim to create that effect. You’ll also need some type of cal and a baseboard. Even the simplest wainscoting will require some type of decorative molding.
What we do with our clients is show them pictures. Tons and tons of reference photos are what works best for us when designing the interior of a custom home. Don’t try and design it yourself. Unless you have some incredible talent for interior design it’s not a great DIY project. Find a wainscoting picture online or in a magazine that you love and then break it down piece by piece. The best interior designers and custom builders have already designed and built some magnificent homes. They’ve done all the hard work for you, the pictures are free and available online, just do a search, find what you like and copy it.
What Size Wainscoting Should I Use?
By size this question is really asking what height wainscoting should I use? And the answer once again is it depends. The standard height is about the bottom 1/3rd of the wall. That’s what you’ll see in just about every home that has wainscoting installed. It’s the same for walls and stairs, about 1/3rd. That leaves 2/3rds of the wall for paint and crown molding, if you want it. But there’s no rule that says you have to build it to the standard.
While you probably wouldn’t want to go smaller, in fact I can’t remember ever seeing a home that went smaller, you could go bigger. Below is a pic of a home that installed wainscoting the bottom 2/3rds of the wall leaving only the top 1/3rd for paint and crown and it looks fantastic.
What are the Hidden DIY Costs of Installing Wainscoting Myself?
You may be thinking of saving some money by doing the work for free. This is true and not a bad option if you have the tools and skill to do the job right. If you have questions there are a bunch of great videos on Youtube explaining how to build wainscoting step by step and tons of free resource pics available online.
While you’re technically not paying yourself for your time, consider all the things that go into doing a wainscoting project by yourself. You’ll need the right tools and lots of things people sometimes forget to price like nails, putty or wood filler, a sanding block or sandpaper and some wood glue could come in handy.
One last thing to remember is to factor in waste. Even the best trim pros that we use to trim million dollar homes factor in about 10% waste. Buy full pieces for the 10% if you can so you can easily return it if you don’t need it. I can’t tell you how many times homeowners return to Home Depot because they need extra material, it’s a total waste of time and money. Measure twice, figure out a material list, buy your materials and add 10%.
3. Chair Rail
Chair rail is that trim running horizontal kind of in the middle of a wall. It sits approximately 3 feet off the floor at the height of a typical chair. Protecting the wall from any furniture that gets placed against it. Chair rail molding is a nice touch that adds a sense of class and proportion to a room by breaking up the wall into two parts, the lower and upper half. This split gives you additional options on how to finish the wall.
Will you paint the chair rail white for the same color as the wall? Or a different color entirely. Will the top and bottom of the wall be the same color or different. Will you add crown molding and if so will you coordinate the color with the chair rail?
The key when installing chair rail is splitting the wall into two sections and getting those proportions correct.
How High Should I Install Chair Rail?
Chair rail is used less as a wall protector and more for looks. As a general rule of thumb we install chair rail about 32″ – 40″ off the floor. We adjust the height of the chair rail in proportion to the height of the ceiling. So for a 9′ ceiling we install around 36″ and 10′ is 40″. Anything above 10′ we stick with around 40″. Careful not to install chair rail too high.
The idea is to break the wall up into sections so keep this in mind when figuring out a height. The top portion should be about 2/3rds leaving 1rd for the lower half on a standard 8′ ceiling. The proportions change as the wall gets taller but the important thing is that the top part is taller. That’s the look your going for. If you put the chair rail too high and split the wall into halves it won’t look right.
How Much Does Chair Rail Cost?
Chair rail costs vary quite a bit depending on how fancy a trim you select. With prices ranging from as low as $1 per linear ft. to as much as $5 per ft. for pine. As always MDF would be a little less and stain grade a lot more.
Installation costs for chair rail are fairly cheap compared to other types of trim work since it’s basically just a long piece of trim nailed to the wall. Corners take the most time so if you have a lot of them the price will go up. Also long walls where a joint is needed will take a little more time as well. An average sized room can be done in a day here in NJ for around $400 labor per room.
What Style Chair Rail Should I Use?
Chair rail style should be matched to your other trims. Don’t think of just what style chair rail do I need, rather what style home do I want and what style trim do I want throughout the house? All your trim styles should flow together and should be appropriate for the homes overall style. So pick the style home first. Then match your trims accordingly.
We recommend to our clients looking at reference photos. Tons of them. There are literally thousands upon thousands on photos online of some of the most beautifully done homes you’ve ever seen. Some of them on our own website and blog. Check them out and find a collection of pics that you love. Then apply the look to your own home. Here at Gambrick we sit with each client and go through the pics together answering questions and making suggestions as we go, any good builder or trim contractor should do the same if you ask. This method works best since you can see the finished product before you even start the job.
Is Chair Rail a DIY Project?
Yes, Installing chair rail trim makes a great DIY project. As long as you have some basic skill and the proper tools it’s one of the easier trim jobs to complete. There are dozens of videos and articles online on how to install it so we won’t get into that here. Just know going in you’ll need a good miter saw to make the angle and joint cuts, a nail gun with compressor, tape measure, level and pencil. We use a little wood glue on joints when we install trim but you don’t have to, some pro use it and some don’t. And don’t forget the wood putty, get something sandable not painters caulk and a sanding block or sand paper, medium to fine grit.
Painters caulk goes on last to fill any small gaps between the top and bottom of the trim and the wall. Install it right before you paint so it has less chance to shrink. Make sure you wipe enough out, your just trying to fill the gaps. One of the most common problems we see with DIY trim jobs is homeowners using way too much caulk. Caulk is just for filling small gaps, not for fixing bad trim installation, if you make a mistake take your time and redo it, don’t just shoot in a ton of caulk covering the problem area up.
4. Window Trim
Window trim, also known as casing, is one of the most common types of trim you’ll find in a home. Although not required since a window can be trimmed with sheetrock alone, it’s a standard on the vast majority of new homes being built today.
The most common way of trimming a window is to use 4 pieces of trim with the ends cut at a 45 degree angle. Nailed together they form a frame which is nailed to the sides, top and bottom of the window. Because all 4 sides match this is a cheap and easy way to trim any size window. This method called picture frame.
The Window Sill
Another common way is to build a frame around 3 sides of the window, the top left and right sides, with a separate piece of trim cut for the bottom, called a sill.
The more common method for most new homes in the picture frame however we do frame a lot of windows with sills. It’s correct to frame a window either way and you can’t go wrong no matter what you decide. Also keep in mind you can use both in the same home as long as you stay consistent. By that we mean don’t frame one window in a living room with a picture frame the the one next to it with a sill. If you have 4 windows in a room and they’re all the same size then trim them all the same.
The most common windows we add sills to are the bathroom, kitchen sink and large windows you may want to decorate or add a candle too.
Having a deep sill to place objects on can be an advantage if you plan on decorating your window. The horizontal piece below the shelf, called the apron, can be shaped and sized as you like. The shelf can be shallow or deep, depending on what you’d like to place there and you’re overall design.
What Style Window Trim Should I Use?
As with any of the other trim styles coordinate your window trim with the rest of the home. Make sure it fits with the overall style of the home, not just the other trim pieces. Look at lots of reference photos on your own or with your builder and choose rooms you love as inspiration.
Window trim can get fairly elaborate with styles such as colonial, flat stock, craftsmen, craftsmen with a filet, craftsmen with a filet and cap, and cambridge to name a few. And these are just the more popular options.
I can’t stress enough to use reference photos as much as possible to find the style that works best for you. And make sure you don’t over do it. Design your trim to be appropriate for the value and size of the home. Adding thousands of dollars in custom trim won’t necessarily get you a return at resale if your local market won’t warrant the added work.
What Size Window Trim Should I Use?
Window casings range in sizes from the standard 2 1/4″ you’ll find in the vast majority of homes you go in, to 4″ which is used on large high end luxury homes. Generally speaking use the trim that’s appropriate and most common in the area you live in. A good trick is to look at houses for sale locally on Zillow and see what’s in the homes. If you want to go a little bigger then size up one size, but don’t go crazy. If everyone in your neighborhood is using a 2 1/4″ it’s fine to upgrade to a 2 1/2″ or even 2 3/4″ but don’t use 4″. You’ll end up throwing your money away at resale.
Wider trims are for bigger rooms. That’s the general rule of thumb. It’s not just about cost. If a house is small but costs a million dollars because of the area then smaller trim is appropriate. If a house is huge then wider trim looks better.
Stay consistent. Windows should be trimmed the same unless your going for something special, which is fine. If you have a large picture window you want to showcase it’s fine to trim it with something wider. Just make sure to stay within the same style range and match the other trims. Generally a trim style will come in several styles so it’s easy to match them all.
Another general rule we use is that windows should be trimmed slightly smaller than exterior doors but the same size as interior doors.
Is Window Trim a DIY Project?
Yes, window trim makes a great DIY project. Provided you have the tools and skill to do it. If you have a miter saw it’s easy to picture frame a window, you just measure and cut a bunch of 45 degree angles. The tape measure and saw do all the work. It’s a little harder than installing chair rail but much easier than wainscoting.
Window sills are a bit harder since you’ll have to cut the sill with a jigsaw to fit it into the window properly but if you have the tools and know what your doing have at it. You can do it. Like other trims and DIY projects there are tons of videos online teaching you how to do this stuff so we won’t get into install tips here. I recommend working with a professional if your thinks of trimming a whole house or doing something elaborate but if your just trimming a window or two it’s no big deal.
5. Door Trim
Much like window trim, door trim is traditionally installed as a frame with 3 sides because for obvious reasons door trim has no bottom.
Door trim should match the window trim in style as well as the other trims your using in the home. Varying trim sizes however is a great way of distinguishing the different elements of a home. We follow the following rule of thumb when trimming the majority of custom homes we build.
- Front entry doors have the most intricate and widest trim
- Large exterior doors are trimmed wide but less so than the entry door. Doors such as a french, gliding or bifold patio door.
- Small exterior doors such as a side or laundry door are trimmed smaller than the larger doors.
- Interior door and window trim are generally the same size
Generally we tend to match the size of the door or window to the size of the trim. Keep in mind his has nothing to do with style. Even when using the same style, trim sizes can and should vary.
As with windows the most elaborate way to trim a door is to use a custom design. Separate pieces of trim for the top and sides. Because each piece is different the trim can be richly detailed and quite ornate. Each piece is cut and installed separately, achieving the exact profile and look you want.
Custom trim is a layering effect. Different pieces cut and installed together to create the desired effect. There’s no way to achieve the look of custom trim work from a stock piece of trim found at a Home Depot or Lowes.

6. Crown Molding
At the top of the wall is the crown molding. Just like other trims the choice of style and size depends on the size of the home, size of the room, budget and overall style of the home. Crown molding is generally speaking always a great choice for just about any room.
What’s especially nice about crown molding is its ability to make a wonderful transition between wall and ceiling by creating a cap to any wall or cabinet. Rather than have an abrupt sharp corner, crown molding lets the eye ease into moving from one plane to another.
Just adding something as simple as a basic crown molding can transform even the most basic room into something rich and elegant.
What are some benefits of crown molding?
Crown molding was designed for a specific purpose. In older homes where the ceiling and wall met it tended to crack. Old homes used lath and plaster, not sheetrock and spackle. Plaster is harder and had a tendency to crack. Out of this problem crown molding was born. It’s functional purpose was to cover up the cracks in the joining of two surfaces. As a side effect it just happens to be a beautiful look for just about any home.
Today, crown has become much more than a way to cover up cracks. When done right, crown molding helps draw the eye up high, elevating the space and making the walls feel higher.
Crown molding is also one of the most sought after upgrades we get asked for in new and remodeled homes. It’s one of the few upgrades that can actually help sell a home and retains it’s value almost dollar for dollar.
Crown molding can transform the look of a room from plain to something really special. Try it for yourself. Add some basic crown molding to even a small bathroom and see what a difference it makes.
What Does Crown Molding Cost?
Like the other trims it’s hard to say for sure since crown molding can get fairly elaborate. Custom multi layered crown molding is very expensive. Some clients even add lighting to their crown molding which is a whole other expense. Crown molding is sold like other trims by the linear foot so keep that in mind when pricing your project. For now let’s talk about some simple in stock moldings.
Basic 2 5/8″ crown molding is sold at any Home Depot, and generally always in stock, for around $2 per linear foot. On the high end their 5 1/4″ crown molding sells for around $3.50 per foot. These prices are for pine, as with other trim MDF is cheaper while stain grade is very expensive. Around double to triple the cost.
Here in NJ we pay around $700 to install crown in an average sized living room for labor. A small bathroom around $400. This covers everything except the paint. For an average living room of about 300 sq. ft. expect to pay around $1000 for everything.
Is Crown Molding a Good DIY Project?
As with the other moldings it depends on who’s asking. If you have the tools and skill set then sure, try it out. If not then we’d strongly recommend hiring a professional. Even among trim subcontractors installing crown molding is not considered an easy job so always ask to see their work. Quality will vary. Make sure the cuts are accurate and gaps are tight, especially in the corners. Molding should sit flush on the wall and ceiling without big gaps. You shouldn’t have any gaps in the corners.
Unlike with other trims you’ll need a helper since crown molding is so high. In addition to all the necessary woodworking tools you’ll need at least two ladders and possibly a scaffold depending on the height of the ceiling. You’ll also need a large miter saw since crown molding has to be cut on an angle. One with a slide works best.
If you have to rent some or all of the necessary tools it’s just not worth it. Because of the height, crown molding is actually one of the hardest trims to install properly. Most homeowners end up with large gaps on the end joints which looks terrible and gaps in the middle because long distances can be tough to measure and cut properly.
If it’s your first time installing crown molding I’d recommend starting on a small bathroom first before trying a larger room. The cost will be minimal and small rooms are a great place to get some experience cutting joints.
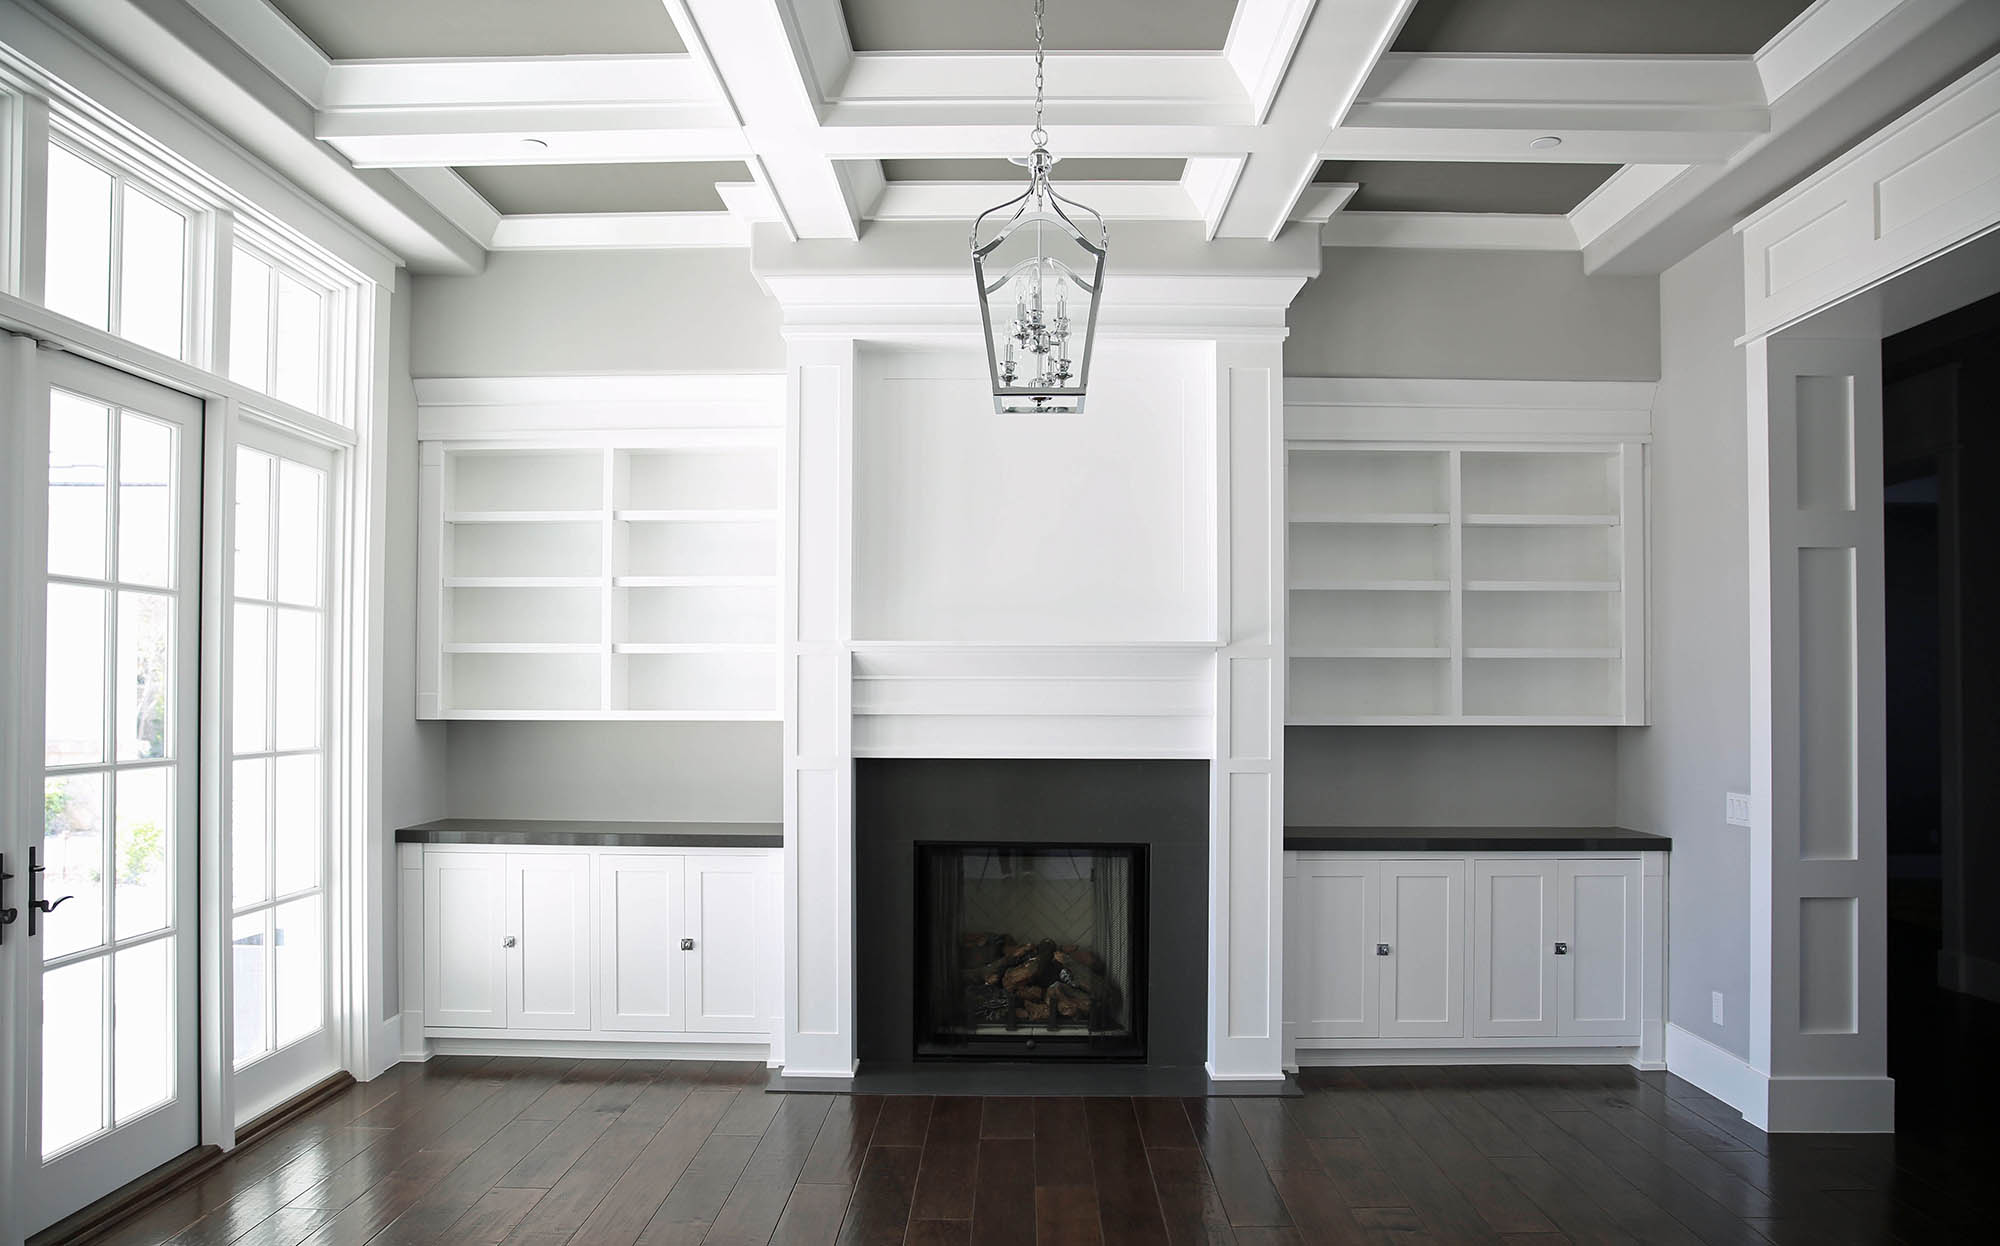
7. Coffered Ceiling
If you’d like to add dimension and character to a plain room then nothing beats the beauty of a coffered ceiling. Coffered ceilings are a high end custom option not found in your typical home. The price makes them rare, primarily found in higher end custom homes. If you want a room to really stand out and make an impact a coffered ceiling is the way to go. Just look at these pics and see for yourself. Among high end custom trim work a coffered ceiling is about as good as you can get.
Like other types of trim the size, complexity and detail of the ceiling varies. With this type of work the options really are almost endless. You can build almost any design you want, even curves and geometric shapes work, you don’t have to stick with simple square coffers. And you can add options like ceiling fans, speakers, recessed lighting or tract LED lighting along the edges.
What Does a Coffered Ceiling Cost?
There’s really no way to give you a good idea of what a coffered ceiling ceiling will cost you since the amount of variables is far too high. This is 100% custom work. Beneath the trim you see is a frame which first has to be built and nailed to the ceiling by hand. Then layer after layer of trim is cut and installed one piece at a time to create the coffers. Each piece has to be measured and cut perfectly to make it all fit with tight joints and symmetrical coffers. It’s hard, technical, highly skilled work. Even among expert trim contractors it’s difficult, time consuming work.
All I can do it give you some rough numbers to use as a guide. The picture above and below are both average sized 300 – 400 square foot living rooms with a basic coffered ceiling design. Large square coffers with crown molding inside, recessed lighting and/or a ceiling fan. To duplicate these rooms, in NJ, your looking at around 7 – 10 grand. That’s all in, materials and labor. Not including paint.
That’s an average price of around $25 per square ft. of ceiling.
Is a Coffered Ceiling a DIY Project?
On this one I’d have to say no. It’s far to technical for the average homeowner. Not to mention it requires a lot of talent and skill. Just being a trim guy alone doesn’t mean you can build a coffered ceiling. I know plenty of great trim subcontractors that don’t do them. It’s really a specialty niche thing in construction. You need to find a trim guy that can not only build them, but build them at a high enough level that our customers demand. Generally we’re installing these in luxury homes in Spring Lake, Seagirt, Deal, Rumson, etc. Really high end home with customers that demand perfect work.
Nothing is impossible however so if you want to tackle the project watch lots of videos on youtube and read plenty of articles first. Take your time and plan ahead. Coffered ceilings are all about the planning and layout. The frame has to be perfect before you start installing trim. This isn’t a simple weekend project. I’ve had professionals build ceilings that took 3 weeks to complete so if your going to do it be prepared to be working on it for a while.
If you do tackle a coffered ceiling by yourself I’d love to see it. Send me some pics by e-mail and if you like I’ll post the pics on our blog in the DIY section.
What size Coffered Ceiling Should I build?
Although coffered ceilings draw the eye upward toward the ceiling, the beams extend downward into the room. Because of this, coffered ceilings work best in rooms with high ceilings. Nine feet tall and up work best. For example an 8 ft. ceiling with a 6 inch coffer beam creates a 7 1/2 foot ceiling. Rooms with lower ceilings can become claustrophobic by adding thick beams and deep coffers.
So as with other forms of trim, always adjust your coffer size and design to meet the size of the room and ceiling height. With coffered ceilings we actually have two sizes to consider with separate guidelines for each. Both the size of the room and the height have to be considered.
As a general rule of thumb if you have an 8 ft. ceiling don’t build more than a 4″ coffer. A simple beam with a 2 1/4″ crown molding will look great. With a 9 ft. ceiling you can comfortably build up to an 8″ coffer. 10′ ceilings and up you can pretty much build whatever you want. For really high ceilings of 16′ and above make the coffers large or you’ll lose the depth.
The second thing to consider is room size. The basic shape is what’s shown in the above and bottom pics. Splitting the room into 6 coffers works best. If you build a bunch of small coffers the ceiling will look overwhelming. You need a big room to pull off small coffers. And keep in mind the coffers don’t necessarily have to all be the same size.
Like with other trims look at reference photos online and in magazines to find the style you like best.
Do Coffered Ceilings Require Special Maintenance?
No. Coffered ceilings don’t require any special maintenance. The most common problem with any trim work is cracking at the seams between to trim and ceiling or wall and gaps opening up at the joints. This can happen once the work has time to settle and wood contracts or expands with a change in temperature. Fixing these gaps would require some caulk or other filler and re-painting.
This is easily avoidable by nailing each piece properly with the correct size trim nail and the correct amount of nails. We also like to add a little wood glue to all the joints. Any good trim contractor that regularly builds coffered ceilings knows this so make sure to hire a professional and none of this should be a problem.
Other than this re-paint or stain as you would any trim in the house.
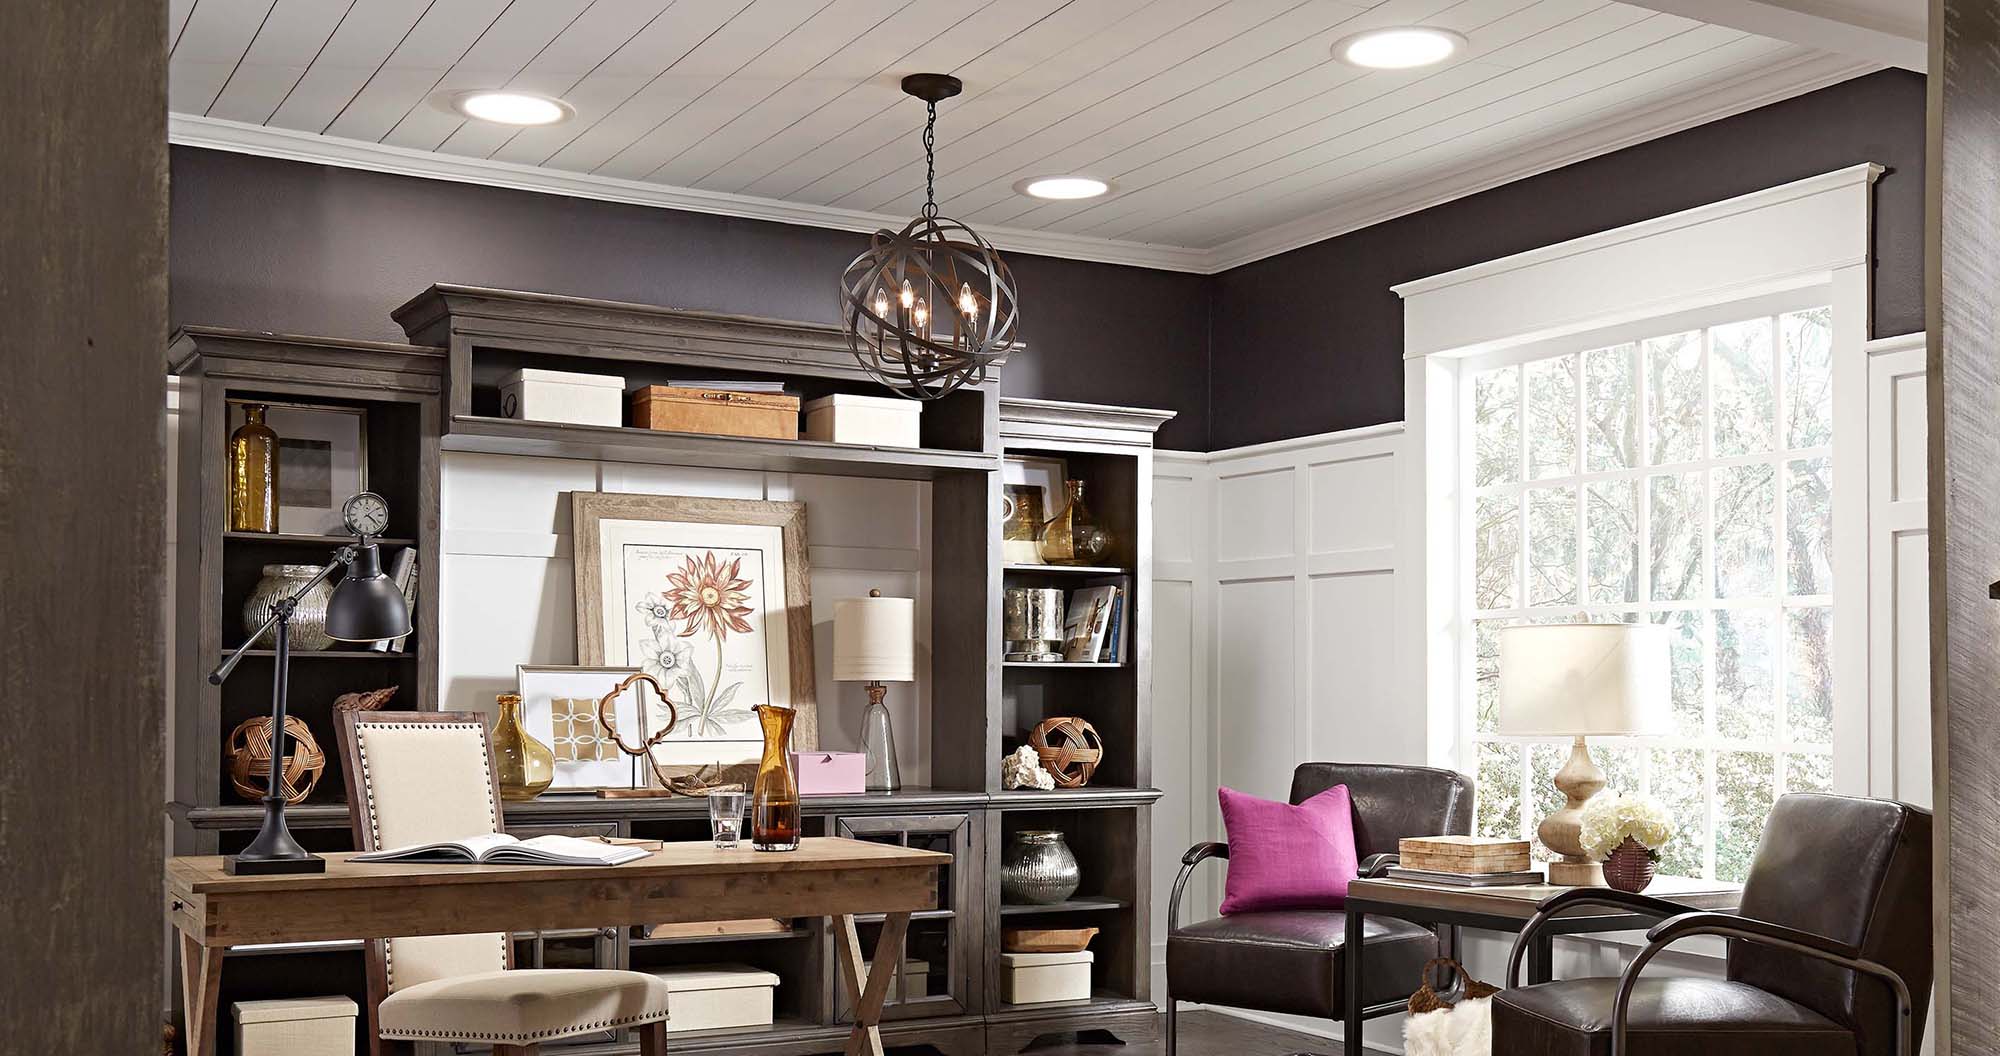
8. Built Ins
Whether you’ve got a small space you want to maximize, a huge wall you don’t know what to do with, or an awkward niche in the corner of a room, built in shelving can be the answer. Older homes stand out with their hardwood floors, ornate multi layered trim and beautiful built in shelving and cabinets. Rarely do you see built in shelves in anything but the most expensive of luxury custom homes. Find ways to incorporate these traditional elements to give your home that rich ornate look you’ve always desired.
Built ins are basically just cabinets or shelving permanently built into a wall. Serving the same function as store bought shelves or cabinets only these are custom built to fit perfectly into any size space. As permanent additions to the home be sure you plan out where your built ins will be before you start construction. They work better as part of the overall design and flow of the home than as an add on later.
What Do Built Ins Cost?
The cost for built ins is high. Consider that your carpenter is essentially custom building you furniture from scratch and permanently installing it in your home.
Some of the factors that factor into the cost of built ins are as follows:
- Materials: Like trim you can build built ins out of a variety of materials. This of course effects the price quite a bit.
- Construction: There are basically three different kinds of cabinets. Pre made, semi-custom and custom. The pre made cabinets are basically store bought and installed like kitchen cabinets, semi-custom are store bought but altered some, custom are completely custom built.
- Labor: Both the size and complexity of the job effect the labor cost. This also varies by region.
- Design: This is a huge factor. The more intricate the design the longer it will take.
- Height: The higher the shelving the more it costs. As a general rule anything over 8′ is none standard and more expensive.
- Fitting in: If you need to remove molding, flooring or other elements to build your units then this costs extra. Also you may have to pay for some additional repairs.
- Features: If you want to custom features like doors, drawers, glass, etc. then you’ll pay more for each item.
- Accessories: You can add accessories to your units for a more personalized look.
Make sure to hire a trim pro that has experience building built ins. This isn’t a job for just any trim guy. Make sure to look at their finished work. As always get a few estimates and pick who you like best. And make a counter offer. No where is it written you have to pay what a sub bids. Make them an offer, generally speaking they’ll be willing to work with you.
What Style Built Ins Should I Build?
The style of your new built ins should match the style of the home and other trim work. Trim should all be coordinated into one cohesive look. It all has to flow together with nothing standing out or feeling out of place. It’s a big job but not as hard as it may sound.
What we always tell clients and what we’ve mentioned a dozen times here already is look at reference photos. Lots of them. They’re free online and easy to find. Spending the time to plan out a project like this will save you time and money later and will ensure a better finished product and a happier client.
Is My Home Right For Built Ins?
This is a good question and tough to answer here without seeing your home. Every home is different but as a general rule just about every home has a room where a built in would work.
Built ins are one of the few options that work no matter the size of your home. In a really bid custom home where space isn’t an issue it’s easy to fit them just about anywhere you want. And in a small home where things are tight, since built ins are built into walls they actually save space compared to larger furniture which sit out and away from the wall and base trim. Tiny homes are a trendy thing to build now and creative use of space and storage is a must. Built ins help to maximize living space by reducing wasted space and providing a much needed spot to store all your stuff.
So no matter what size or shape home you have a built in is a good option to consider.
Do Built Ins Add Resale Value?
In General the answer is yes. Across the board, in our experience from building or renovating well over a hundred homes, most custom trim work adds value to a home. Just don’t go crazy with it. Don’t over spend or over build. You have to match the neighborhood you live in. It’s tough and takes work and some research but it’s well worth it if your looking to make money on a flip or just resell your own home.
Adding built ins is a great feature most home buyers will want. And it’s one of the options we’re asked to install most on new homes. Just design it appropriate to the price point your home is at. Use common sense. Look on Zillow at the homes that are selling in your area at the price point you want to be at and see how they’re finished inside. Finish your the same or a little better.
We always tell our investor clients up size one size at most. That goes for everything. Be a little better than average. Building a multi million dollar home in a neighborhood of $200 thousand dollar homes is a sure way to go broke.
Are Built Ins a Good DIY Project?
The answer to this question is yes and no. If your buying pre-made cabinets and shelving like kitchen cabinets the the answer is yes. Built ins would make a great DIY project. On the other hand if you want to custom build all the cabinets and shelving yourself I would say no. It’s definitely a job for a professional.
DO NOT build the shelving or cabinets if you don’t know how. That should be considered rule number one. You run a lot of risk with everything you’ve built falling apart under the weight of your things and just not coming out right. By all means design the look you want, but you rely on a carpenter to construct them or purchase pre-made units from the store.
That said, even if you went with store bought pre-made shelves and cabinets we’d still recommend hiring a pro to almost any homeowner. You probably wouldn’t install your kitchen cabinets and countertop yourself so why install your built ins. Pros have the tools and previous experience to install your built ins for a better quality finished product than the average homeowner. And that’s really the most important thing for any home improvement project. If you want to get the most enjoyment out of your home and the maximum return on investment at resale then the work has to not only be done but be done right and to a high quality standard.
So What Trim Should I Use? All Of Them.
Here are a few pics of homes that successfully brought together the look of base, window, wainscoting, chair, and coffered ceilings into one elegant, beautiful design.
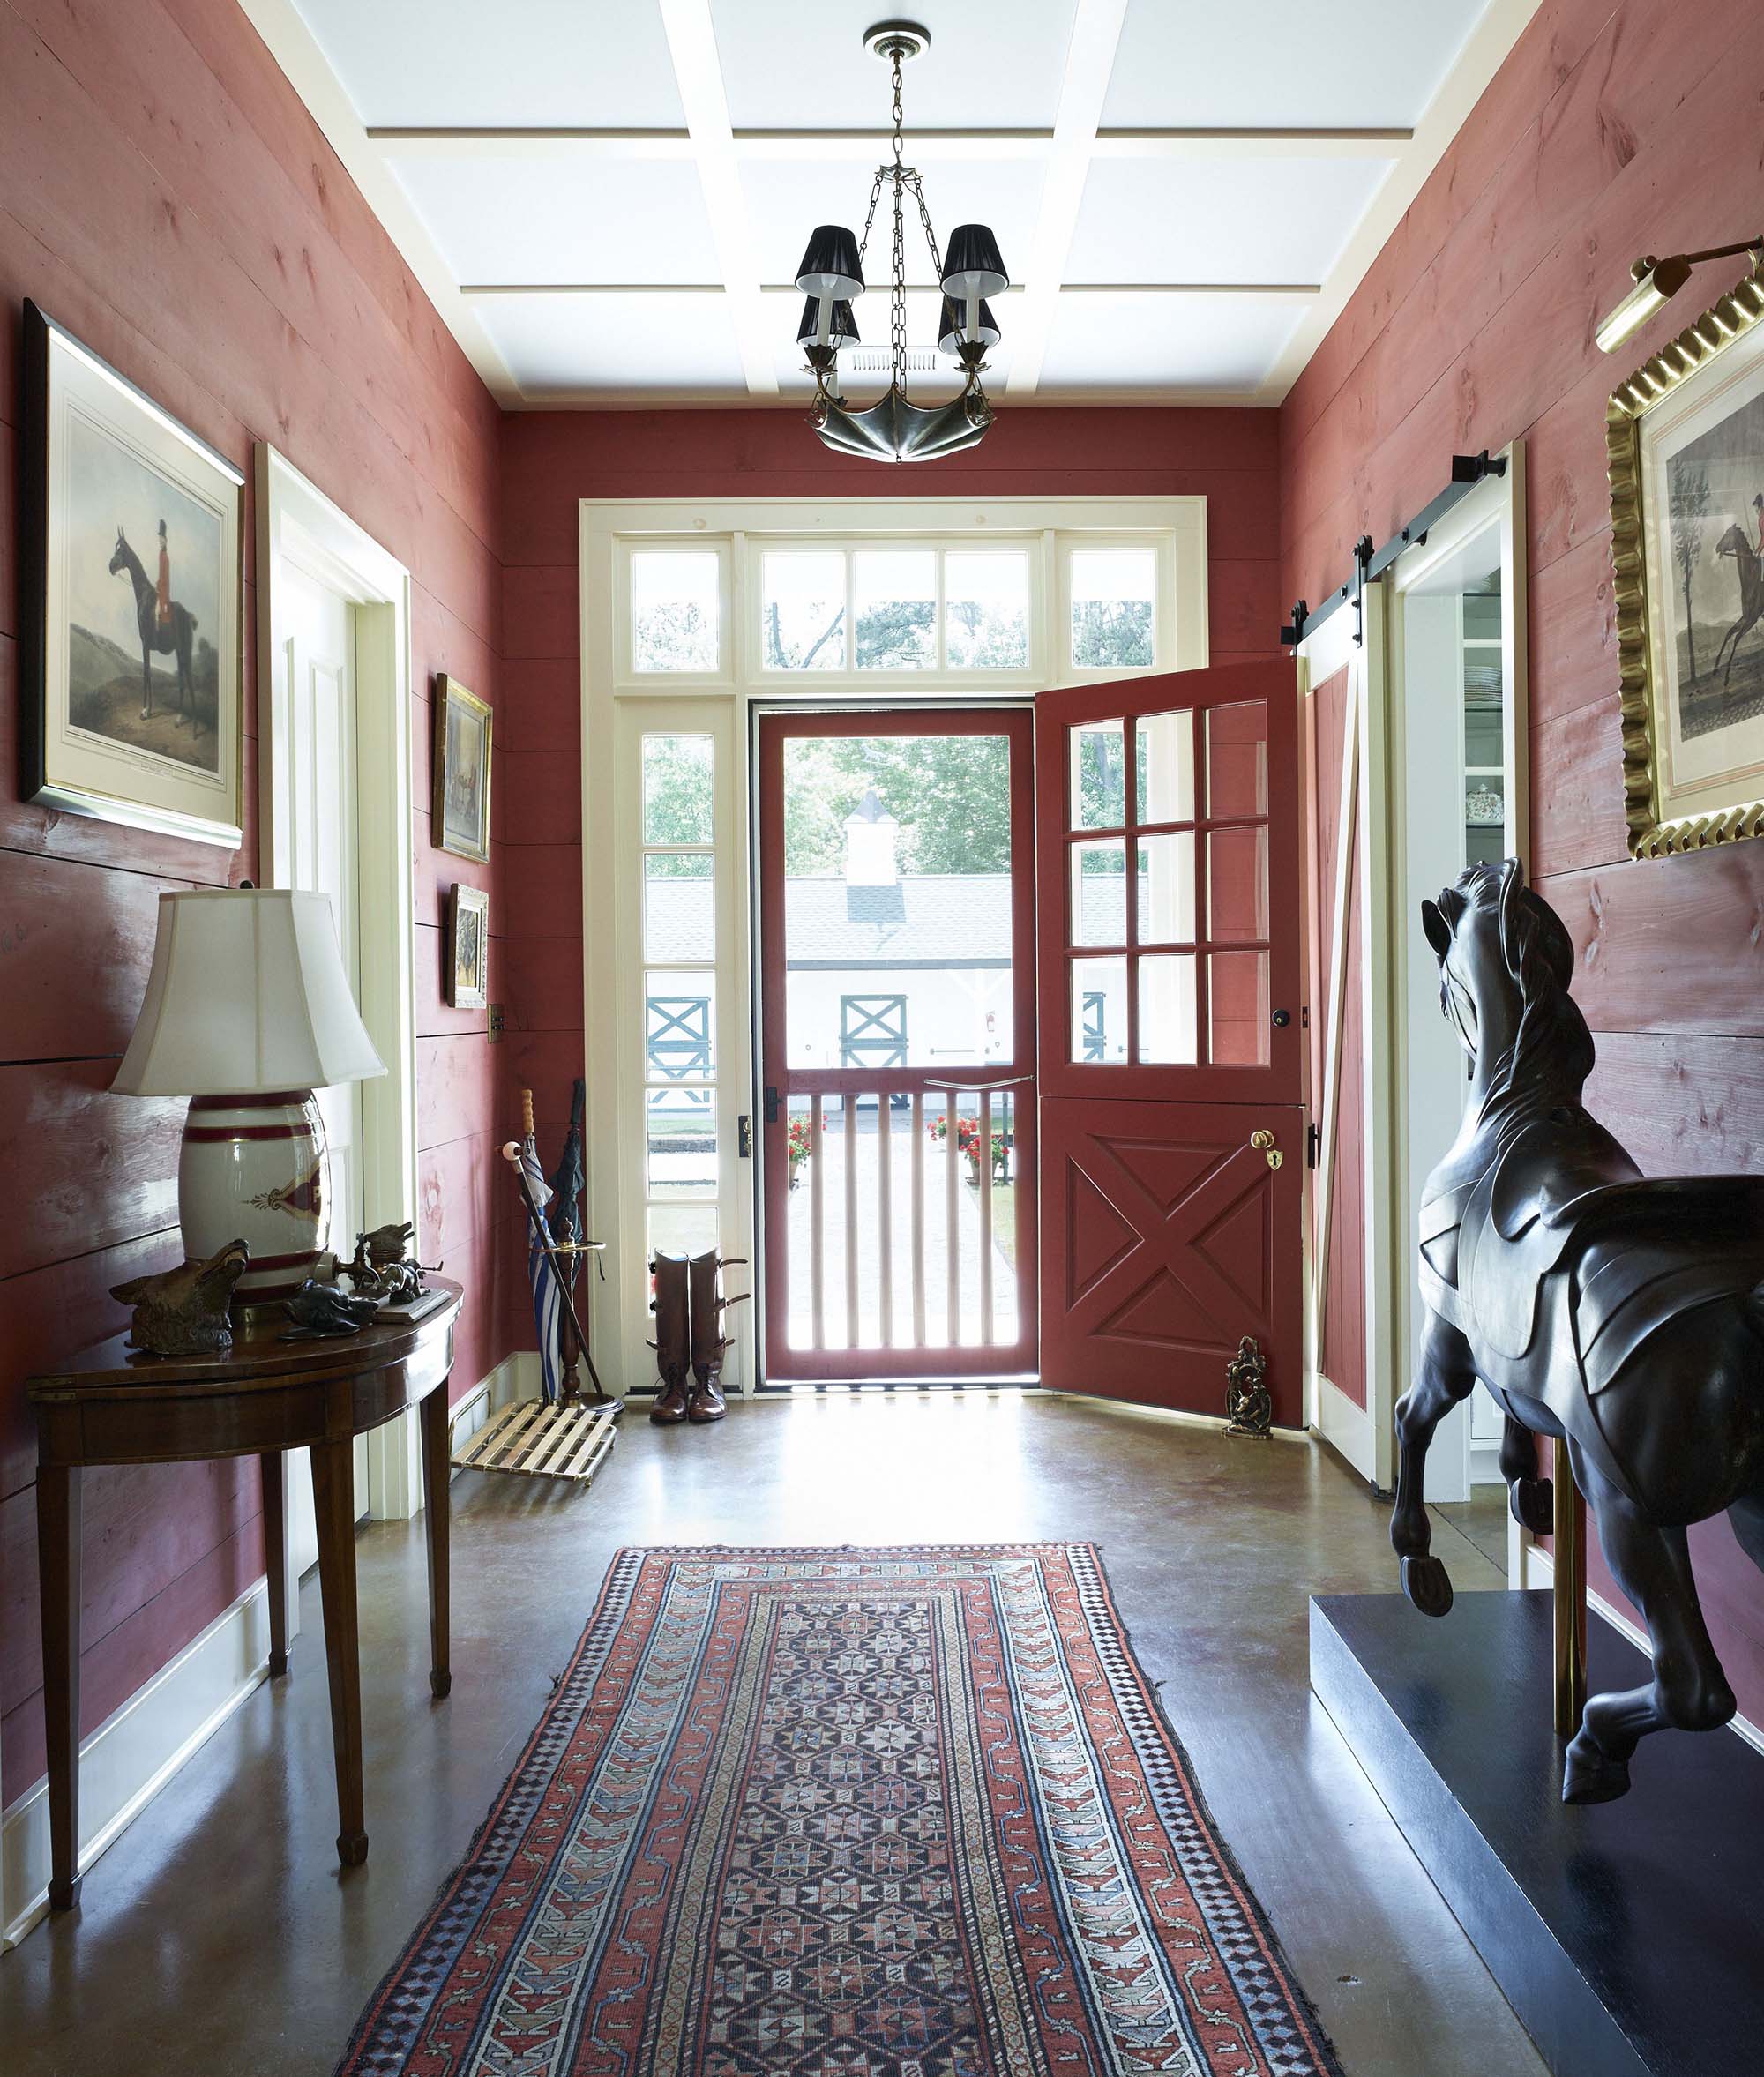
Rustic Trim Design
Here is an example of a rustic, custom country home with a really nice low profile coffered ceiling. This would work great in a home with an 8′ ceiling, it draws the eye up, dressing up an otherwise boring ceiling while not making the room feel claustrophobic. The window / door trim is really nice here as well. They matched the trim styles and sizes perfectly. Base is a 4″ with show molding.
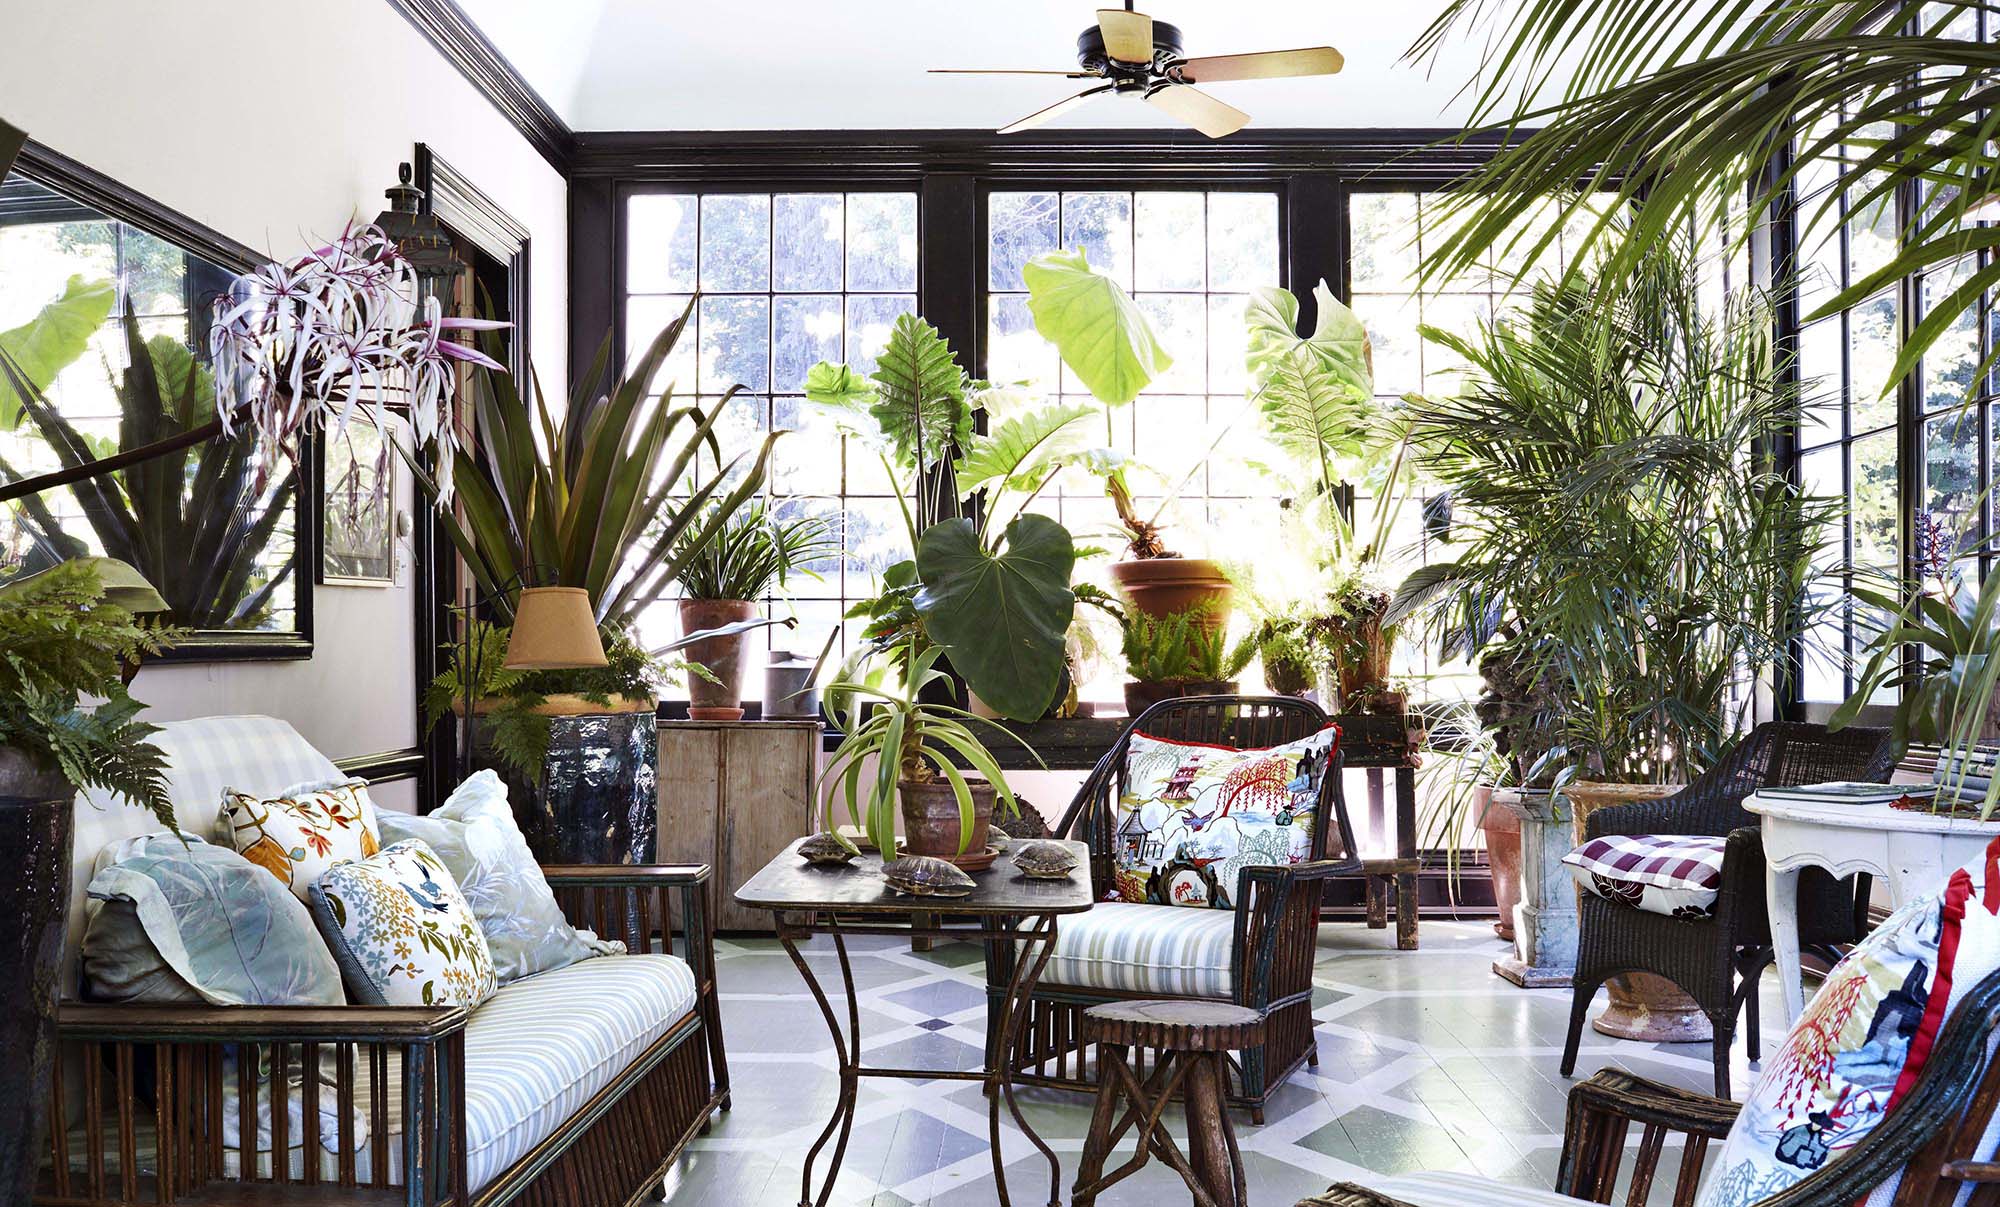
Dark Stained Trim
This sunroom / conservatory expertly uses several types of custom trim to achieve a beautiful, rustic look. Chair rail, thick base trim with shoe molding, crown molding and window / door. A coffered ceiling would have been a fantastic addition here, if they had the ceiling height to pull it off. The dark, earthy colors works perfectly against the green of the plants.

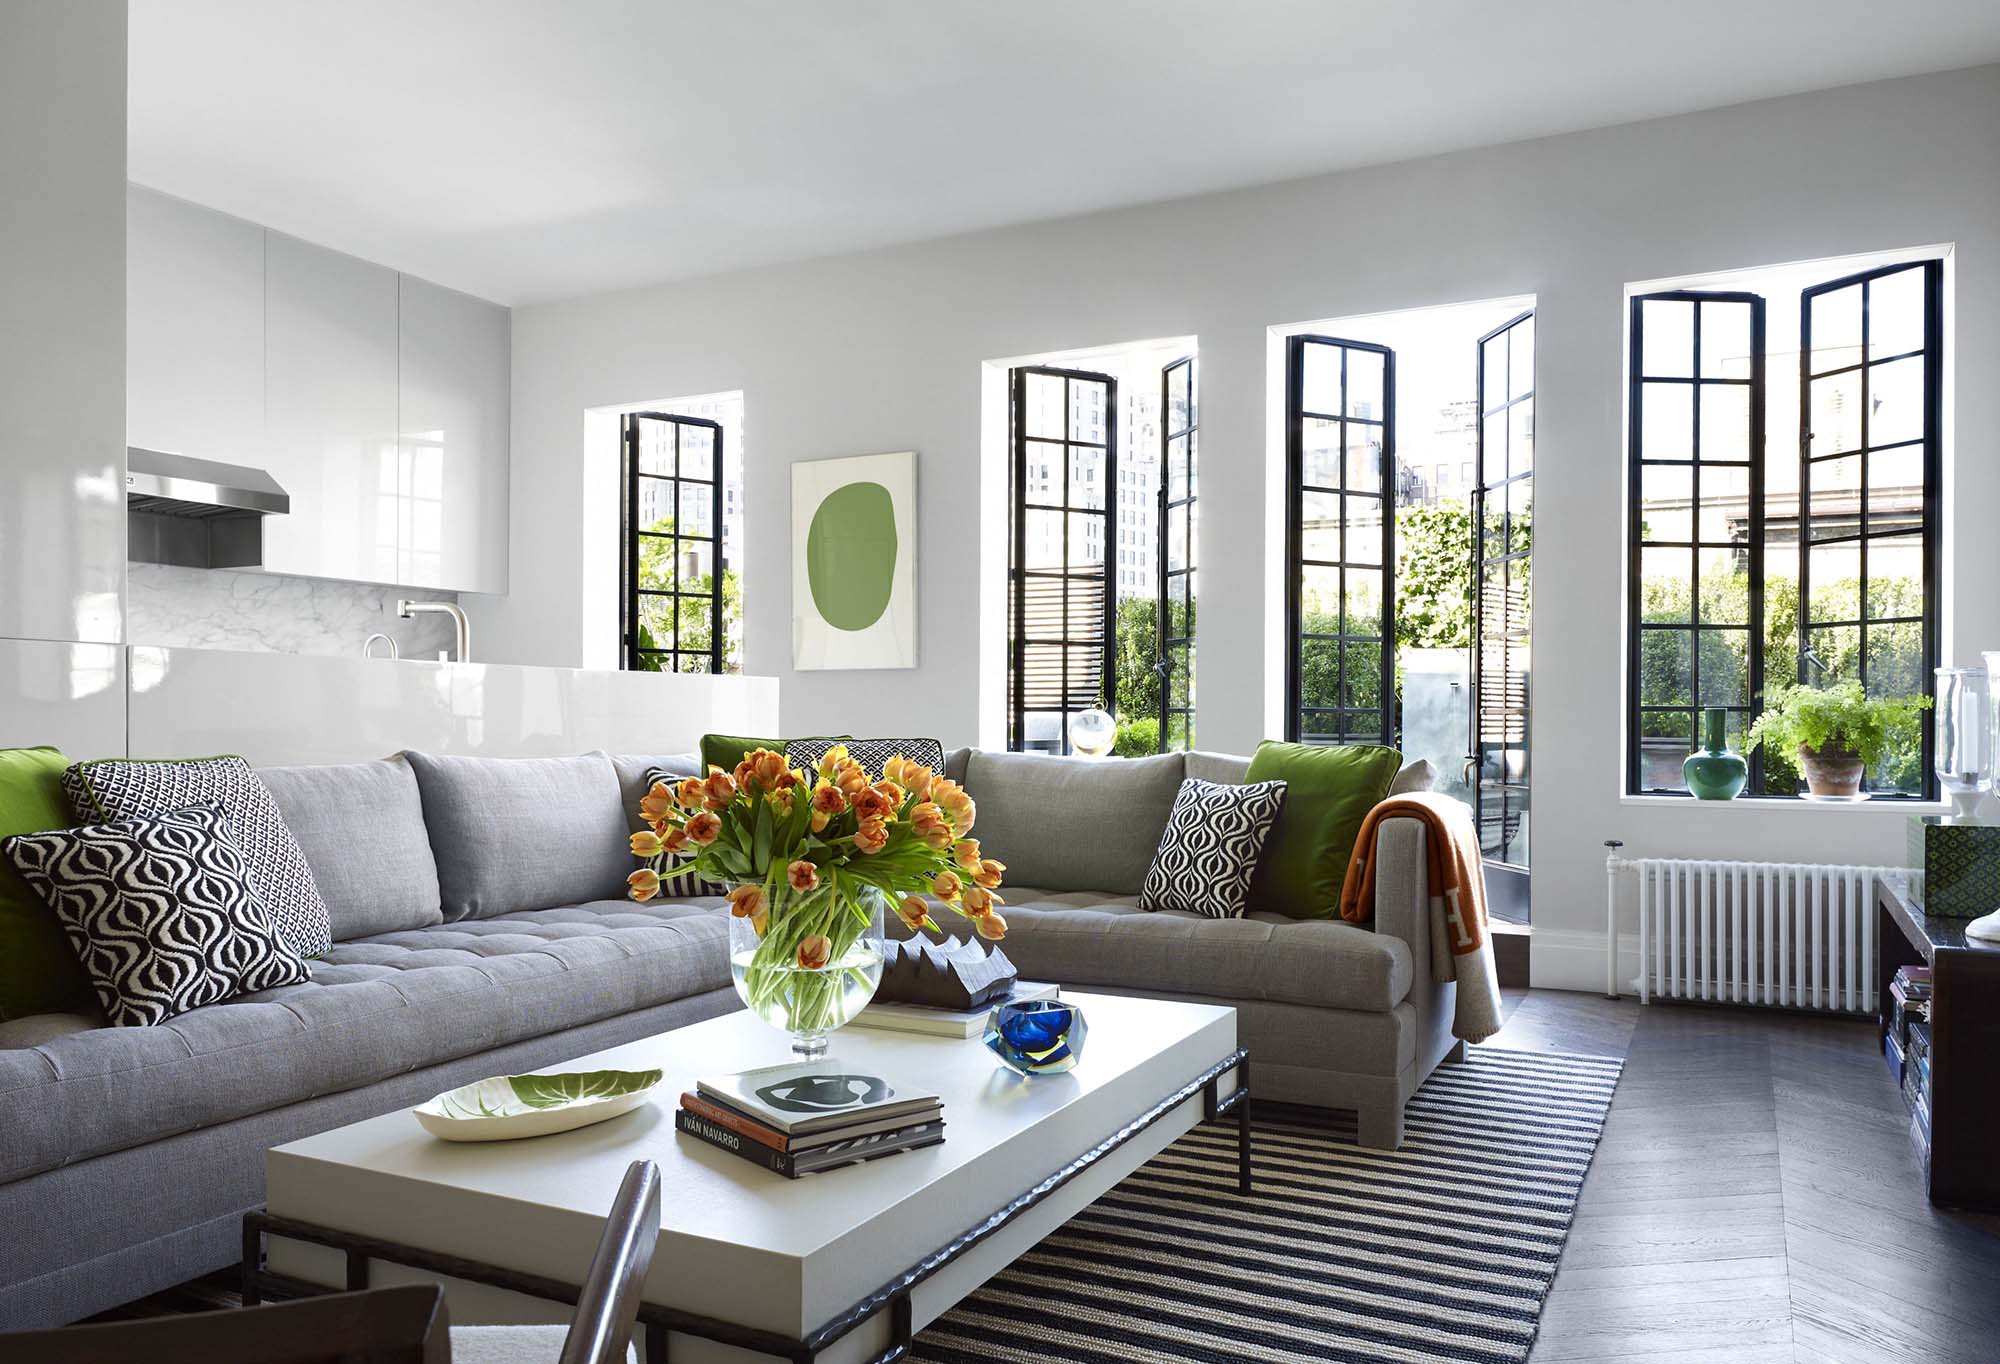
No Trim At All
Above is a perfect example of windows finished without trim. They look great. It’s a nice, clean, modern edge that can be achieved on windows of any size or shape. Here we see a contemporary, city living room but the effect can be added to any style home.
Molding Free
Another example of windows and doors without moldings. The design creates a really nice, clean edge and a minimalist look. 4″ base trim with a cap and and shoe molding complete the look.
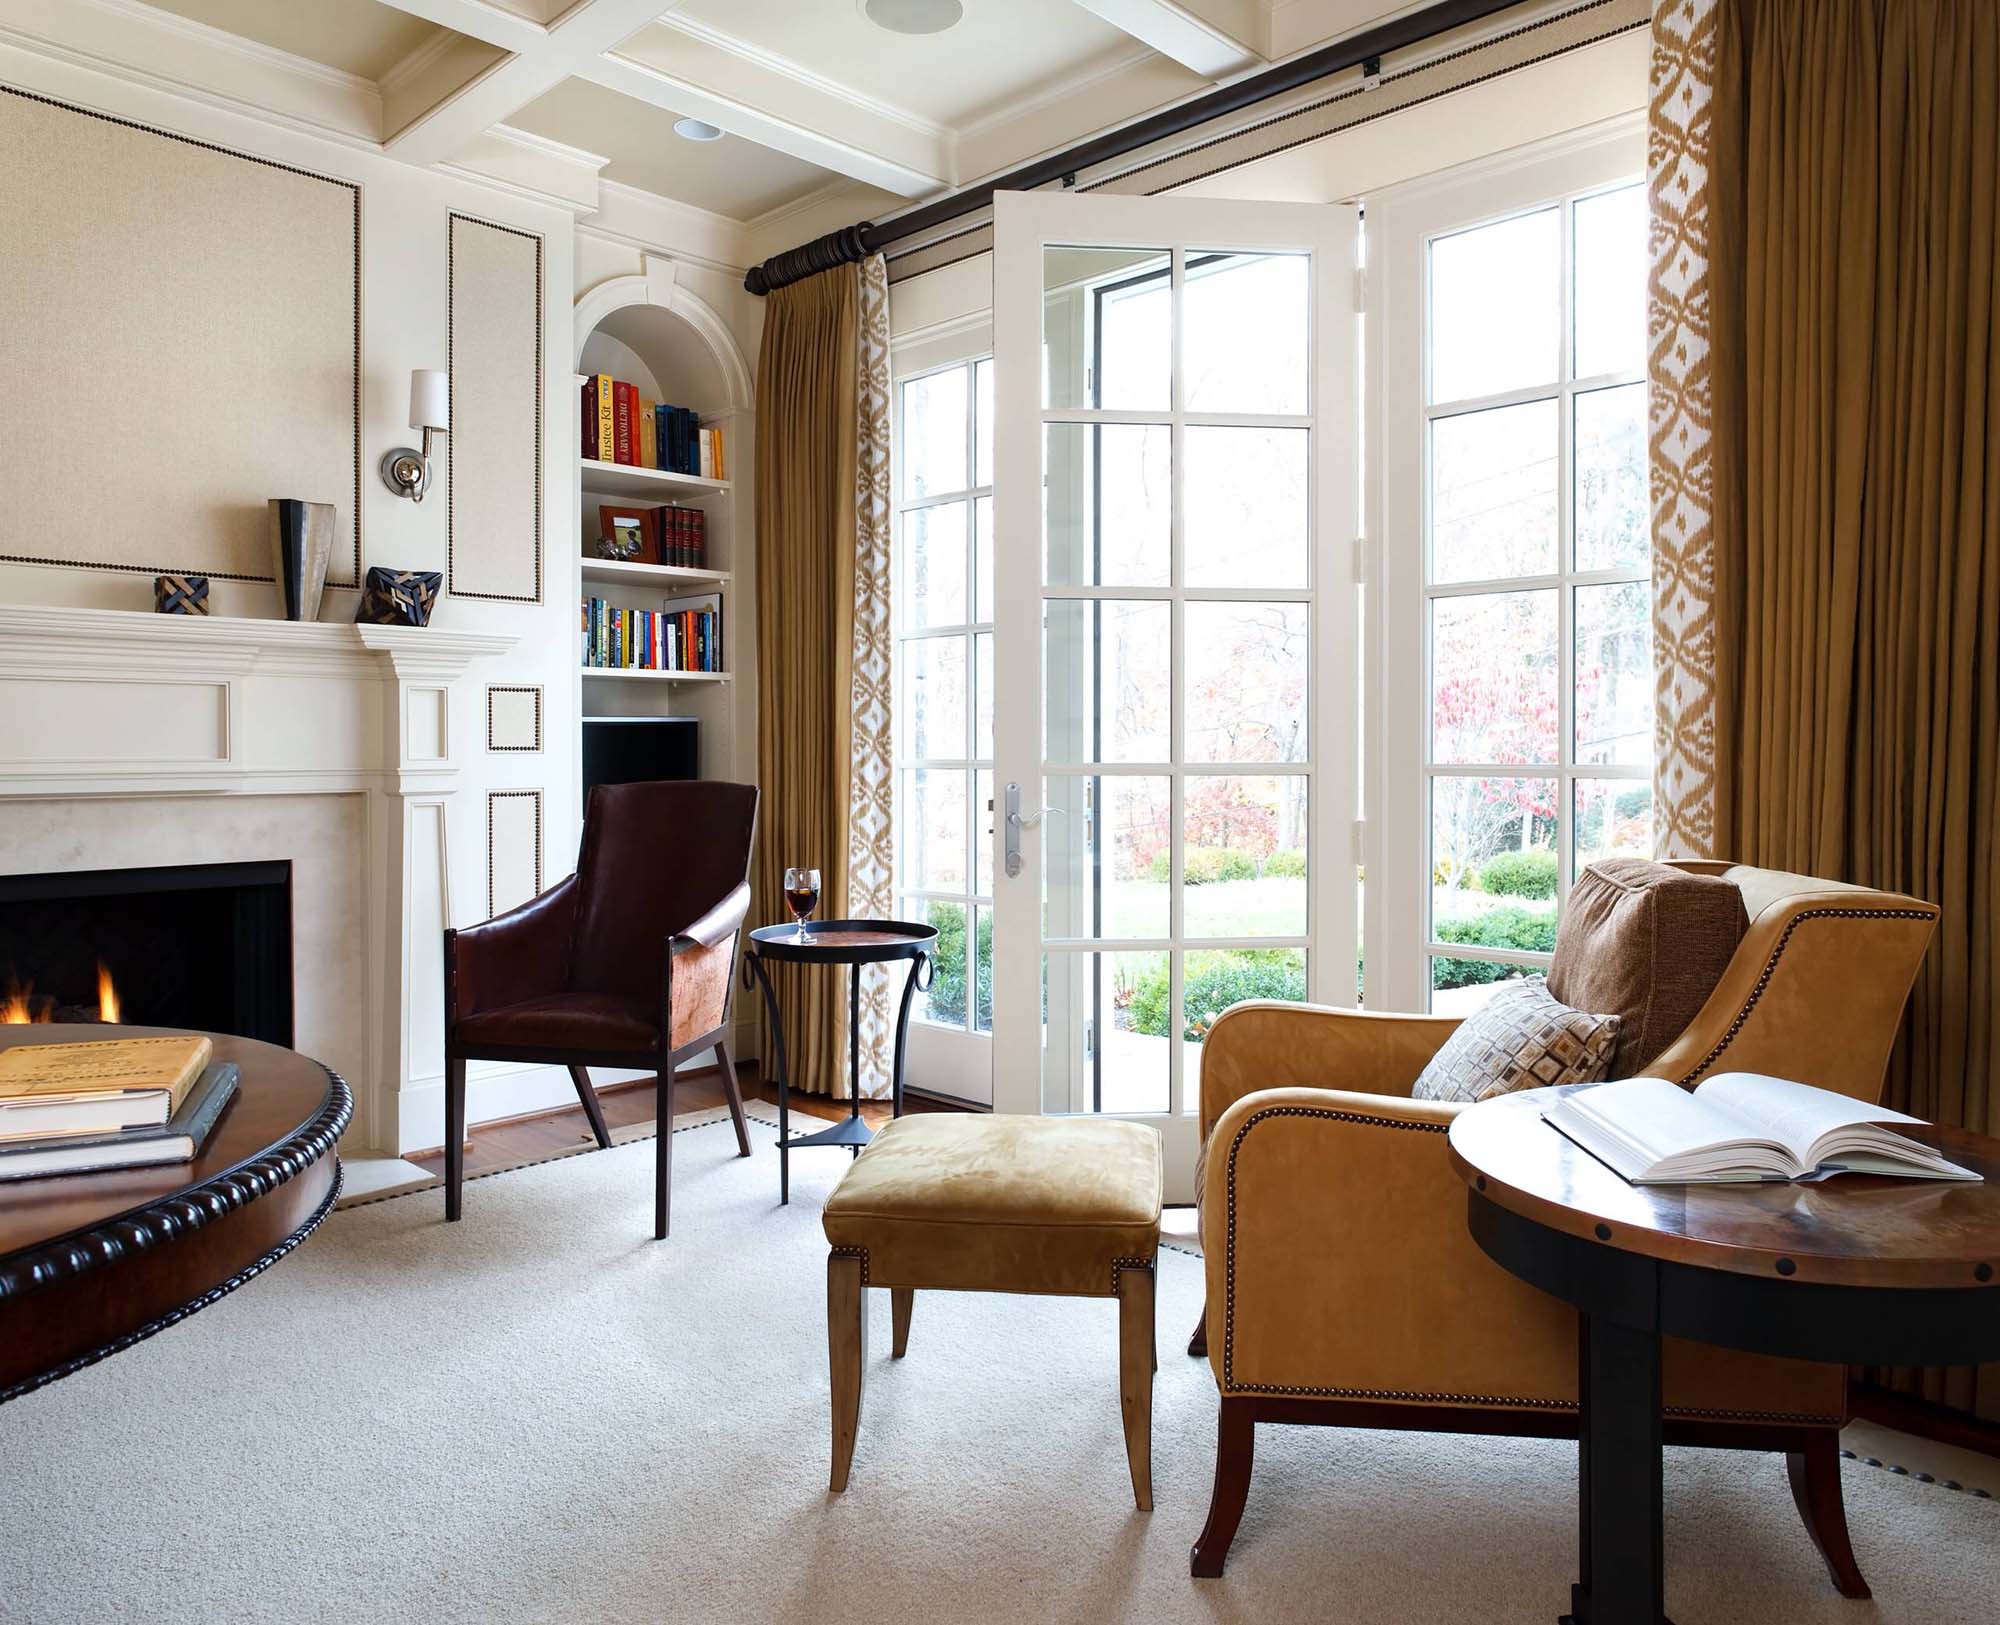
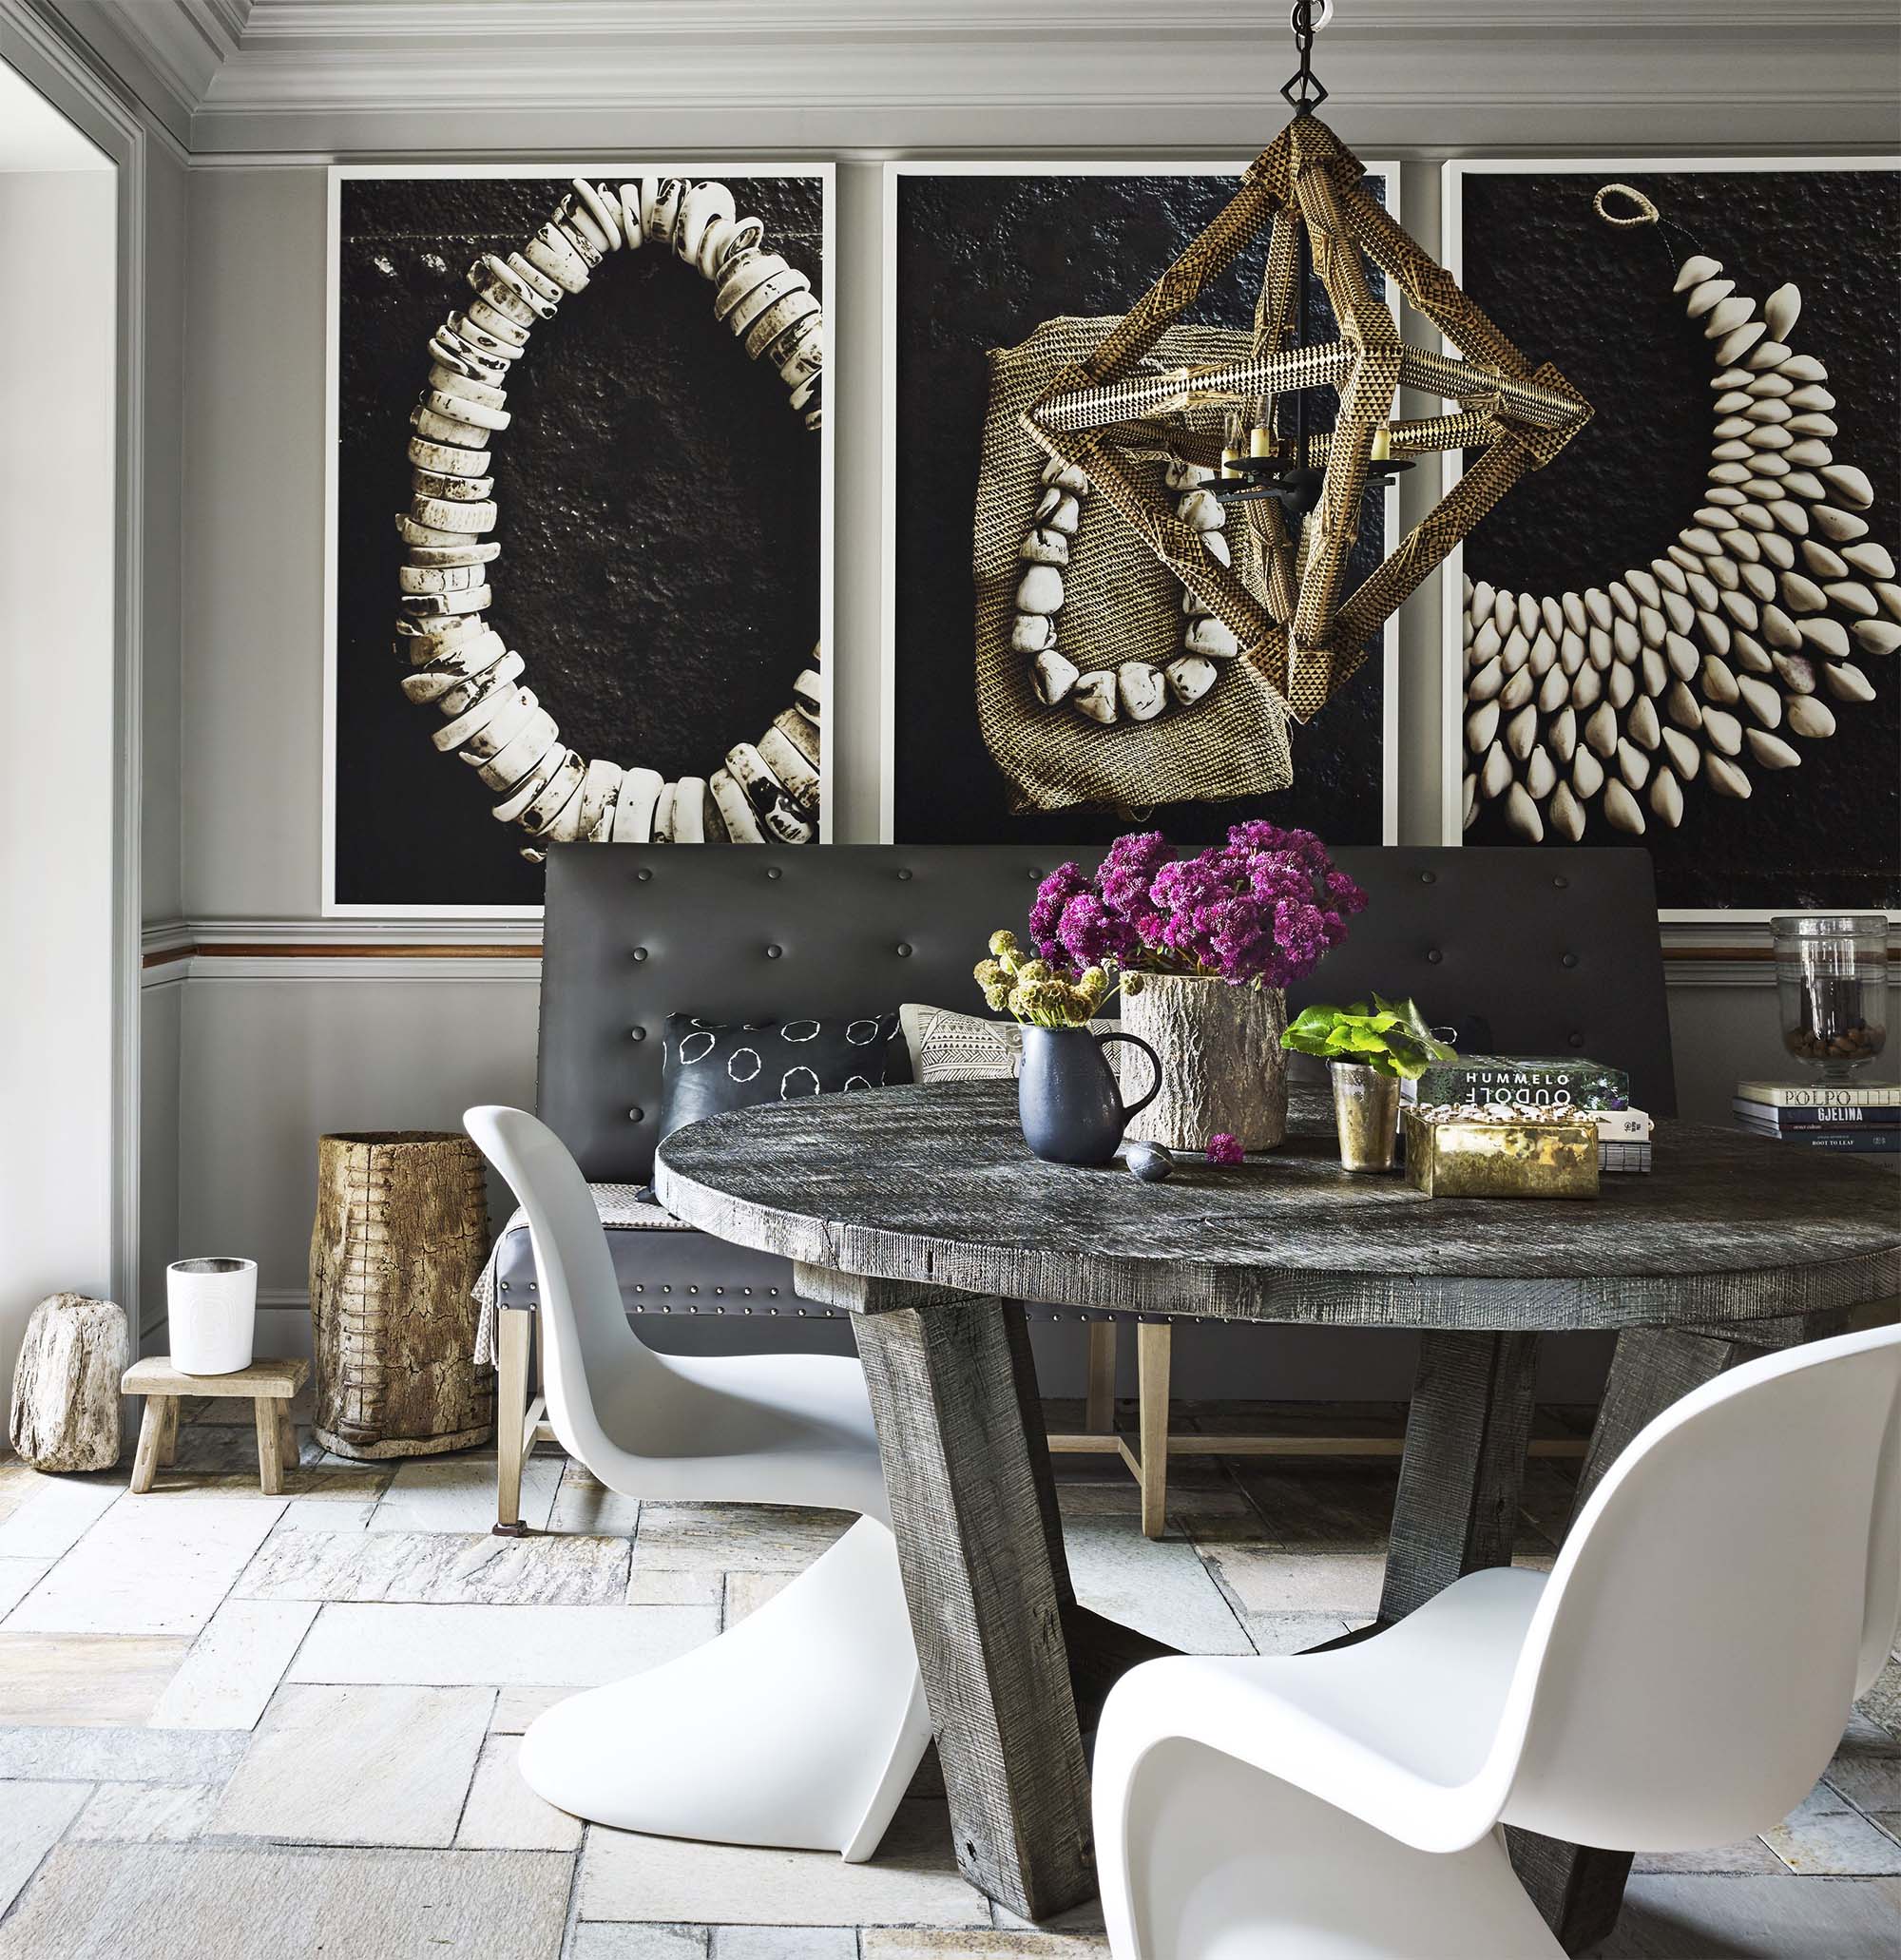
Multiple Trim Styles
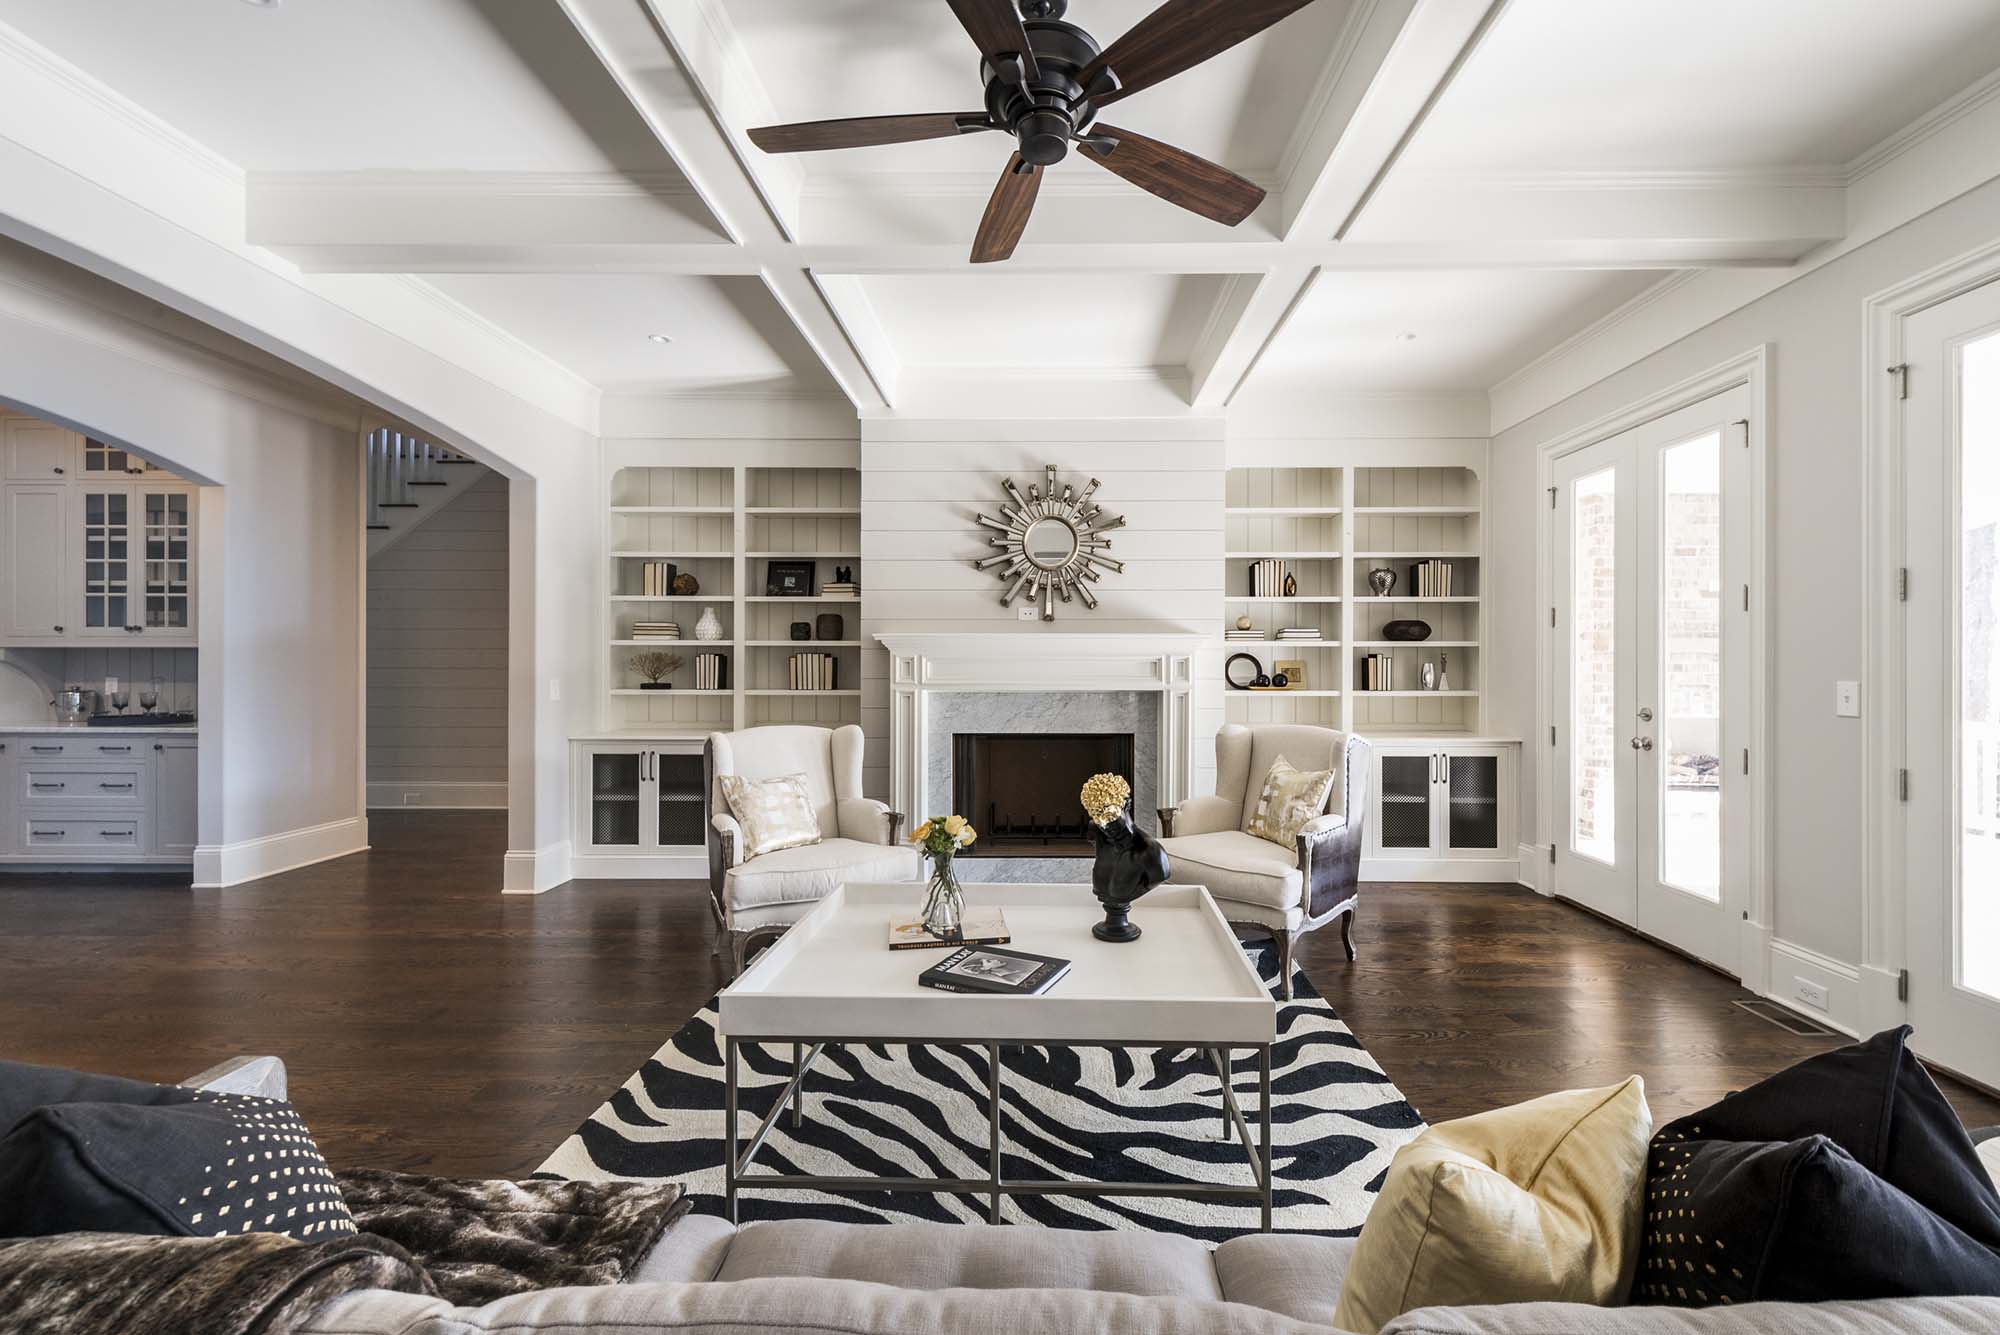
A beautiful homes study / sitting room which successfully combines multiple styles of custom trim. Thick window / door and base trim with shoe molding. A custom built fireplace mantle. Wall paneling. A coffered ceiling with crown molding. And built ins. This is the perfect example of what we’ve been talking about this entire page. Notice how every piece perfectly flows with one another. They’re all the same style, all the sizes are correct, the work is immaculate and the design is outstanding. Even the paint and room decor are done exquisitely.
A Final Tip: Make Sure All Trim Elements Go Together
Within any style home, there are a variety of trim choices. Particularly where moldings intersect, your selections need to flow seamlessly with one another. Not only trim styles but also sizes should always be considered. A a general rule the sizes from thickest to thinnest should be as follows.
- Base
- Crown
- Window / Door
- Chair Rail / Picture Rail / Paneled Wall
Keep all your styles consistent and your sizing correct and your on your way to a beautifully trimmed, custom home.
Conclusion
There are so many great options and styles to choose from when selecting trim for your home. Whether you want to make it classy, modern, fun, country or quirky, custom trim is a great option to make your home look it’s best. These are just a few pics, tips and general we’ve compiled for you to look over based on out 40+ years building and renovating custom luxury homes at the Jersey Shore. Let us know how your trim turns out when your all done, we’d love to see the pics.
And remember, whatever your style, it’s hard to go wrong with custom trim work.
If you have any questions or comments e-mail us any time. We’d love to hear from you.