What Is Board Formed Concrete?
Board formed concrete is concrete that’s formed with wood planks instead of flat panels. This creates a wood grain texture on the surface that matches the boards that formed it. Concrete is wet when it’s poured but hardens like a rock. When it hardens, it takes the shape of whatever form it was poured into. In this case the boards. It’s a striking look because most poured concrete walls are smooth and don’t look anything like wood.
I’ve been a mason for over 25 years and use board forms indoors and out for all sorts of projects like walls, planters, ceilings, columns, stairs and fireplaces. You can build an entire home with board-formed concrete or use it in special places as a focal point.
Board-formed Concrete is the name of the process that leaves a wood grain image on hardened poured concrete, but it’s not different than regular concrete other than how it looks. If the concrete cracks, you can make repairs with a DIY concrete crack filler to prevent future damage.
Concrete is a fantastic building material that’s strong, durable, weather resistant and fairly cheap. But some consider it a little cold for indoor use. By imprinting a wood grain on the surface, it softens and warms concrete’s appearance. This makes it more suitable for a wider variety of home styles.
When building with board-formed concrete, forms are built out of horizontal or vertical planks that touch the concrete when it’s poured. Once the forms are removed, the wood grain pattern remains, leaving behind a beautiful wood grain finish in a rock hard concrete structure.
How Is Board Formed Concrete Made?
Concrete is a unique material because it starts off wet but hardens strong like stone. As it hardens, concrete takes the shape of any form it was poured into. This is how poured concrete walls, footings, sidewalks, driveways, statues, countertops, barges (yes, concrete can float) and patios are all made.
Forms are built first. They’re what hold wet concrete in place until it hardens. Usually, wall forms are made out of large, smooth panels that are bolted together. As the concrete dries, it takes on a smooth appearance just like the surface of the forms.
When you want board formed concrete, the smooth walls are replaced with individual planks of wood. When the concrete hardens it takes on the look of the boards. Even small details like knots and wood grain will show up in the concrete.
Because you’re replacing large smooth panels with individual boards, it takes a lot longer to build the forms. The edges need to be mitered and screwed together to form sharp right angles. And each board has to be tightly fit together to prevent concrete from seeping out the seams.
Concrete is very heavy. The higher and thicker the wall, the more weight the forms have to hold. Forms are reinforced with large vertical steel beams that help hold them in place as the concrete is poured. Board formed concrete forms need extra reinforcement because there are so many individual boards and seems to hold in place.
Ties are run through the wall from one side to the other and tightened with bolts and square washers. After the wall hardens, the ties are cut flush with the surface of the wall. Ties are a very important part of concrete wall construction because they help hold the forms tightly in place.
What Type Of Wood is Used To Make Board Formed Concrete?
Did you know that if you count the rings of a tree, you can determine how old it was when it was chopped down. Dark rings are from winter growth and lighter rings are from summer growth. Since trees usually grow slower in winter, the wood rings are denser and appear darker than the faster growing, more loosely spaced summer growth rings. These rings are what gives wood it’s grain when it’s cut into planks.
I use Spruce Pine Fir or Doug Fir to build all my board formed concrete forms. Both types of wood have a a really nice grain pattern without too many knots.
Planks should be at least 3/4″ thick. This thickness gives the wood enough strength to resist the pressure of all that concrete. If even one board fails, a poured concrete wall can be ruined.
As you build the forms, make sure to miter the edges and screw them together. Be very careful as you install the planks because they’re the mold for your concrete. The exact pattern you create with the planks is what you’ll see when they’re removed. It’s a more artistic process than using standard smooth forms.
Pro Tip: If you want a more prominent wood grain, sand blast the planks before installing them. This cuts down some of the surface imperfections and reduces the size of small rings which makes the grain stand out more. If you want a smoother finish, sandblast and then sand the planks. The smoother the wood the less grain you’ll see in the wall.
Sandblasting all the planks costs about $10 to $20 per square foot, in addition to the cost of the concrete wall. It’s cheaper to simply take board planks and build a form. But preparing the boards first creates a nicer finish.
Board Formed Concrete Wall Ties
Concrete wall ties are also called form ties. They’re an accessory used in form work that holds the concrete wall forms firmly in place against the pressure of wet concrete.
Concrete wall forms have two sides with concrete poured in the middle. The distance apart you place the forms is the thickness of your concrete wall. For example, if you install the forms with a 10 inch gap between them, you’ll end up with a 10 inch thick wall. Form ties go between the two walls which anchors them together. When concrete is poured into the gap it creates a lot of pressure which pushes the forms apart. Form ties help hold them together.
Wall ties maintain an equal space between the forms which results in uniform wall thickness. If even a single plank fails, the wall could be ruined.
Wall ties run through the gap which means they stay inside the concrete wall once it’s hardened. But the ends that anchored to the wall are cut off with a grinder. This means you’ll see the cut edge of the tie when you look at the wall.
Wall ties come in two basic forms, steel and fiberglass. I recommend using fiberglass. I think they look better and never rust.
How To Hide The Ties
Form ties don’t do anything inside the wall once the concrete is hard. But you can still see them. Some people like the look and some don’t. I make a demo wall for clients with different ties and let them pick their favorite design. Some like fiberglass, some steel and some none at all.
If you want to hide the wall ties, you can drill them out and patch them. Use a 1/2″ drill bit to drill a hole into each tie. You don’t have to go very deep, 3″ to 6″ is plenty. Then use a masonry chisel to chip the edges really good. What you don’t want is a perfectly round hole. Sometimes I’ll chip 6 inches in either direction to mimic the wood grain.
Before you fill the hole with concrete, use a little bonding agent first. Wet concrete doesn’t bond well to dry concrete. The bonding agent will help it stick.
Once the hole is filled, use a wood stick to create some texture. Try to match the the wood grain of the wall. I also like to use some of the same form wood. Pressing it firmly to the patch helps create a little bit more texture. If you do it right you won’t be able to see where the patch is.
It’s important to match the grain around the patch as best you can. Some patches will need a lot of grain to blend in and some none at all.
Make sure to use the same concrete for the patches as what’s in the wall. If you use a different batch the color can be off which makes the patches stand out.
If the color is matched perfectly, once the patches are textured you won’t see them.
Use Screws Not Nails
Building strong forms for board formed concrete is very important. It’s similar in principle to using standard form panels, but there are hundreds and some times thousands of individual planks being used. If even one planks comes loose the wall can be ruined. Strong connections are very important.
Each corner of the form should be miter cut to create a smooth and sharp right angle.Take your time with these cuts. If the angles aren’t perfect mitered and screwed together tightly, you’ll see the imperfection in the concrete wall. Remember, the board forms are creating a mold. However you assemble the boards will show in the wall.
I use at least 4″ to 6″ screw to hold them together. Generally I use a 6 inch plank which means 2 screws per plank. On at the top and one at the bottom. Install the screws at least 1″ from the edge to prevent splitting.
Install the screws carefully. If a screw splits the wood you’ll see it in the finished wall.
Anywhere else you fasten to the forms use screws instead of nails. When the concrete is poured and vibrated it creates a lot of pressure. Nails can wiggle out from the pressure and especially during vibration. Screws can snap, but they shouldn’t back out.
Use a good quality exterior grade screw. Deck screws work really well. They’re strong and have a head that’s designed to go through wood without splitting it.
Installing The Boards
Push the boards that make the form tightly together. Concrete will push through small gaps which will show when the forms are removed. There are a few joints you need to pay attention to.
- Vertical: Make sure boards are pushed together tightly from side to side. Vertical seems should fall on the vertical steel posts that reinforce the wall. If the wall is small and you’re not using steel reinforcement, use wood instead. Make sure to reinforce all your vertical seems or concrete pressure can create a bulge.
- Horizontal: Planks are stacked on top of each other to form the wall’s height. This creates lots of horizontal seems. Make sure the boards are pushed tightly together to prevent concrete from seeping through. If the boards aren’t tight, when you remove them you’ll have lots of thick seem lines in your wall.
- Corners: Make sure you miter cut all your corners and screw them together tightly. Edges are an area that can make or break a wall. In order to have tight, clean edges you need the boards perfectly mitered and tightly screwed together.
Some designers want lots of thick lines between boards and some don’t. If you want a smoother, cleaner wall, use some silicone. I use a caulk gun to apply a thin layer of silicone between each board at all vertical and horizontal joints and between miter joints. The silicons helps prevent small amounts of concrete from working it’s way into and through the joints. The result is less fine lines and a cleaner looking wall.
Silicone is only to prevent fine lines. If you have gaps it won’t work. Concrete will push the silicone right out of the seems. Make sure you push those boards together tightly.
Bracing The Boards
Strong bracing is crucial to using board forms. The planks are stacked on top of each other with seams in between the boards. Bracing is built to support the boards and handle the pressure of heavy concrete. Ties are also used to keep the forms in place.Without strong bracing and ties, the concrete would push the forms apart as it’s poured.
Form ties can be made of fiberglass or steel. I generally prefer fiberglass but sometimes want to look of steel. This should be left up to the wall designer.
Once the form work is done it should be locked together with screws. Don’t use nails. The corners should be mitered and also secured with screws per board. All of this is an important part of bracing the forms for concrete.
proper bracing ensures the boards won’t move when the concrete is poured. They have to be well braced and screwed together tightly. No movement as you pour and vibrate the concrete is what you’re aiming for.
The higher and thicker the wall, the more bracing you’ll need. When I make small cast products like a fireplace surround, planter or bench, hardly any bracing is needed. But tall foundation walls need a lot.
Bracing helps create a smooth appearance that showcases the wood’s beauty. Even subtle things like wood grain and knots will show if you build the forms correctly.
What Type Of Concrete Mix Should You Use For Board Formed Walls?
I use at least a 5 bag 3500 PSI concrete mix with a 4″ to 5 ” slump for all my board formed work. This includes structural walls, retaining walls, fireplaces, ceilings, planters and decorative work. It’s a strong mix that’s easy to work with which is important in a high wall. The 4″ to 5″ slump is good for decorative concrete because it’s a relatively stiff mixture that holds it’s form really well.
For some projects I also use a Plasticizer in the mix. They’re a liquid you add into wet concrete to improve it’s qualities.
Here are a few of it’s effects on concrete:
- Reduce the water/cement ratio without any adverse effects on workability. Usually less water means concrete is harder to work with but not if you use a plasticizer.
- It increase concrete’s setting time. This gives you more time to vibrate the wall before the concrete hardens. More vibration time decreases bubbles and honeycombing. Since board formed concrete is all about the look, you want more time to create a better finish.
- Help avoid cracks and shrinkage in concrete. This is another benefit that’s very important with board formed concrete because it’s a finished look. Traditional poured concrete walls can be finished with a different material later which hides cracks. But board formed isn’t covered, so cracks will be visible.
Other additives can be used like micro rebar or fiber to add additional strength without sacrificing workability.
Color can also be added to the mixture but be careful. Whenever you add color to concrete, you have to be very precise. The color has to exactly match from batch to batch. Most of our board formed concrete jobs easily use 5 to 10 truck loads and each trucks color has to be exactly the same.
Pouring & Vibrating The Concrete
Once the forms are built it’s time to pour concrete. When you pour concrete for a board formed look, it’s important to start from the bottom and work your way up the wall. Don’t pour from the top and let it fall down to the bottom. This method creates more voids, bubbles and honeycombs.
I use a wall pipe to shoot concrete to the bottom of the wall. Pour about 2 feet at a time and then vibrate. Once the 2 foot section is vibrated, pour another 2 feet. Repeat the process until you reach the top of the wall.
Once you’ve poured concrete to the top, use long vibrators to vibrate the entire wall from top to bottom. I vibrate in 1 – 2 foot sections around the entire perimeter of the wall.
Don’t under vibrate the wall. This is a common mistake if you’re used to pouring traditional poured concrete walls with flat panels. It’s easier to pack concrete tight to a flat surface than boards and appearance isn’t as important. With board formed walls, you need concrete in each crevice and gap and against each board’s surface.
Remember that board formed concrete is a finished look. You won’t be covering the concrete later with a different material. Take your time when pouring and vibrating the concrete.
Pro Tip: One of the most important and overlooked or rushed steps is to vibrate the concrete. Vibrate as you pour from the bottom up and when all the concrete is in. This consolidates the concrete, packs it into small crevices and helps avoid bubbles, voids and honeycombing. Don’t rush or skip the vibrating phase or your wall won’t look as good as it should. Don’t over vibrate because you could pull aggregate to the surface.
How Much Does Board Formed Concrete Cost?
There are two basic types of board formed concrete that have completely different pricing. Structural board form and cosmetic. The process is fairly simple and often costs less than other concrete finishing techniques like stamping. And it’s usually less expensive than building walls with brick or stone.
Cosmetic: Some people use board form concrete just for show. This is much cheaper because it involves a lot less concrete and lighter forms. In some cases, the concrete is just an inch thick which is basically the thickness of cultured stone. The price is typically between $25 to $50 per square foot.
Planks can be installed over an existing poured concrete wall, cinder blocks, cement board, brick, stone or other masonry surface. The distance between the forms and wall can be as little as an inch. Concrete is poured into the gap and vibrated. When the forms are removed you have the look of board form concrete without the structural strength.
Structural: An entire home can be built out of board formed concrete when it’s a structural pour. Instead of using traditional smooth forms, board planks are used instead. You can use board forms to create foundation walls, retaining walls, interior walls, chimneys, and anything else that’s made with poured concrete.
The thickness a structural poured formed concrete is the same as using traditional forms. The only difference is the appearance. But the forms are much harder to build and take a lot longer. Each plank must be cut and installed separately. The planks need a lot of reinforcement to keep their strength as the concrete is poured in and vibrated. Fiberglass or steel ties are used between forms to tie them together.
In general, the price for board formed concrete walls is 25% to 50% higher than smooth formed or block.
A Brief History Of Board Forming
Board formed concrete is an old technique that predates the large panels we typically use today. Pretty much from the time concrete was first invented, wood boards were used to contain and form it. Panels were created hundreds of years later to make pouring concrete walls easier. And they do a great job, it’s much faster and easier to pour concrete walls than it used to be. But the look is totally different than using boards.
Board formed combines concrete’s natural plasticity with the beautiful look of wood. All the knots, gaps, and wood grain show up in the finished wall once the forms are removed. But to do it right takes a a lot more time to build the forms. In general the jobs we’ve done have taken about 3 times longer than when we use flat panels.
Board formed concrete recreates an old fashioned look that was around hundreds of years before form panels were made. Before plastic and metal, wood planks were used to form and cast vertical concrete. Wood was cheap, readily available and strong enough to contain the pressure of poured concrete. Using wood boards, builders were able to shape vertical concrete high and strong to create walls, piers and foundations.
About 75 years ago, steel-reinforced vertical panels became the standard in construction. Most concrete walls were used primarily for strength and not appearance. But these days lots of homes use poured concrete walls, floors and ceilings as a finished look. So more attention is paid to building forms and pouring the concrete. Modern board formed concrete forms are both for structure and appearance.
What Can Go Wrong?
Board formed concrete isn’t that hard to do if your an experienced mason that’s used to pouring concrete and building strong forms. But there are some challenges and things that can go wrong. Especially if your not used to using concrete as a finished product like with cast products, statues or countertops. The surface needs to be much better with less honeycombing and bubbles. Most failure I see are small cracks and other cosmetic issues rather than major wall failures. But that can happen too.
Common things that can go wrong and how to avoid them:
- Seepage: Concrete can seep between boards and joints. Pack the boards tightly together and use a bead of silicone between the seems.
- Honeycombs: Vibrate the concrete from top to bottom as you pour and then again at the end. Don’t over vibrate because you could pull aggregate to the surface.
- Rust: Metal form ties can eventually rust. Use stainless steel or fiberglass. Or drill and seal the holes.
- Corners: A lot can go wrong at the corners. Make sure they’re mitered and screwed together tightly. And use some silicone in the gaps.
- Cracks: Brace the forms and screw them together. Vibrate the concrete as you pour. Use additives.
- Wood: Board formed concrete is all about the wood look. Use Doug Fir or Spruce Pine Fir.
- Bracing: If you don’t build strong forms that are properly braced, they can blow out from the pressure. This can be disastrous. The larger the wall the more bracing you’ll need.
Board form concrete is more money because it’s both aesthetic and structural. To get that right, build strong forms, use the right concrete, wood and other materials, consider using additives and vibrate.
Small Imperfections Are OK
Some small imperfections are actually OK and can make the finished wall look better. So don’t worry about every tiny detail when the forms come off.
I’ve done lots of board formed concrete jobs, and every one was a little different. Each board is totally unique, they’re shape, grain pattern, knots and sizes always vary. It’s a work of art that’s also structural and you can’t control everything. You’re going to get some seepage, tiny hairline cracks, honeycombs and bubbles. Just try to limit them as much as possible.
Board formed concrete softens the look of poured concrete and makes it appear warmer. Wood is considered a warm building material while concrete is cold. You bring the look of both together with board form. And natural materials like wood aren’t perfect. They have lots of imperfections throughout every board that makes them special. If I end up with some small imperfection I don’t try to fix them when the boards come off. They’re a part of the structure’s beauty.
How Thick Is Board Form Concrete?
When you’re using board formed concrete to build a wall, the thickness is whatever the wall is. The board forms are what actually forms the concrete wall. So if your foundation wall is 8 inches thick, then the board formed wall is 8 inches thick. There’s no difference between the thickness of a traditional poured concrete wall using smooth forms vs board forms. The boards only change the appearance of the wall’s surface.
When you’re using board form only as a cosmetic feature over an existing masonry wall, just like tile or brick and stone veneer, it should be about 1 inch thick. The board forms can be installed an inch or so away from the wall, braced, and then filled with concrete. But because the concrete is much thinner, I recommend using a plasticizer and strength additives like fiber to prevent cracks.
You can also make board formed concrete panels in form boxes. Make a square box out of melamine to form the sides. Then cover the face of the form with boards. Lay the board side down on the ground face down. Fill the form with an inch or so of concrete and let it harden. When done, you’ll have a 1 inch thick board formed concrete panel. Install the panel onto any masonry surface with thin-set or cement mortar. These are also refereed to as board formed concrete tiles.
Board Formed Concrete Gallery
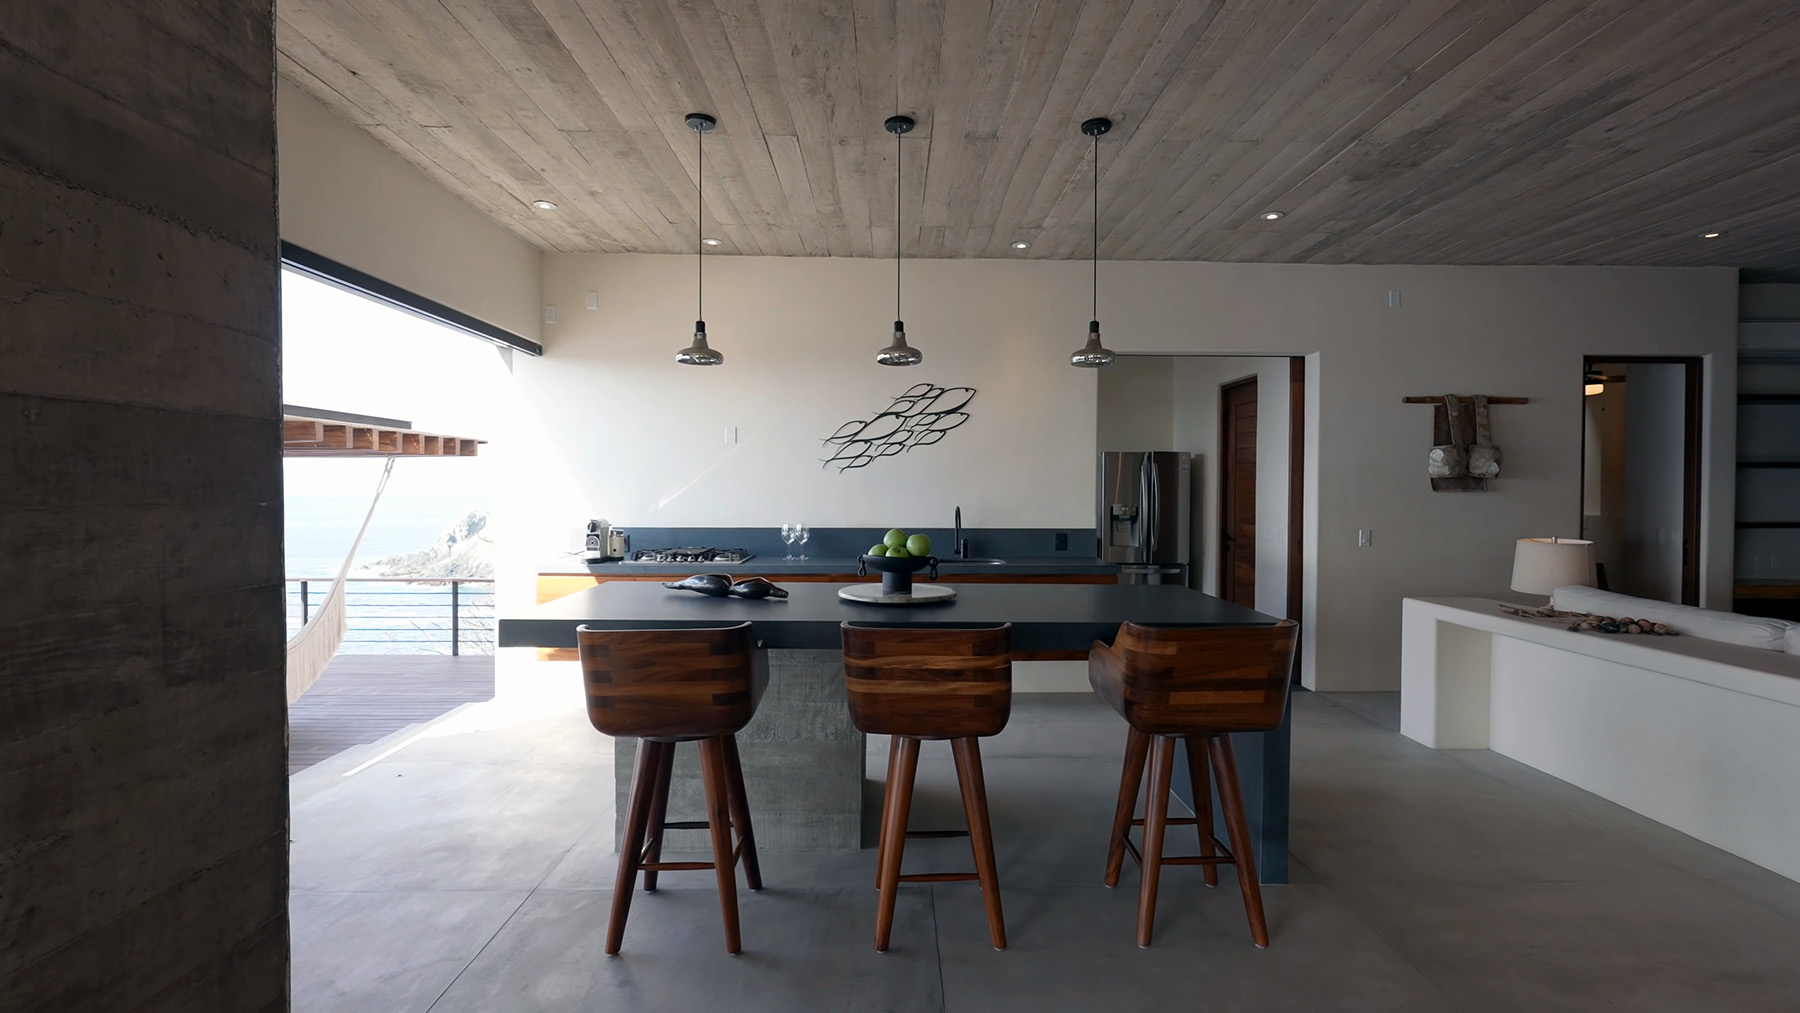
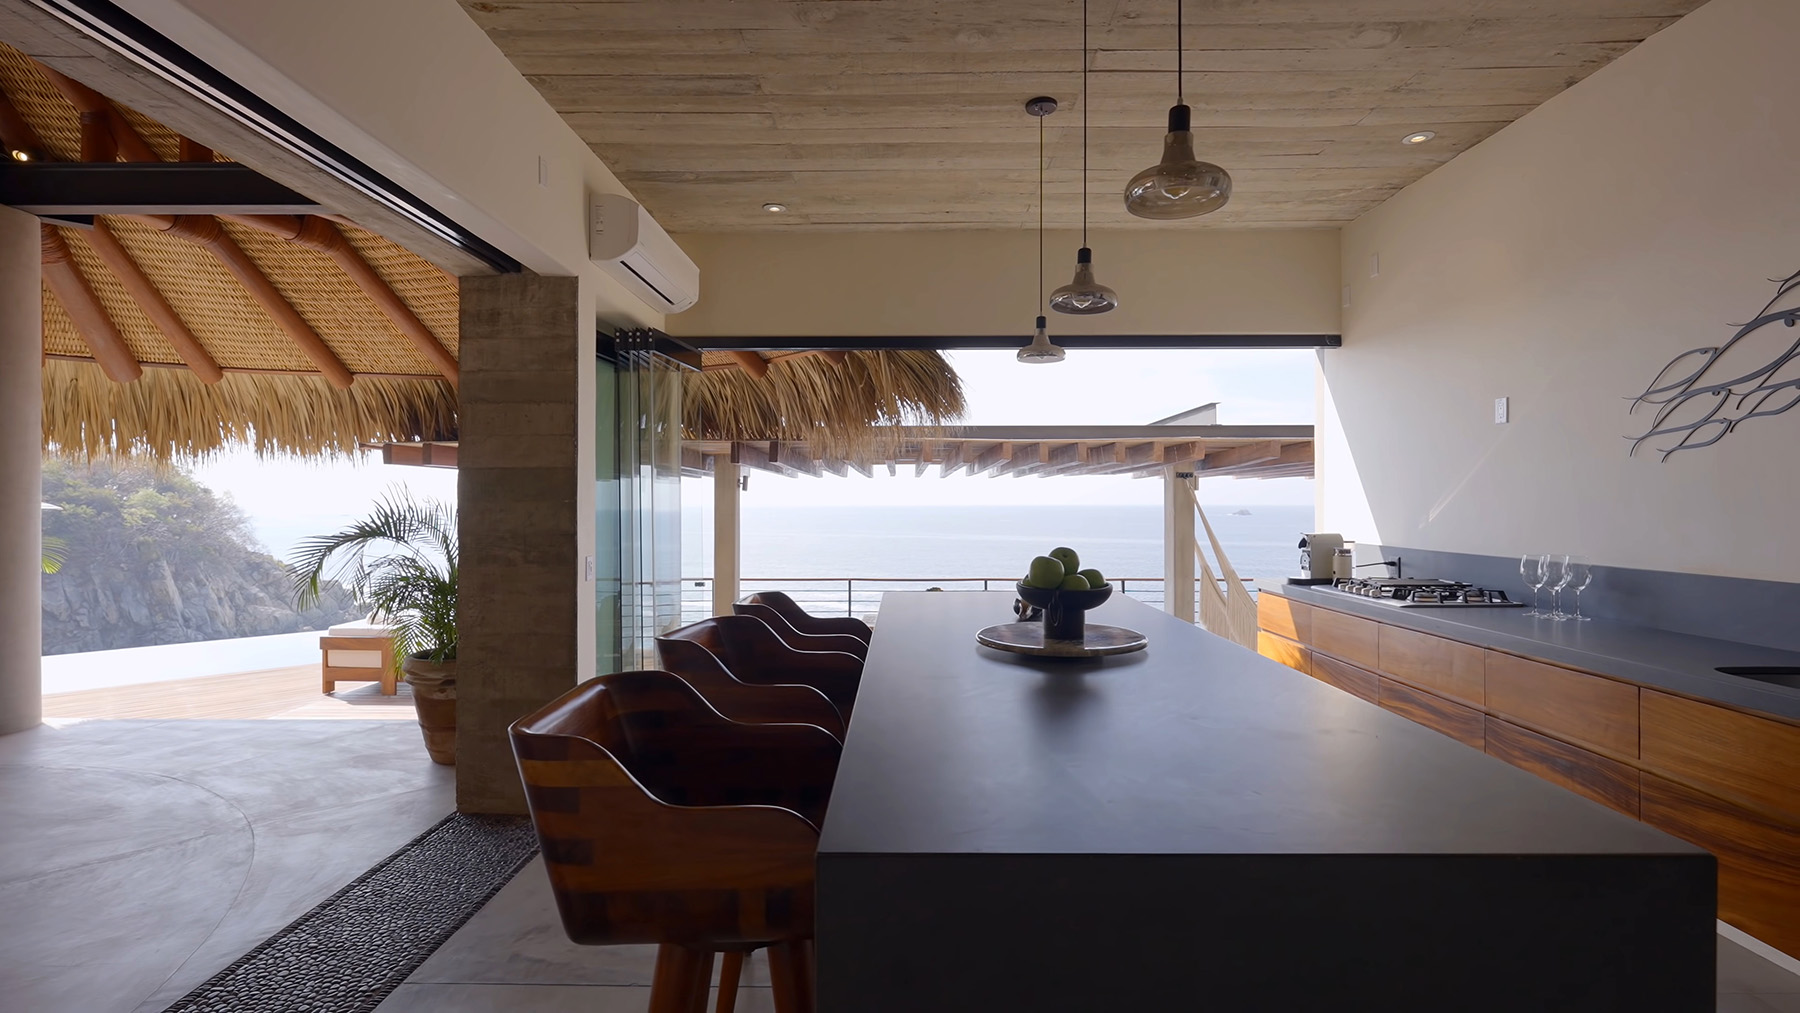
Here’s a small gallery filled with some of my favorite board formed concrete examples. You’ll see it used on ceilings and walls as well as to build smaller projects like planters, pots and tables.
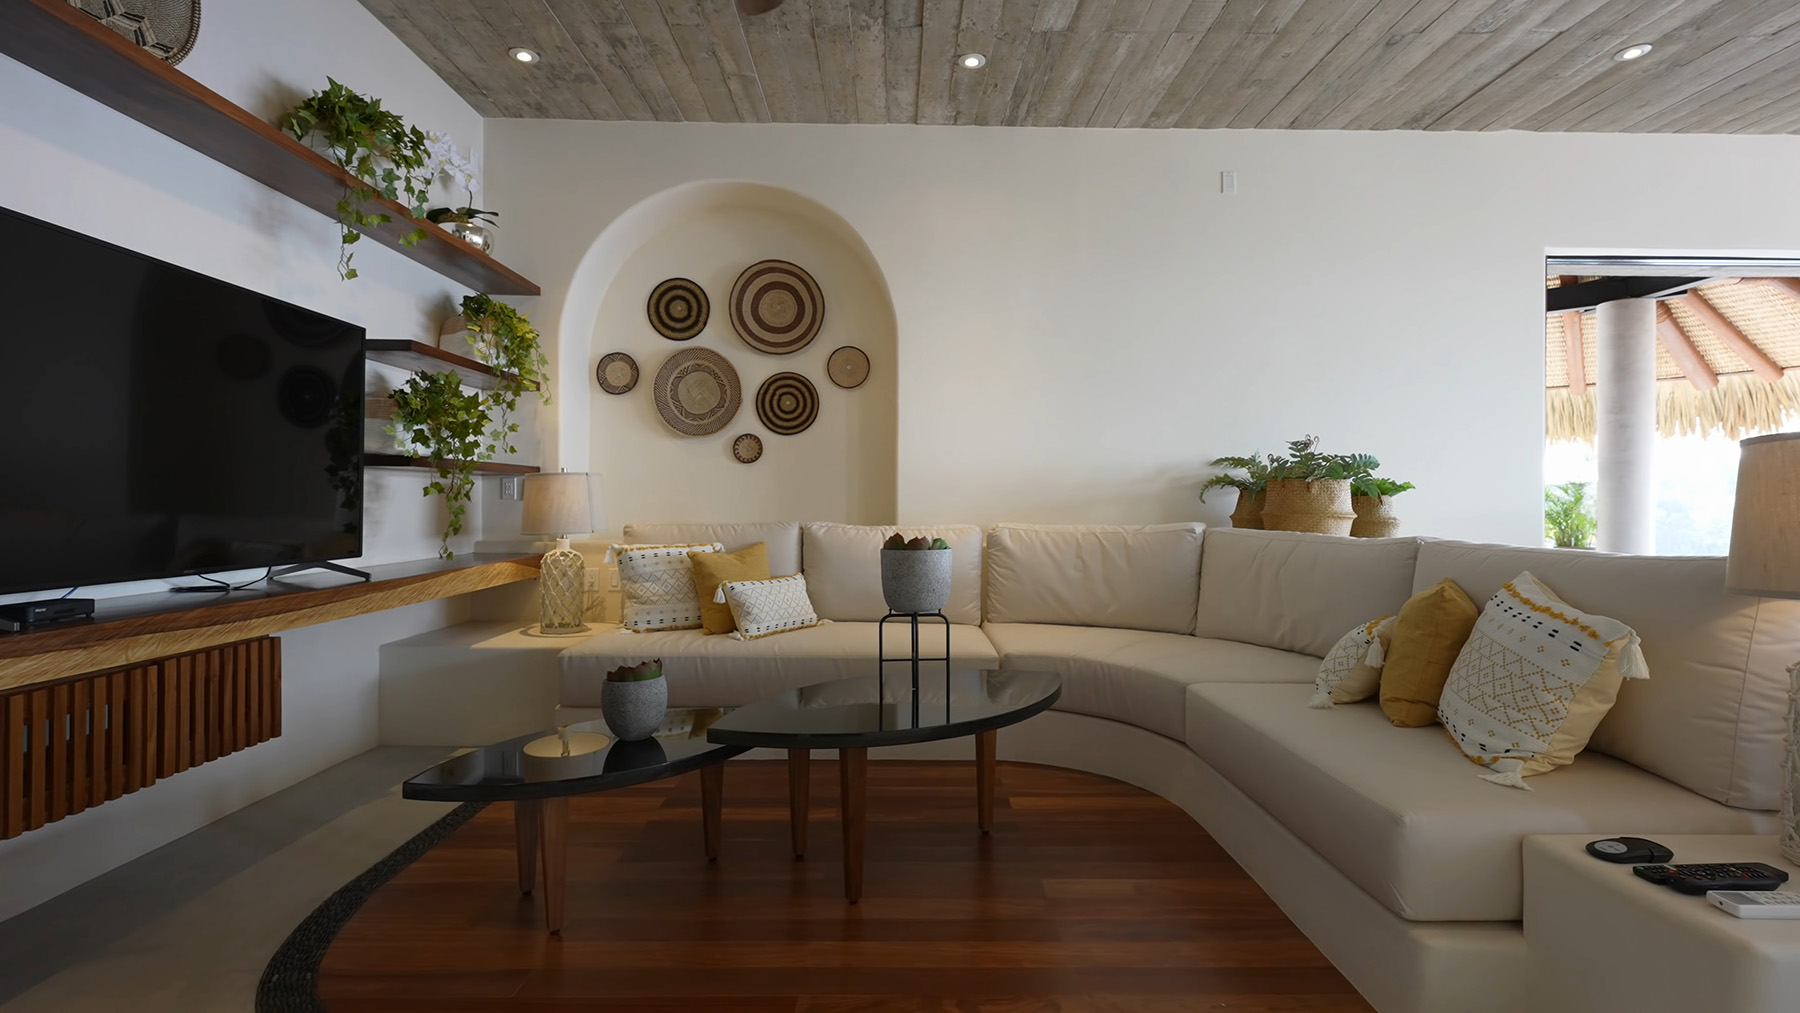
Board formed concrete used on the ceiling of this beautiful living room.
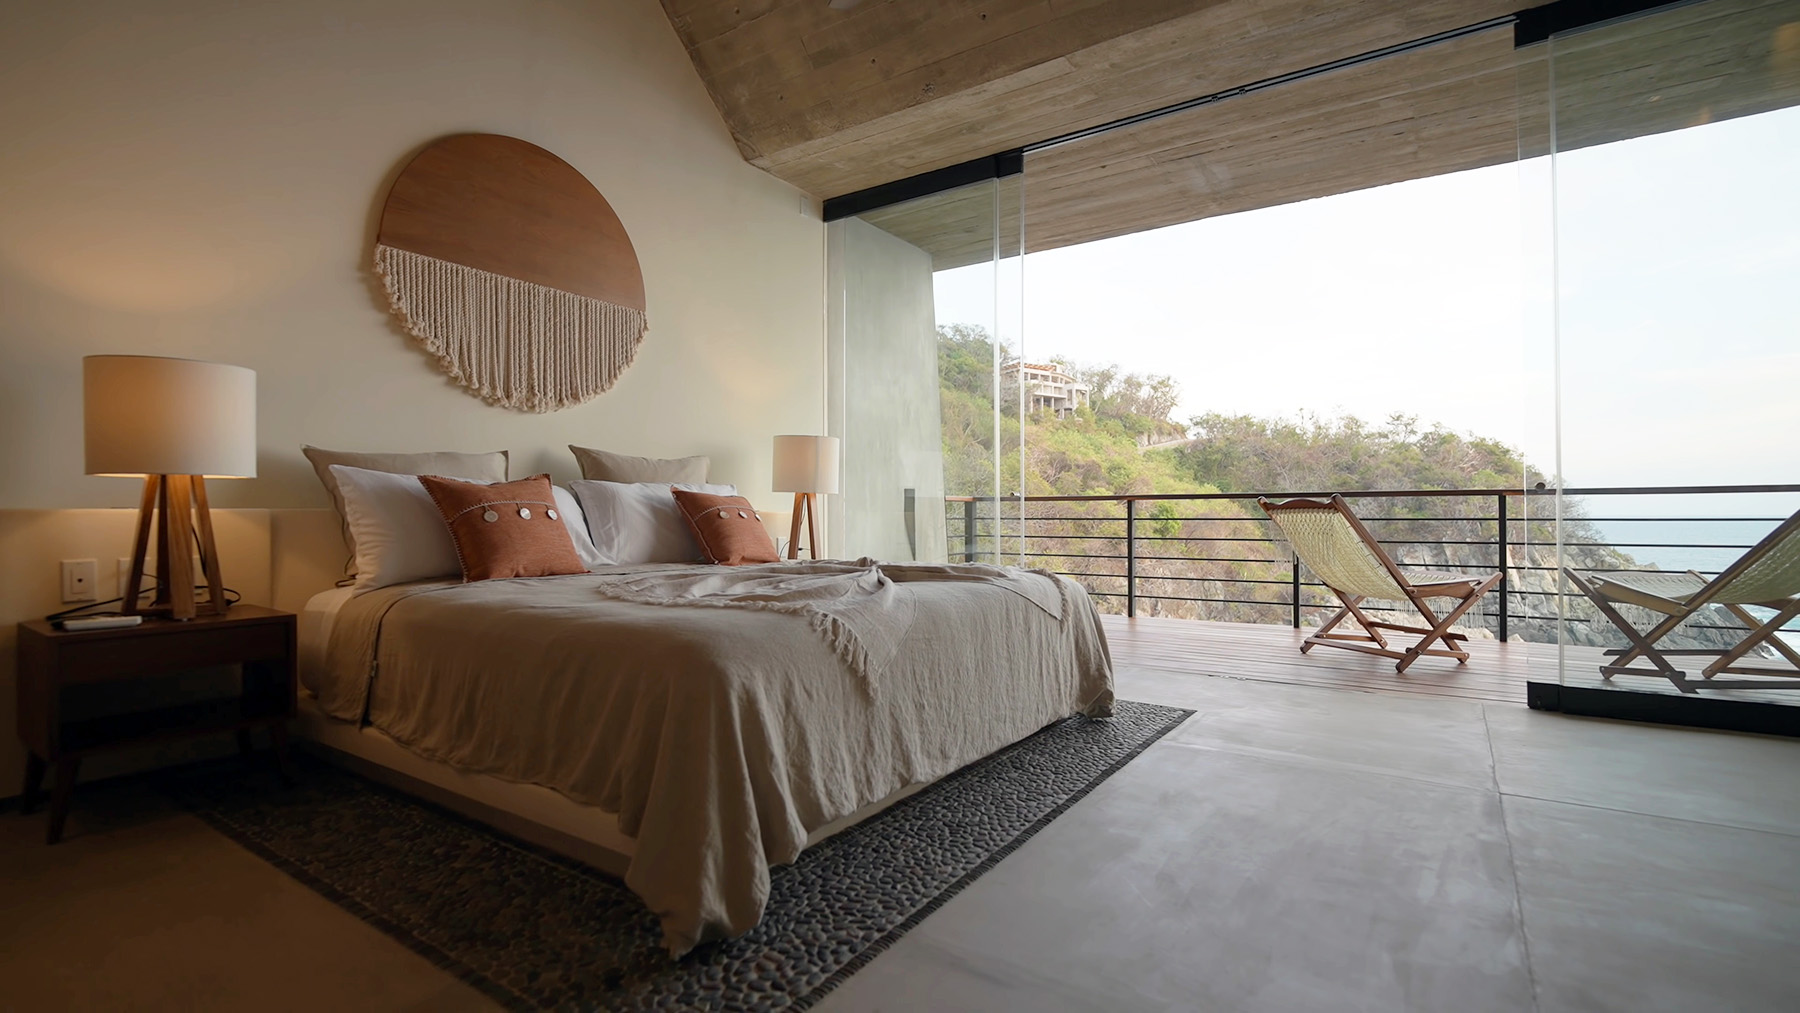
More board formed concrete on a bedroom ceiling extending to the exterior balcony roof.
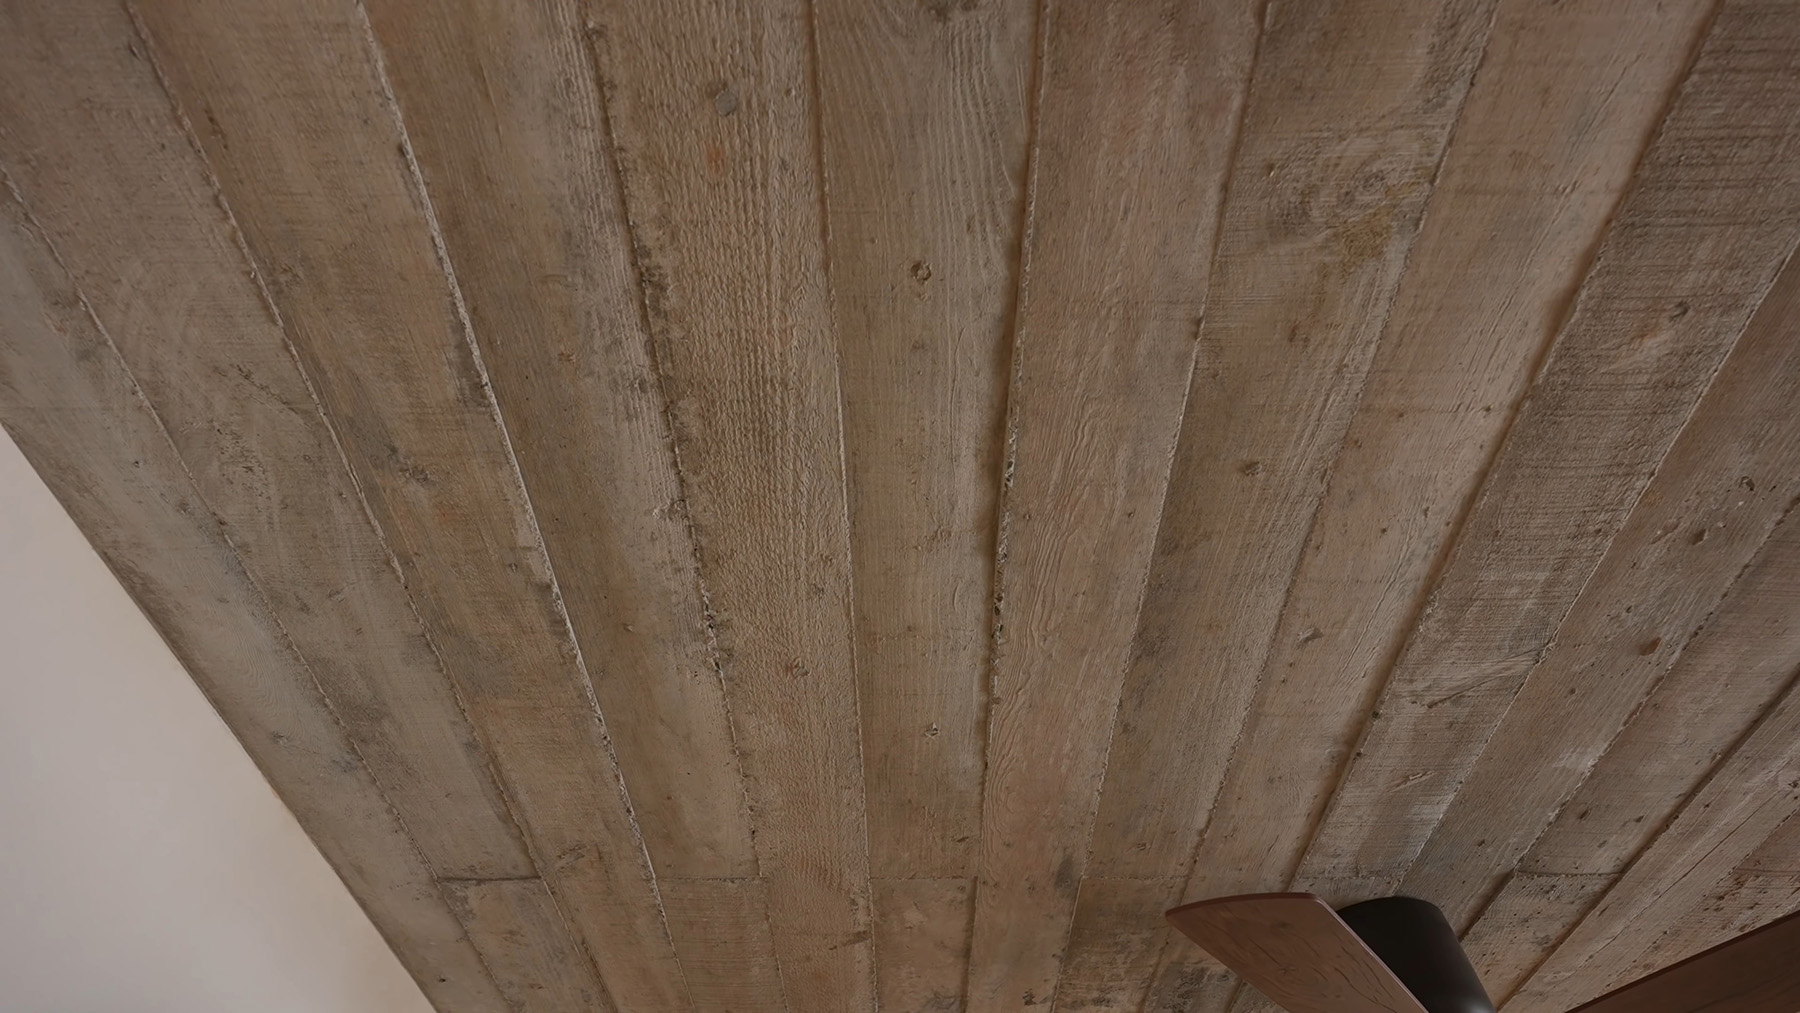
Closeup pic of board form concrete on the ceiling.

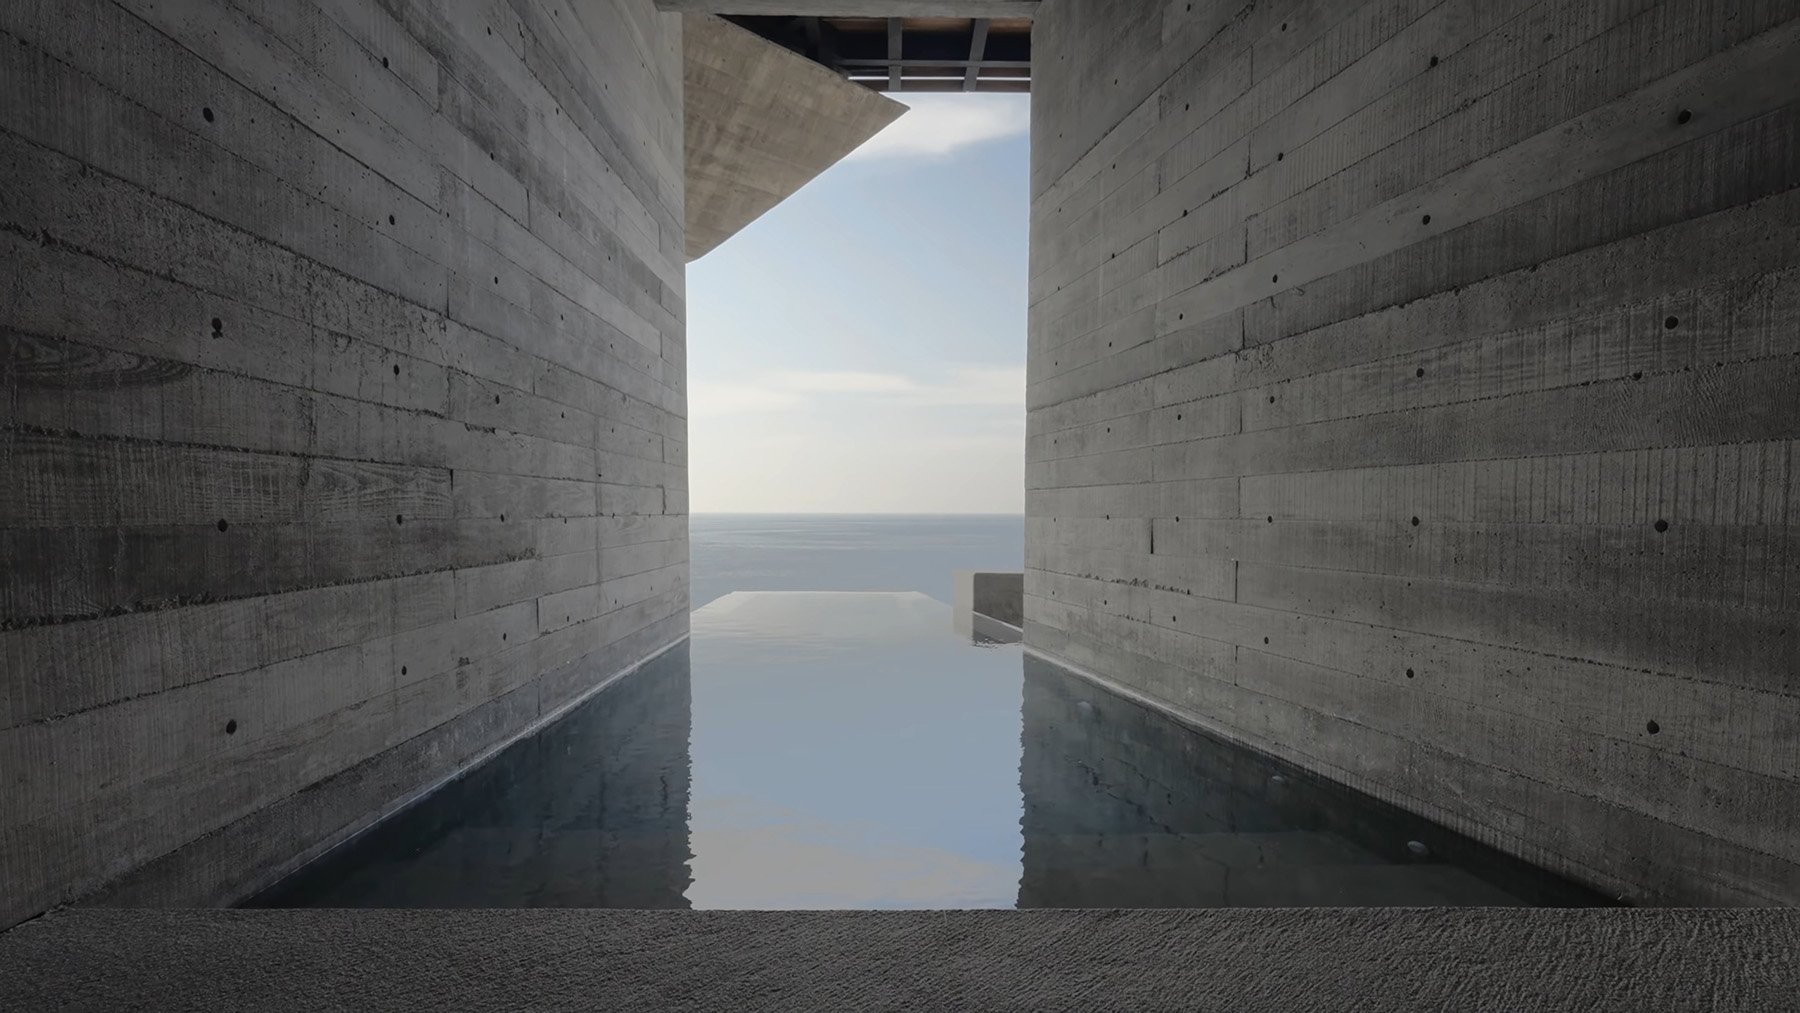
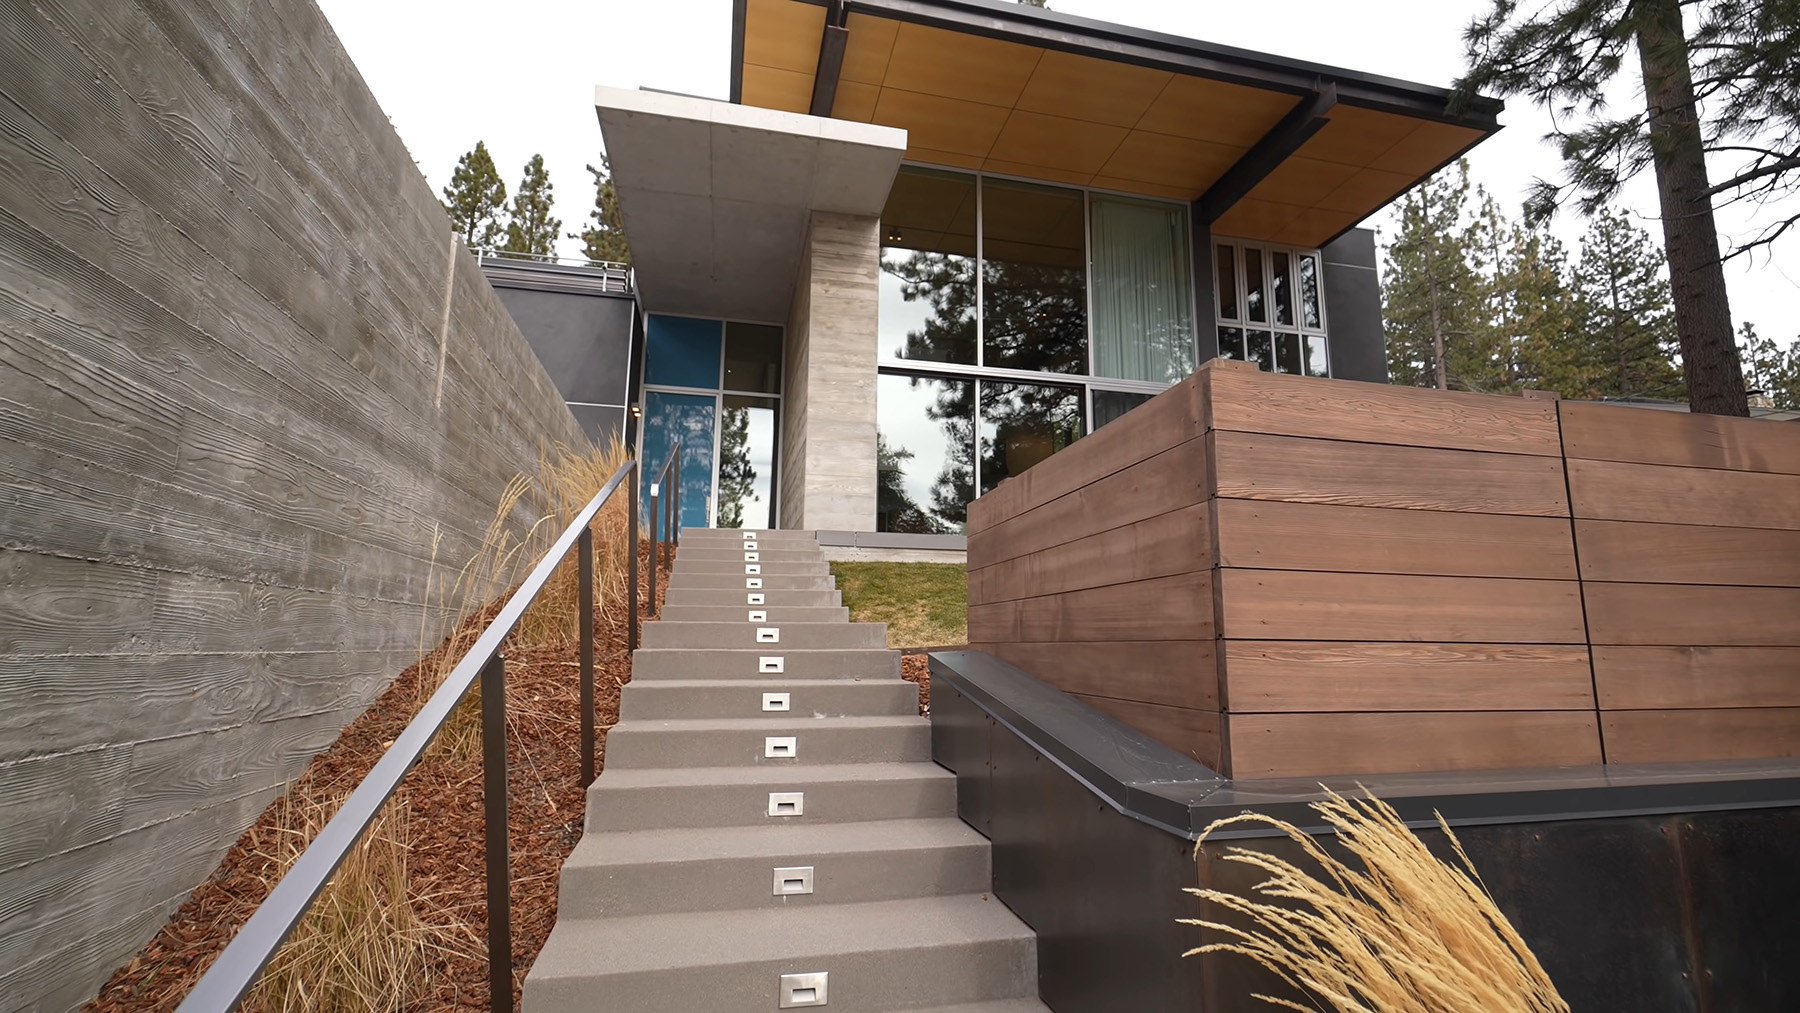
Exterior board formed concrete used horizontally and vertically.
Horizontal board form used on the walls of this stunning modern pool.
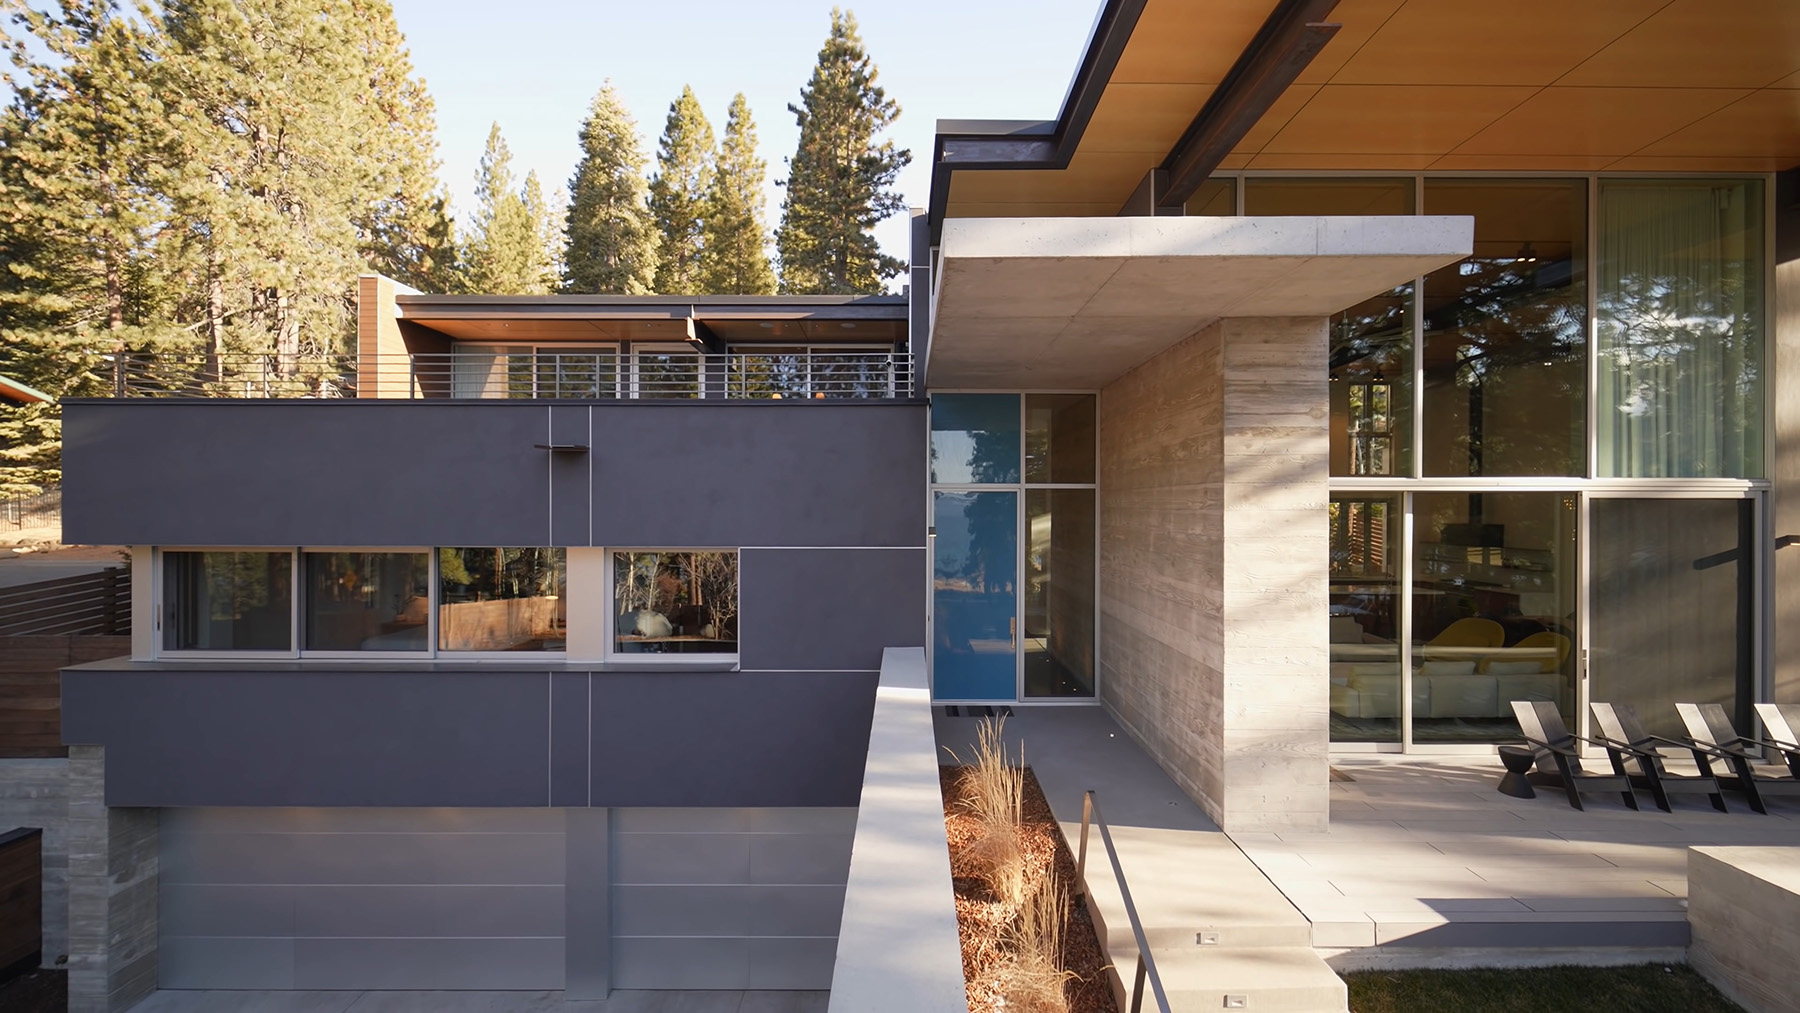
Modern home with board form exterior / interior walls.
Another view of these beautiful walls.
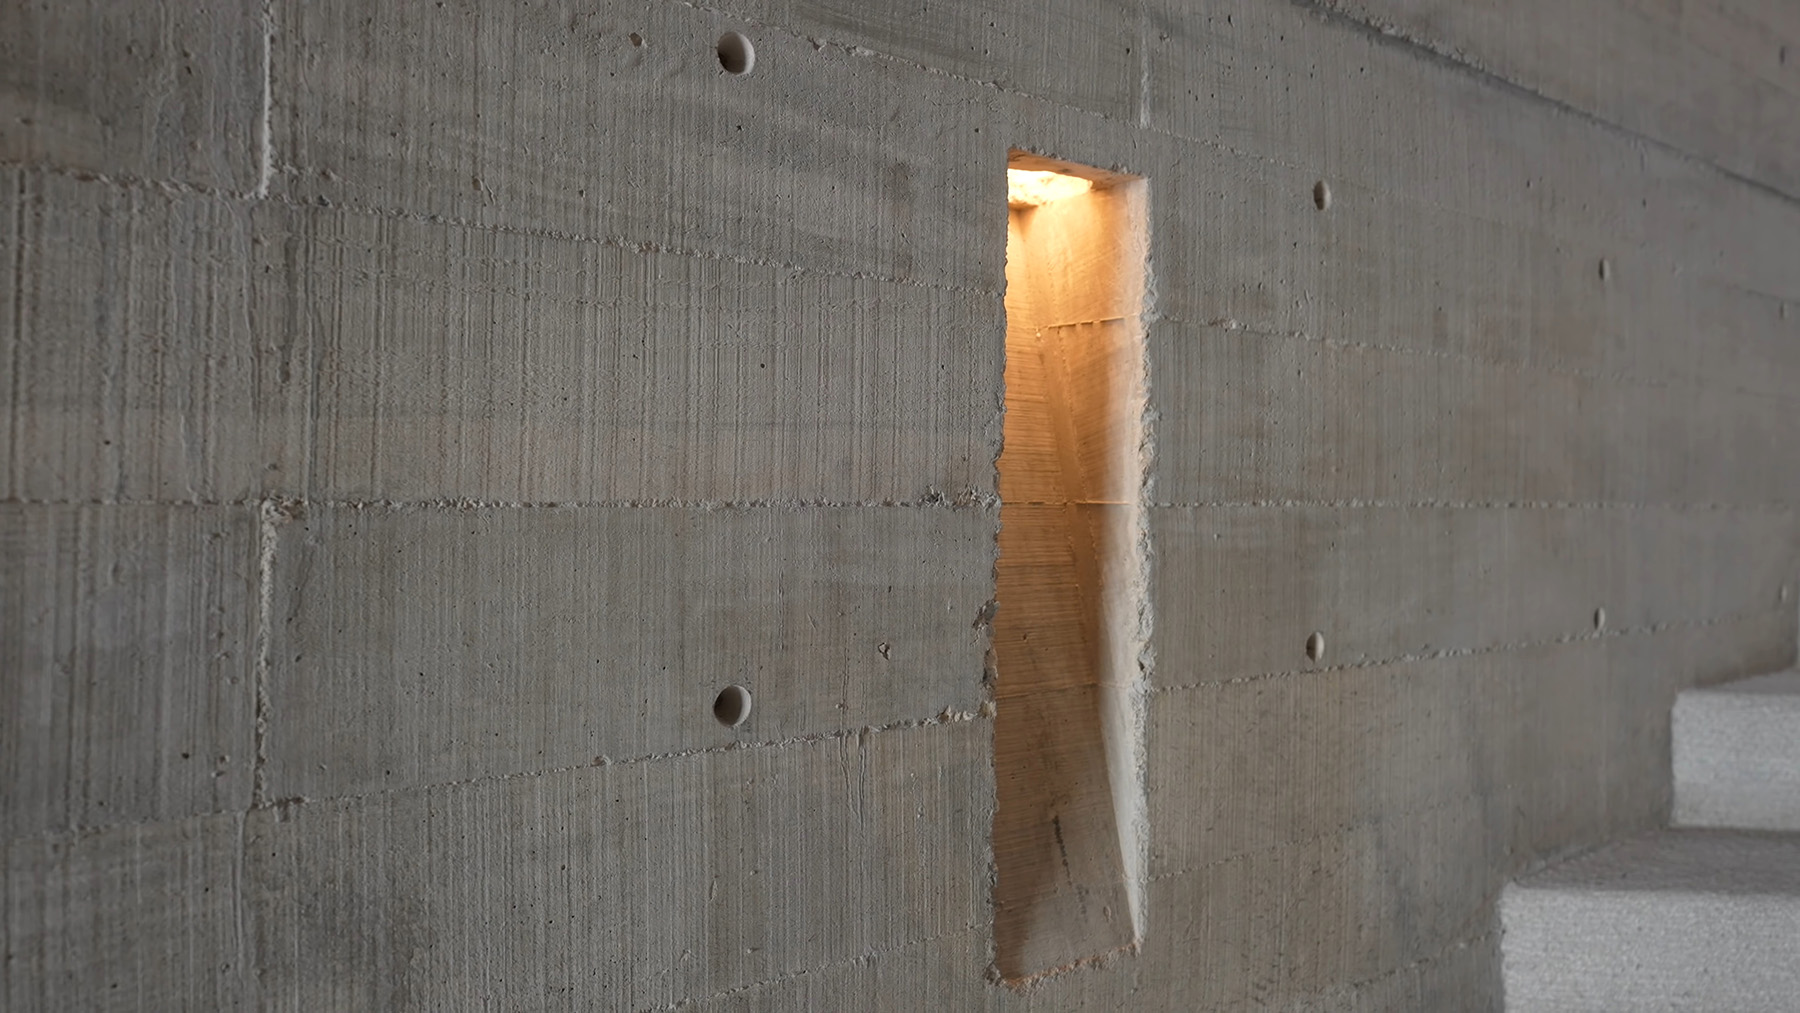
Closeup view of the walls with built in lighting.
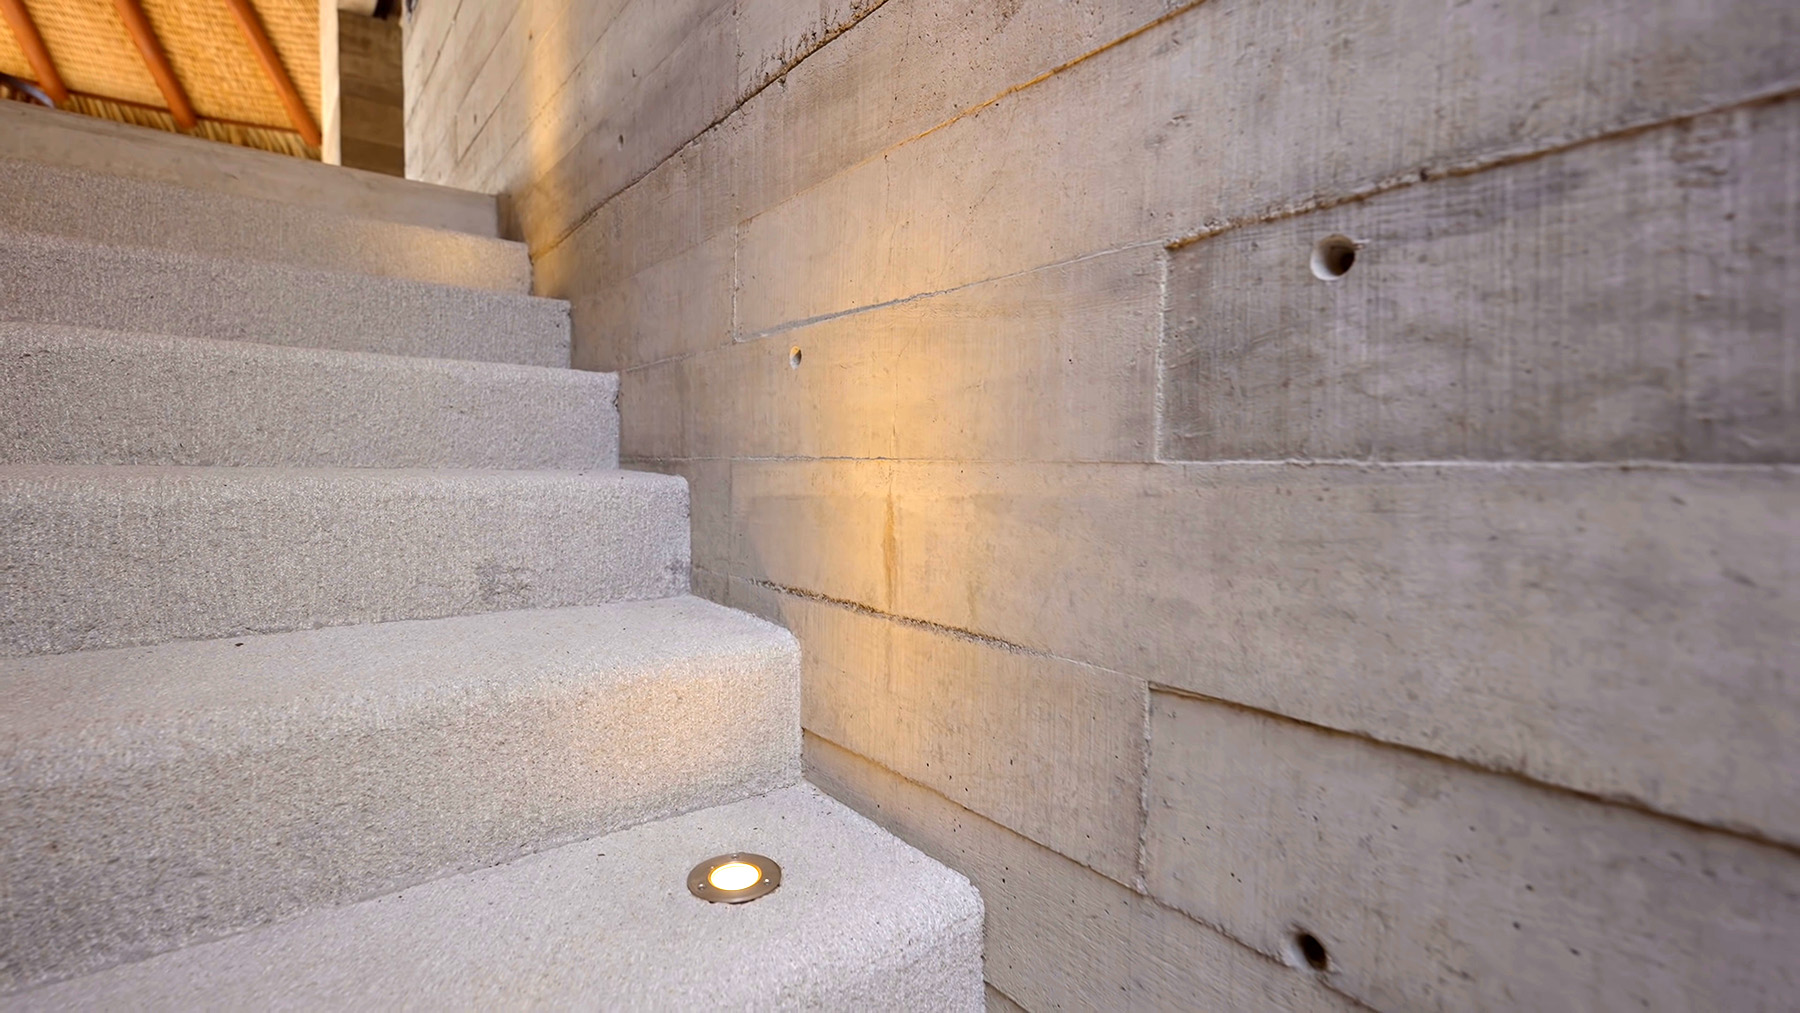
Another closeup vies of the wall detail.
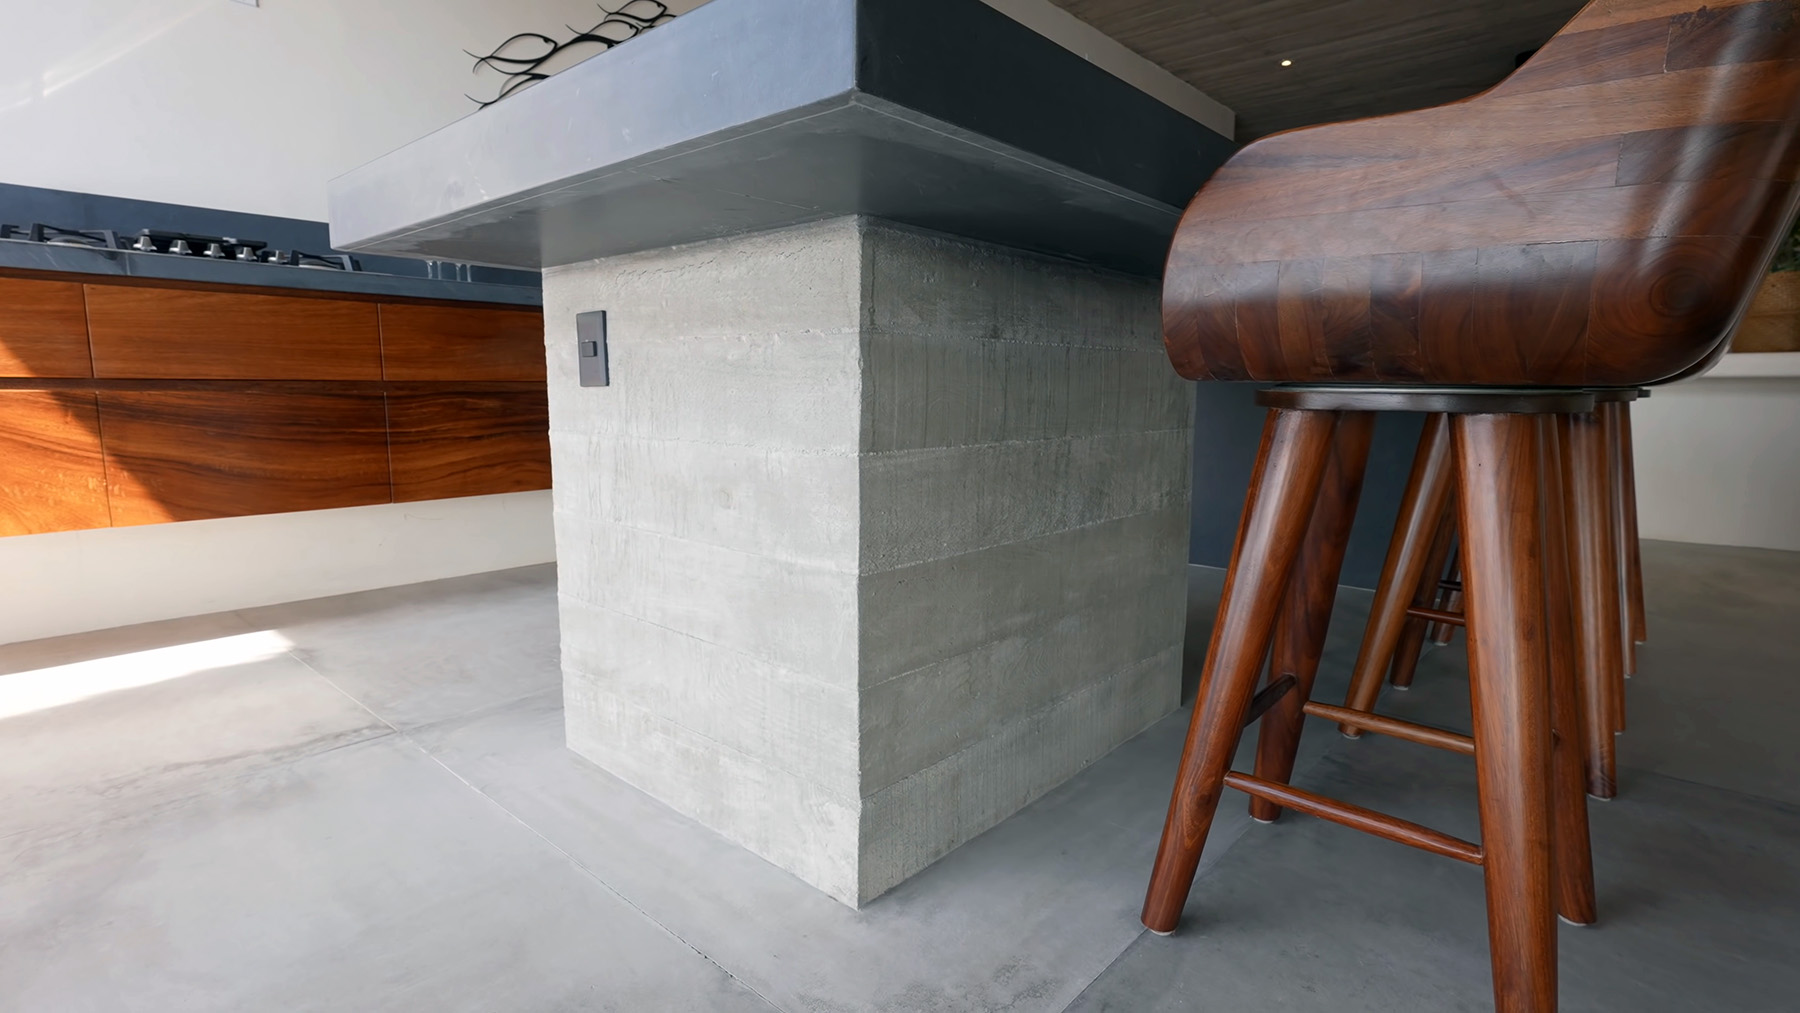
Beautiful board formed concrete kitchen island.
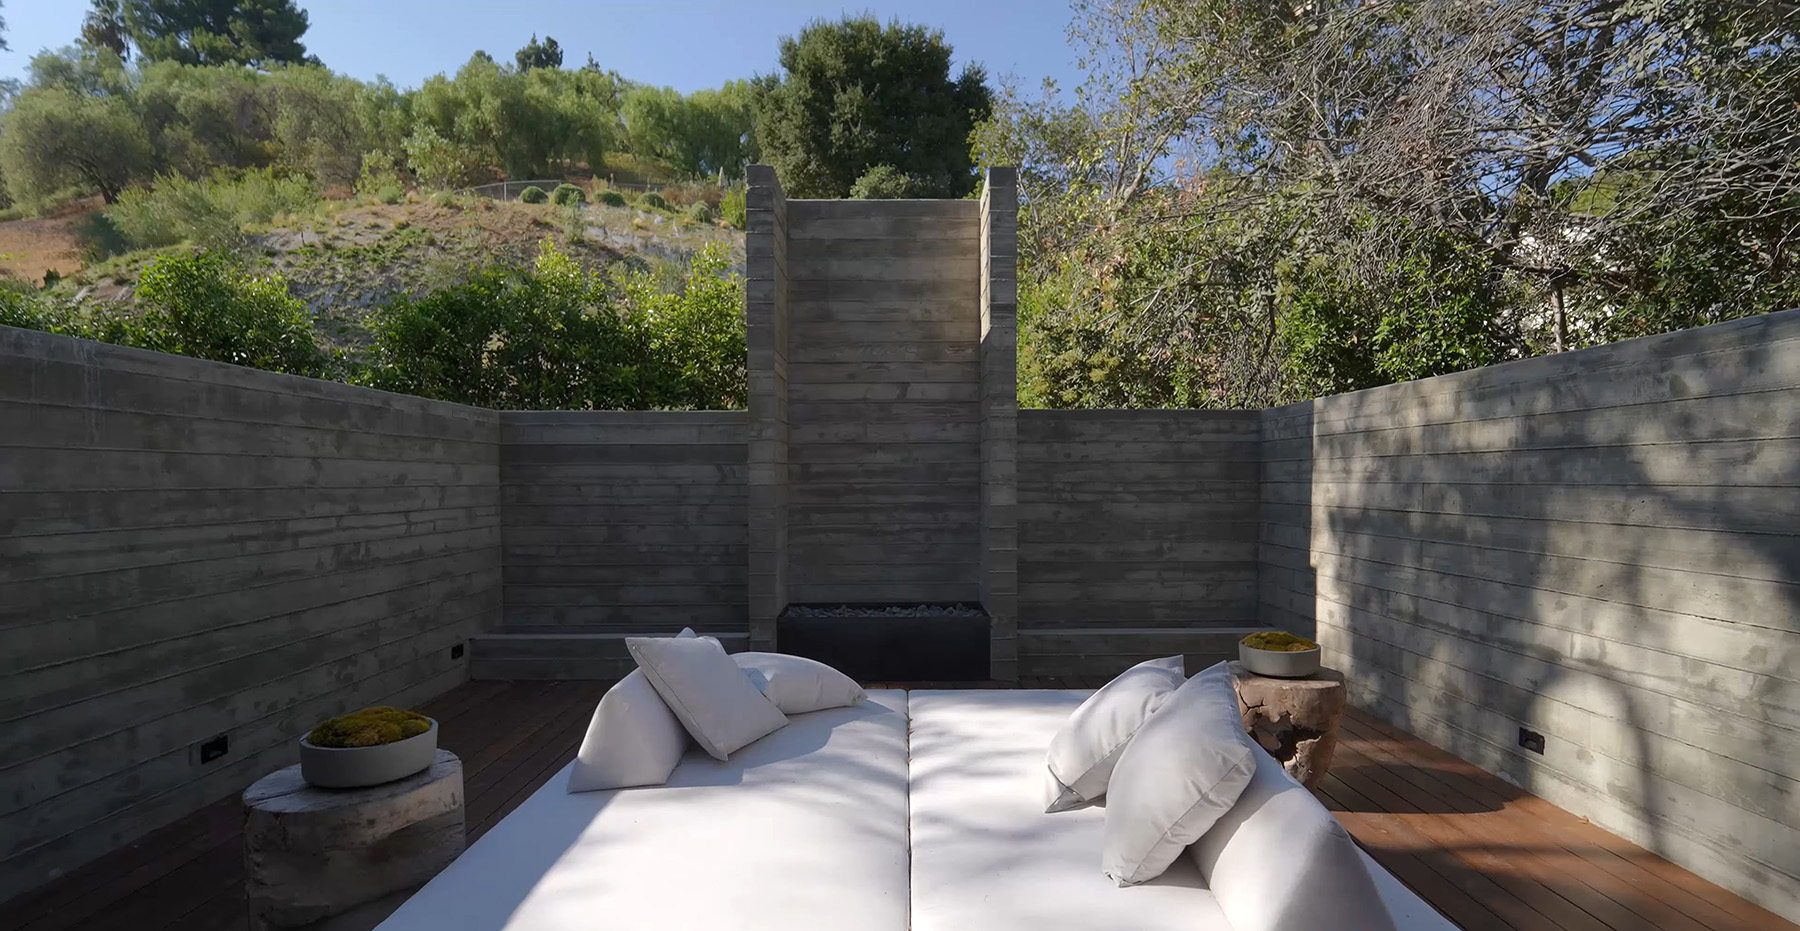
Exterior board form concrete walls and fire pit surround.
Summary: What Is Board Formed Concrete?
Board formed concrete is concrete that’s formed with wood planks instead of flat panels. This creates a wood grain texture on the surface that matches the boards that formed it. Concrete is wet when it’s poured but hardens like a rock. When it hardens, it takes the shape of whatever form it was poured into. In this case the boards. It’s a striking look because most poured concrete walls are smooth and don’t look anything like wood.
I’ve been a mason for over 25 years and use board forms indoors and out for all sorts of projects like walls, planters, ceilings, columns, stairs and fireplaces. You can build an entire home with board-formed concrete or use it in special places as a focal point.
Board-formed Concrete is the name of the process that leaves a wood grain image on hardened poured concrete, but it’s not different than regular concrete other than how it looks. If the concrete cracks, you can make repairs with a DIY concrete crack filler to prevent future damage.
Concrete is a fantastic building material that’s strong, durable, weather resistant and fairly cheap. But some consider it a little cold for indoor use. By imprinting a wood grain on the surface, it softens and warms concrete’s appearance. This makes it more suitable for a wider variety of home styles.
When building with board-formed concrete, forms are built out of horizontal or vertical planks that touch the concrete when it’s poured. Once the forms are removed, the wood grain pattern remains, leaving behind a beautiful wood grain finish in a rock hard concrete structure.
If you have any questions about concrete email or leave a comment below.

John Mazzuca | About | More Posts |
Custom Home Builder
John Mazzuca is a custom home designer and builder at Gambrick with over 25 years experience in the construction industry. John has designed, built and/or remodeled hundreds of homes, small buildings, and commercial projects. He writes about business, real estate, home building, and household electronics. His work has been featured in Fox Business, Better Homes & Garden, House Beautiful, and more.