
How To Hang A Picture On Concrete
Hanging pictures on a concrete wall isn’t as easy as if it were framed out of wood. But don’t let that stop you. There are a few great ways to hang a picture on solid cement and they’re all pretty easy to do. Hanging a pictures or two or three is a fantastic and easy way to make any space feel more like home. Pictures can be a huge benefit in that department if your walls are concrete because they tend to feel cold and sterile. The 3 best ways we hang pictures on concrete are adhesive hooks, hardwall hangers, and masonry anchors. In this article, I’ll explain all three in depth and include some great tips from our interior designers.
Before you pick a hanger and start hanging pictures on your concrete walls, make sure you know the weight first. Some methods are better than others depending on what your pictures weigh.
Next, figure out if your walls are solid concrete or hollow block. Some hangers work better on solid concrete than others. Solid poured concrete walls are extremely dense and hard to penetrate. You can tell if your walls are solid because concrete walls block Wi-Fi.
Measure and mark where you want the pictures to go before you hang anything. Working on concrete walls is more permanent than with wood. When your ready, purchase the hooks you’ll need (removable adhesive hooks, masonry anchors, or hard wall hangers), make sure your hooks can bear the weight, and hang your photos.
Hanging photos on a concrete wall isn’t that hard to do once you know how and which methods works best. Good Luck.
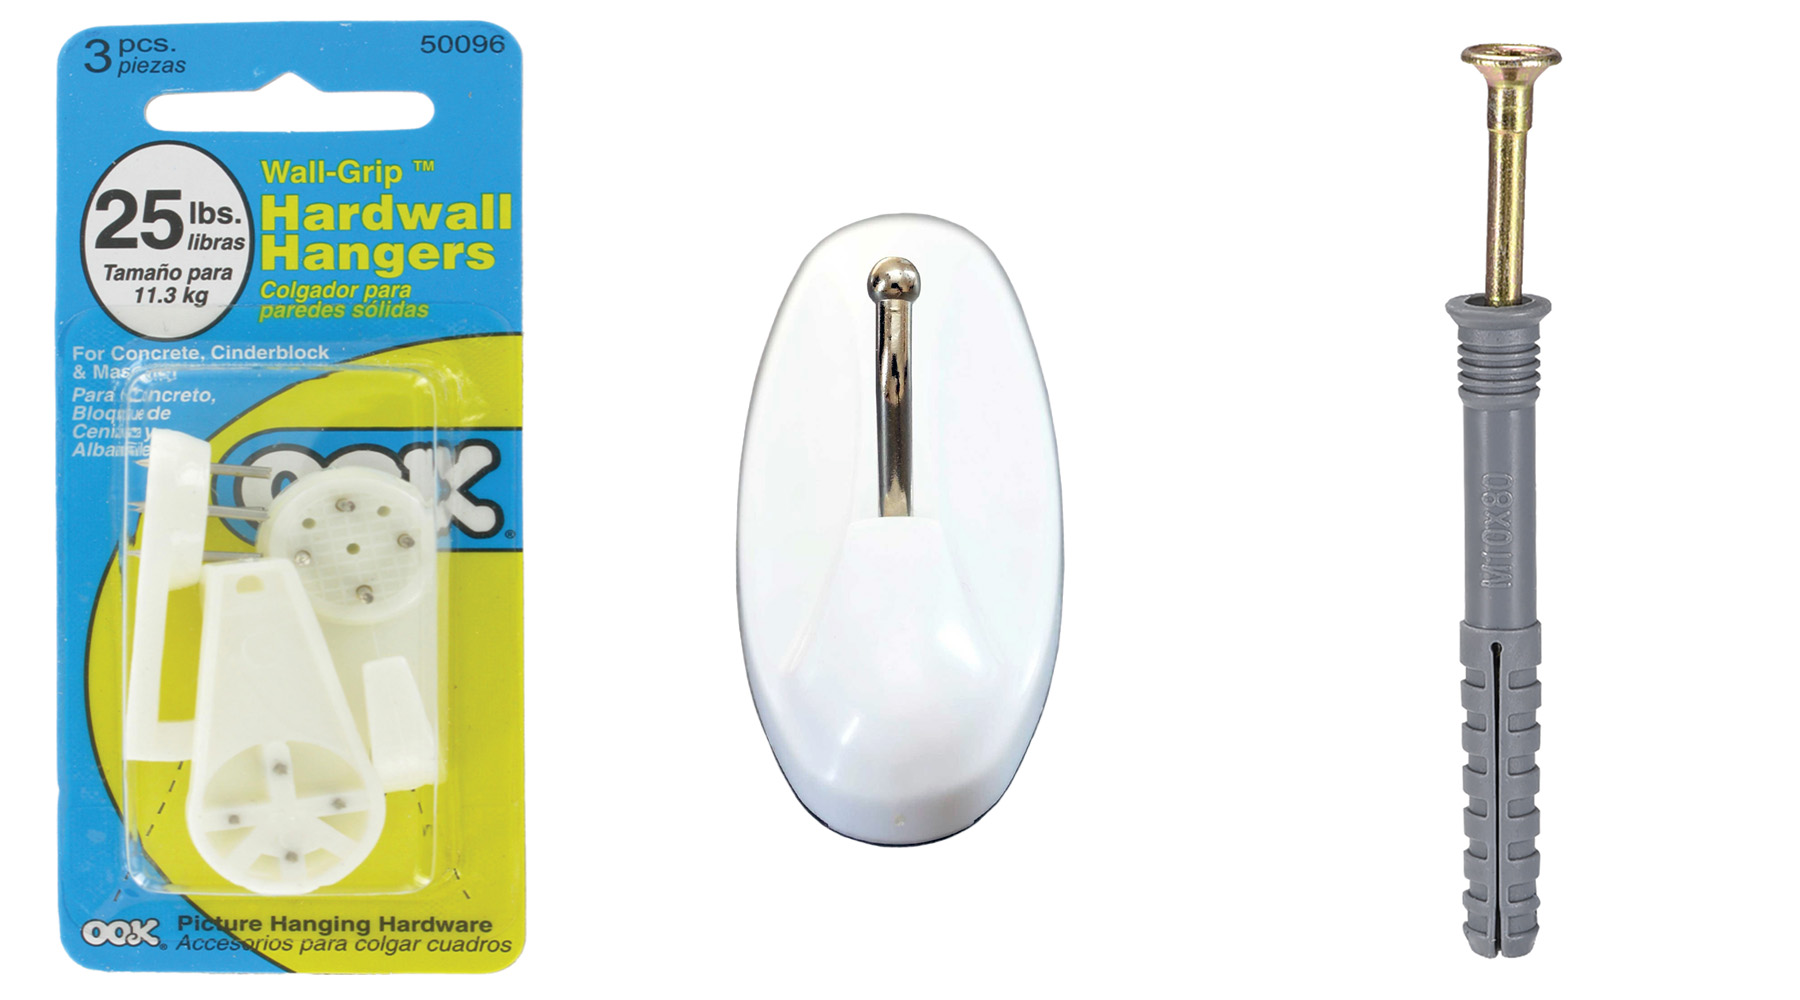
Concrete Picture Hangers side by side. Hardwall Hangers, Adhesive Hooks & Masonry Anchors.
The Best Ways To Hang Pictures On A Concrete Wall
Once you’ve picked out the perfect spot to hang your picture, it’s time to choose the right mounting hardware.
There are three main types of hardware you can use to hang a picture on concrete. Adhesive hooks, hard wall hangers, and masonry hooks.
Each of these methods work great for hanging a picture on concrete but they’re designed to do different things. And they each have their own pros and cons which we’ll discuss later on.
In order to determine which mounting method is best you should ask yourself a few important questions.
- Are you allowed to drill something permanently into the concrete wall?
- How long will the photo be hung? Do you want a permanent mount or something temporary?
- How much does the picture weigh?
- How big is the picture?
- What’s your budget?
It’s very important to determine which mounting method is best for your particular situation. For example, if your mounting fine art that weighs a lot then I would recommend a permanent mount that can handle the weight. But if you’re hanging a picture temporarily or it’s very light then a stick on mount is typically the right choice.
If you put wallpaper on concrete walls, you’ll have to drill through to install the hanger. Try not to damage too much of the wallpaper when making the drill hole.
I prefer using hardwall hangers on a wallpapered concrete wall because the holes are very small. However, if you have painted concrete walls, any anchor will work fine.
Adhesive Hooks
Adhesive hooks are the simplest way to hang a picture on concrete. They’re super easy to install, simple to remove and are not permanent so they won’t damage the wall. But they’re also the weakest.
Check the label to see how much weight your hooks can handle and know the weight of your picture. If you hang a picture that’s too heavy you can rip the hook right off the wall. However, for a standard size picture that’s under 10 lbs an adhesive hook is typically strong enough.
Adhesive hooks are a fantastic way to hang a picture on concrete because they don’t require drilling any holes. Instead, they have an adhesive backing which sticks firmly to the wall. If you want a solution that’s non permanent and won’t damage the concrete then these are what you should use.
Pro Tip: If you need more support and don’t want a permanent hanger then use more adhesive hooks. 2 or more hooks can work together to support more weight. By using more hooks you spread the weight of the picture among them. For example, a 20lb picture would be too heavy for your average adhesive hook but 3 could probably handle it.
How To Install Adhesive Hooks On A Concrete Wall
Using adhesive hooks to hang a picture on a concrete wall isn’t that hard. But there are a few steps you should take in order to make sure the hooks attach firmly to the concrete.
Step 1. Clean the Wall
If you want a really firm hold, you should clean the area where the hook is going before sticking it to the wall. I like to use a cleaner like alcohol but any mild generic household cleaner will do. Even warm soap and water is typically enough. Put a little cleaner on a paper towel or cloth and wipe the area.
The glue on an adhesive hook sticks much better to a clean surface. If there’s dust or dirt on the wall then you won’t get a good hold.
You don’t have to scrub hard unless the concrete is very dirty. In most cases a cleaning is just to remove dust, dirt and maybe some concrete powder.
Make sure the area is dry before you attach the hook.
Step 2. Mark the Spot
I like to use a pencil and mark exactly where I want the hook. Make sure the mark is level because once the hook sticks you can’t adjust it later.
It’s better to take your time, be precise and avoid mistakes.
Step 3. Stick It To The Wall
The adhesive anchor will have a plastic cover that protects the glue. Remove the plastic covering to expose the adhesive. Make sure not to touch the adhesive because the oils from your finger can weaken the glue. Carefully press the anchor it to the wall for about 30 seconds.
Make sure to carefully line up the hook in exactly the place you want it and press firmly but not too hard. Use just enough pressure to keep it in place.
Step 4. Let The Adhesive Dry
Wait for at least 30 – 60 minutes before you hang anything on the hook. It takes some time for the glue to dry and completely grip to the wall. Once enough time has past go ahead and hang your picture.
Make sure not to hang anything too heavy. If your picture is heavier than the hook can support then it may rip right off the wall. If that happens then get stronger hooks or use more of them. It’s fine to use 2 or more hooks to hang a heavy picture.
Summary
- Clean the area with an alcohol wipe or other mild cleaner.
- Wait for the area to dry.
- Mark the area where the hook goes with a pencil.
- Remove the hooks plastic backing.
- Hold the adhesive on the wall for about 30 seconds with firm pressure.
- Wait at least 30 – 60 minutes before hanging your picture to ensure the adhesive has fully adhered to the wall.
Hard Wall Hangers
Hardwall hangers are designed to work on concrete, brick, block or other masonry walls. They’re a medium strength hanger capable of holding around 25 pounds, or 11 kg. That’s more than double the strength of an adhesive hanger.
Hanging pictures on concrete with a hardwall hanger is quick and easy. They feature sturdy pins that anchor the base into the wall.
You can use multiple hardwall hangers to hold pictures weighing over the limit.
How To Install Hardwall Hangers On A Concrete Wall
Hardwall hangers are quick and easy to install on a concrete wall. They’re are only a few steps, and unlike adhesive hangers, you don’t have to clean the wall first.
Step 1. Mark the Spot
Mark the exact spot where you’d like to install the hanger. Whenever you work with concrete it’s important to be accurate. hardwall hangers are more permanent so there won’t be a chance to adjust the hook later. Take your time and make sure the hook is just right to hang the picture exactly where you want it.
Step 2. Installing the Hangers
Place the hanger on the marked spot. Hold it still with your free hand while you use the other one to nail the four pins into the wall.
Only hammer the pins in about half way at first. Before hammering them all the way in, stop and check whether or not the hook maintains its position and if it’s still in the right spot. After confirming that it’s where you want it, continue hammering the pins.
If the hook isn’t in the right spot then you’ll have to back it out and adjust. This can be a problem because you can’t put two holes right next to each other so take your time and make sure the hook is in the perfect place before nailing.
Take your time and hammer the pins firmly but not too hard. It’s not like driving a nail. Going slowly will help keep the hook in the right place until all the pins are secured. It’ll also help prevent accidents and maybe save a finger or two.
Step 3. Hang The Picture
Hang your desired picture and make sure it’s straight. Just like with adhesive hooks, make sure not to hang a picture that’s too heavy for the hardwall hanger. If you overload them you could rip the hooks right out of the wall.
Summary
- Mark the spot where you’re installing the hanger.
- Hold the hanger on the mark and carefully start hammering in the pins
- Step back and confirm that its in the right spot when the pins are about half way in. If not then stop and adjust.
- Hammer the pins completely into the concrete into the wall.
- Hang your photo.
Masonry Anchors
A masonry anchor is the strongest and most permanent method of hanging a picture on a concrete wall. Some can hold over 10 times the weight of a hardwall hanger and over 30 times the weight of adhesives.
Masonry anchors come in a wide variety of styles, sizes and materials. Each designed for a different purpose. Buy the one you need for the appropriate amount of weight you intend to hold.
All masonry anchors require drilling a pilot hole into the concrete wall before you secure the anchor so you’ll need a masonry drill and some bits.
Because of how complex the process is to install a masonry anchor, they’re the most expensive, labor intensive and skilled way to hang a picture on a concrete wall. But they’re also he most secure.
Use The Right Tools
Masonry anchors require drilling a pilot hole into the concrete wall which requires some special tools. You can use any drill to do it if you have the right bit but I recommend a hammer drill. A hammer drill doesn’t just spin like a regular drill. It also move back and forth as it spins and hammers the drill bit in. The hammering and spinning work together to drill into concrete much better than a drill that only spins.
When you have a hammer drill and a new bit, drilling into concrete is easy and typically takes under 30 seconds unless you hit a stone.
Concrete has stones inside called aggregate. If you get unlucky and hit one of these stones while drilling your pilot hole then just muscle through. It’s harder to drill through a stone than cement but masonry bits can do it. Take your time going through stones though and occasionally back out the bit and let it cool. If the stone is really hard it can burn out the bit from all the heat that’s produced inside the hole from friction. You can sometimes see a bit get red hot and black from drilling against a stone for too long.
Bits
When you buy your masonry anchor, the package will tell you how deep the hole needs to be and how wide. But the right size bit length and diameter to make the hole.
Step 1. Mark & Drill The Hole
Mark the spot you want the hole before you start drilling. A masonry anchor is permanent so it has to be very accurate. There’s no adjusting things later.
When you drill into masonry take your time and press hard. The bit and drill will do most of the work. Typically you don’t have to press too hard unless you hit a stone, then you’ll have to put more pressure.
A hammer drill put the pressure in for you with it’s hammering action. This makes drilling into concrete a lot easier. With a standard drill you’ll have to put more pressure.
Make sure to drill the hole in straight and not at an angle. This will ensure the anchor head sits flush against the wall.
Pro Tip: To make sure I don’t drill too deep I take a piece of tape or a black marker and mark the depth I want right on the drill bit. When my mark is flush with the wall I know I’m in far enough. This is important because if the hole is too shallow the anchor won’t go in far enough and will stick out of the wall. If you drill in too far the anchor can get pushed in too deep while hammering. You want the anchor at just the right depth to be all the way in and flush with the wall.
Step 2. Placing the Anchor In the Hole
Once the hole is drill secure your anchor. Most masonry anchors for picture require a plastic piece to be hammered into the hole and then a screw. These steps are self explanatory and very easy to do. Just hammer in the plastic gently and then screw in the screw.
Don’t hammer the plastic in too hard or too deep. It should end up flush with the wall.
If you have a hard time tapping in the anchor then you may have drilled the hole too narrow or not deep enough. Adjust as you need. But don’t make the hole too deep or too wide to hold the anchor.
Step 3. Installing the Screw
This is the easiest part. Just screw in the screw. For this task, you can use a screwdriver or a screw gun. It works fine either way but I prefer to do it by hand. You want to stop the screw before it’s flush with the wall so some is sticking out. I feel I have more control by hand then with a power tool.
A little space between the screw head and wall allows you to adjust the picture wire a bit.
Summary
- Mark the spot where you want to hang your photo.
- Place the drill bit over the mark and drill into the wall. Make sure to drill in straight.
- Tap your anchor into the hole until flush with the wall.
- Secure the screw into the anchor with a little space left over.
- Hang your photo.
Tips
When deciding on which anchor to use, you should consider not only the weight of the picture but also how long you want the photo to be there. If you want it there temporarily, use adhesive hooks. They’re fast, cheap and easy to install and come off when you want them to with no permanent hole. If the photo will be there for a long time, use masonry anchors or hard wall hangers.
The weight of your photo matters when picking the right hardware as each style bears different weights. If your photo is light (less than 8 lbs) you can use any type of hardware (adhesive, masonry anchors, or hard wall hooks), but if its really heavy (200 lbs or more) you should use masonry anchors. For photos with weight in the middle (8-30 lbs) use a hardwall anchor.
Your photos’ length and height are not that important. The main factor effecting which hook to use in weight. The hook doesn’t care what size frame you have as long as it doesn’t exceed the hooks weight limits.
The last factor to consider when purchasing hardware is your budget. Adhesive hooks are the cheapest, averaging about $5.00 for a pack of two. Next comes hardwall hangers, which are around $8.00. Although hardwall hangers do require you also own a hammer which I assume most people have. If not you can buy a cheap one for under $20 bucks.
The most expensive option are masonry hooks. These cost around $15.00 for a set which includes 4 anchors. But you need a drill to install them and bits. Even a cheap hammer drill costs over $50 plus another $10 for 2 bits. So without the drill your looking at around $25.00 for 4 wall anchors and two bits.
| Adhesive Hooks | Hardwall Hangers | Masonry Anchors | |
| Permanent Damage | No | Yes | Yes |
| Weight | 7.5 lbs | 25 lbs | 250+ lbs |
| Skill | Easy | Medium | Hard |
| Cost | $5.00 | $8.00 | $25.00 (plus a drill) |
| Tools | None | Hammer | Power Drill |
Can I Hang A Picture On Concrete?
Hanging photos on the wall is a great way to make a house feel more like your home. But if your walls are made of concrete it’s a lot harder to do.
If you own the house then making permanent holes is up to you. However, if you rent then your landlord probably won;t want you drilling a bunch of permanent holes in the cement.
If you’re a renter and want to hang a photo or two on a concrete wall, I recommend you stick with adhesive hooks.
Adhesive hooks are not permanent and can hold your typical photo that weighs under 8 pounds. But the great thing is that you can use multiple hooks to hang a single picture. If you have a picture that weighs over the 8 pound limit then use more hooks.
Where To Hang Your Picture
The first step in hanging your picture is choosing the right location. This is a little off topic because where you hang it on the concrete wall doesn’t effect how you hang it. But since some methods are permanent it makes the location extra important, so I thought I’d include a few tips to help you out.
Deciding exactly where to hang your photo can be stressful under normal circumstances, but when the picture may be permanent it’s even more so. Luckily our interior designers have some great advice for you.
When hanging just one photo or a grouping, place it or them in an area that’s a focal point. You could just hang pictures in random places but the best designers choose spots that have purpose. Pictures will draw attention so keep that in mind when picking your spots.
To create the best experience, place the center of your photo at eye level, which is about 57 inches from the ground. When hanging multiple photos, place the center of the collage at eye level as well. Pictures that are too high or two low look strange.
If you want to test out the places then print out pictures of your pictures and tape them to the wall. Adjust as needed. Planning is extra important when your working with anything permanent.
Consider the layout of your room and your furniture. The spots you hang your photos today may look great, but if you change the furniture how will they look later. If you have to move the pictures then you could end up with ugly holes in your walls unless you’ve used all adhesive hooks.
Summary: How To Hang A Picture On Concrete
Hanging pictures on a concrete wall isn’t as easy as if it were framed out of wood. But don’t let that stop you. There are a few great ways to hang a picture on solid cement and they’re all pretty easy to do. Hanging a pictures or two or three is a fantastic and easy way to make any space feel more like home. Pictures can be a huge benefit in that department if your walls are concrete because they tend to feel cold and sterile. The 3 most common ways we hang pictures on concrete are adhesive hooks, hardwall hangers, and masonry anchors. In this article we’ll be discussing all three in depth along with some great tips from our interior designers.
Before you pick a method and start hanging any pictures on your concrete walls, make sure you know the weight first. Some methods are better than others depending on what your pictures weigh. Measure and mark where you want the pictures to go before you hang anything. Working on concrete walls is more permanent than with wood. When your ready, purchase the hooks you’ll need (removable adhesive hooks, masonry anchors, or hard wall hangers), make sure your hooks can bear the weight, and hang your photos.
Hanging photos on a concrete wall isn’t that hard to do once you know how and which methods works best. Good Luck.
If you have any questions or comments e-mail us any time. We’d love to hear from you.