
What Is Tongue And Groove Ceiling
A tongue and groove ceiling consists of long wooden boards installed side to side (tongue into the groove) across a ceiling. It looks a lot like hardwood floors. The boards are typically secured to the ceiling joists with trim nails. One nail per joist. I use at least an 18 gauge 2″ nail. You can also glue the wood planks to the joists for even more support. This is a good way to install tongue and groove ceilings if your planks are wide, long and heavy. The planks can be any type of wood. The most common is pine but I’ve installed oak, cedar, poplar and maple. Pine is great if you’re painting the tongue and groove ceiling white. Poplar or maple looks fantastic with a light or grayish stain or just a clear coat. Oak works really well when you want a deeper rich looking stain.
Tongue and groove ceilings are often refereed to as T&G. One side of the board has a tongue and one side has a groove. The tongue from the first board sits inside the groove of the next. Boards butt up to one another as they run across and cover the ceiling. It’s a great way to add natural wood elements to a home and a lot of style points. Tongue and groove is definitely an upgrade from the usual drywall ceiling. And they’re not that expensive. But I’d advise using them sparingly and not in every room.
Tongue and groove ceilings can be installed inside or outside. However, if you use them outside you’ll have to weatherproof them or use a wood that’s naturally weather resistant like cedar.
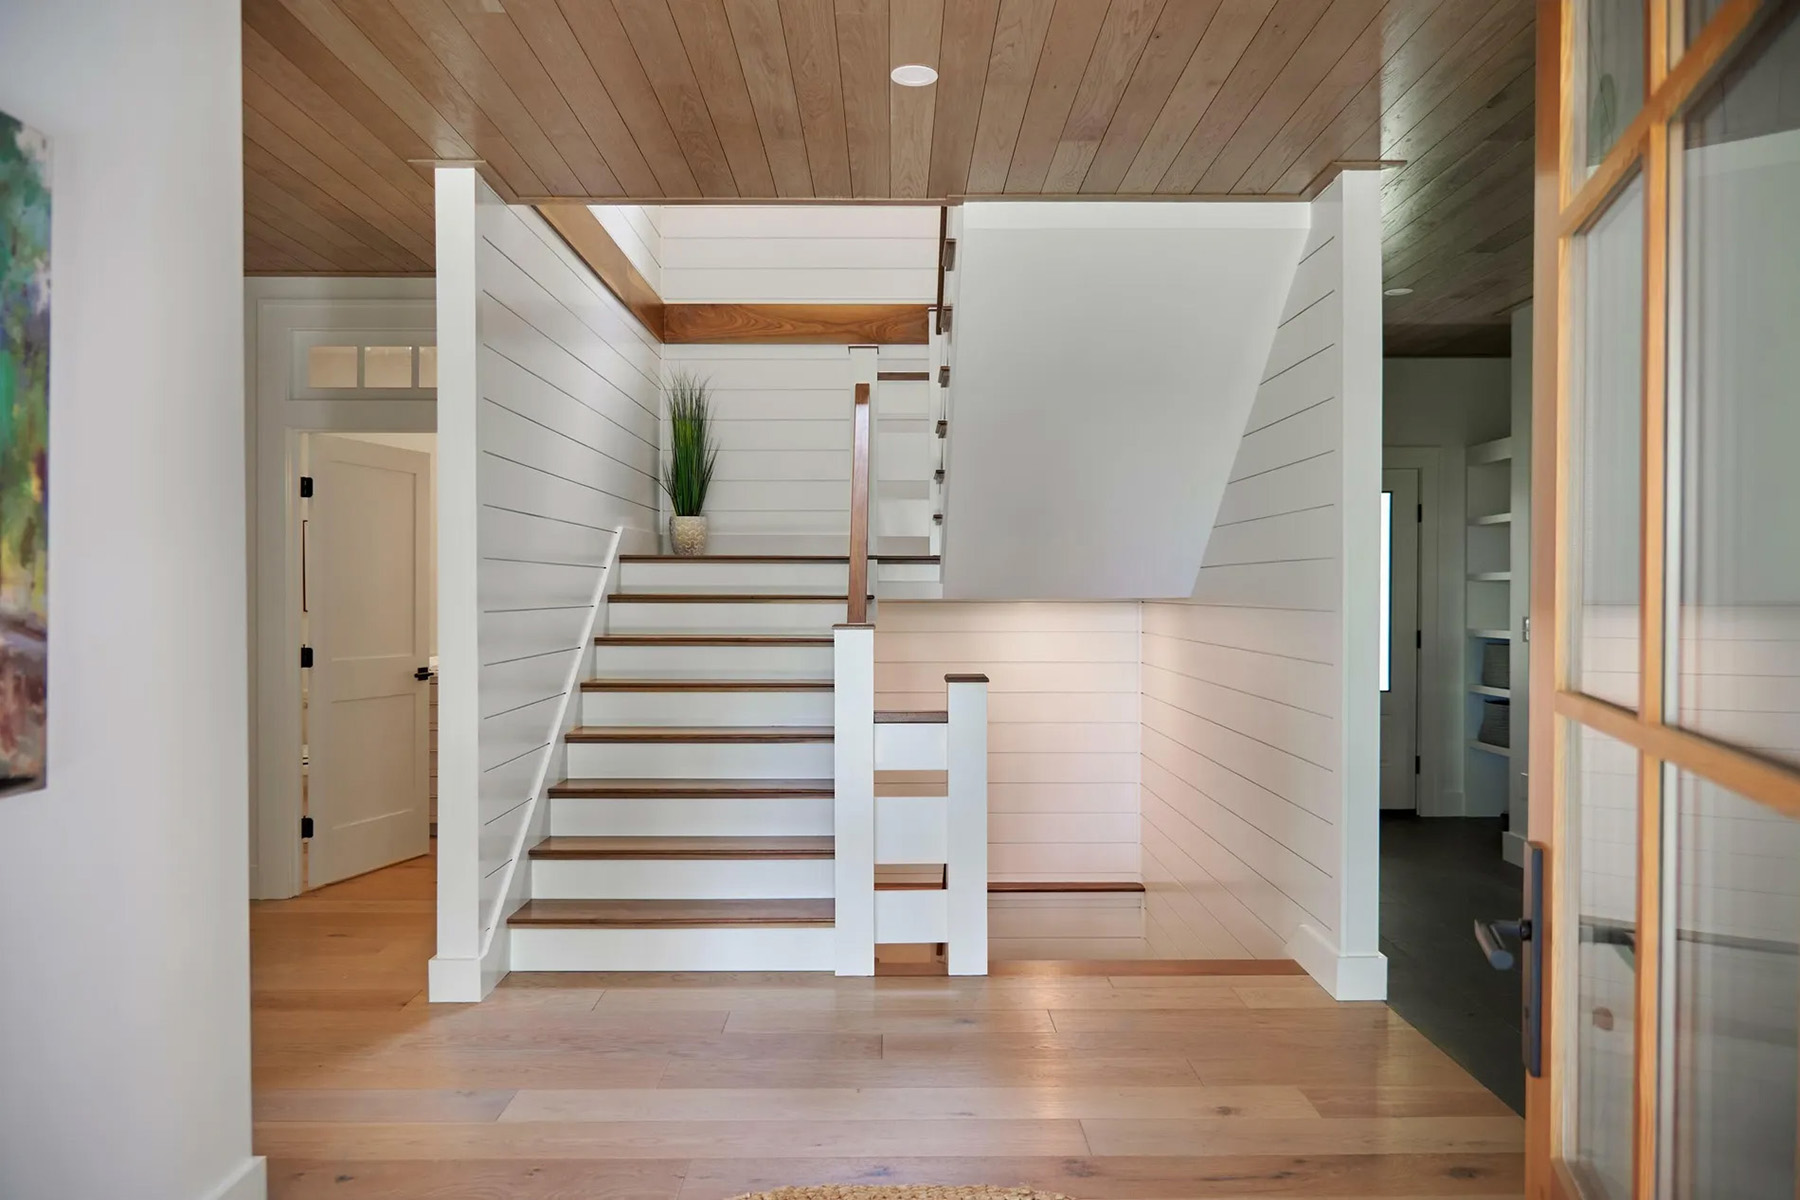
Tongue and Groove wood ceiling stained natural with recessed lighting and white shiplap walls. Matching wood floors and stairs.
How To Install Tongue And Groove Ceiling
Installing tongue and groove boards on a ceiling is easy and makes a great DIY project.
Drive nails in the tongue side of the board. The next board’s groove slips over the previous planks tongue and hides the nail. This creates a clean finish without nail holes.
Nails should never be driven through the face of the wood where you can see them unless you’re painting the planks. In this case, holes can be filled with Bondo and sanded smooth prior to priming. But in my opinion this is a wasted step. Use glue if you need more support.
Tongue and groove ceiling planks should always be nailed across the joists. If you want to run them in the same direction as your joists, you’ll have to install blocking first. These boards are also called sleepers. If you get lucky, tongue and groove boards will be long enough to span the entire width of the room without seams.
Tongue and groove ceilings can be installed by yourself, but it’s easier with help. Measure and cut each plank so it fits tight with neighboring boards or walls. Joints should fall on the center of ceiling joists or roof rafters if your ceiling is cathedral or vaulted.
The hardest part about installing a tongue and groove ceiling is the layout and getting the first board perfect. If the first board is installed squarely, the other boards will follow and you’ll stay on track when you get to the other side of the room. However, if the first board is on even a slight angle, when you get to the other wall your mistake will show
Make sure the joints to fit tightly and keep the rows in straight lines so they remain parallel to the walls on both sides of the ceiling.
Pro Tips
I’ve built dozens of tongue and groove ceilings in all sorts of designs and used just about every type of wood. Here’s a list of tips that I think may help you with yours. Especially if it’s your first time doing one.
- Always keep the end planks symmetrical. Measure and layout the tongue and groove ceiling before you start installing planks. You want the same size plank on each end of the ceiling. Take the total length of the ceiling and divide by the width of your planks. If you don’t end up with an even number you’ll have to rip boards. Don’t install a full plank at one end and a small piece on the other.
- Make sure the first board is perfectly square with the opposite end of the room. This can be hard if the room isn’t perfectly square. If your room isn’t square, you’ll have to make up the difference as you go. To do it, I make every few rows slightly off until I hit square. If the variance is 1/16th to a 1/32nd you can’t see it. If you do it right, by the time you hit the far wall you’ll be square.
- Make sure the depth is set properly on your nail gun. Driving nails too deep will give you a week hold. Too shallow and the groove may not fit over the tongue.
- Check to make sure your joists or rafters are level. If one sits lower than the rest you’ll see the bow when you install your tongue and groove boards. With drywall you can hide these small imperfections by feathering the spackle but you can’t with wood.
- Be careful when you cut the butt ends so they fit tightly to one another.
- Glue the planks in place to help with expansion and contraction. It holds better than just a nail.
The Tools Needed To Install Tongue And Groove Ceiling
The tools I use to install a tongue and groove ceiling are all used for basic woodworking. Here’s a list.
- Tape Measure Or Laser: Careful measuring is important. Make sure the planks stay square and in straight lines with the outer walls by measuring. And keep those butt joints tight. If possible, I always bring a tape long enough to measure the room end to end. For really large rooms I bring a laser.
- Pencil: Mark the boards lightly with a standard pencil. If you’re staining the planks, pencil marks can easily be erased or sanded off.
- Saw: I use a chop saw but any saw will do. You could even cut the planks by hand if you have a jig. I like to bring a table saw for ripping planks and a jig saw to cut around things like light fixtures.
- Nail Gun: I use a regular or angle nail gun with 18 gauge 2 inch trim nails. But you could also use a hammer and nails.
- Caulk Gun: If you’re gluing the planks, I recommend using adhesive in a caulk tube. Liquid Nails works great.
- Speed Square: I always bring a speed square to help cut edges and calculate angles.
- Sand Paper: Whenever I work with wood I always bring some medium grit sandpaper. It comes in handy for all sorts of issues.
- Pliers: I always bring a pliers just in case a nail doesn’t go in right and needs to be removed.
- Hammer & Nail Set: These come in handy if a nail doesn’t shoot in at the correct depth.
- Ladder or Scaffold: Installing tongue and groove ceiling means working up high.
These are all for installation, other tools will be used to finish the ceiling. I’ll discuss those later in the article.
How Much Does A Tongue And Groove Ceiling Cost?
Tongue and groove ceilings look beautiful and are actually pretty affordable. Materials can cost anywhere from $2.50-$5.00 per square foot depending on what you choose.
If you’re on a tight budget, consider using knotty pine. It’s a cheaper wood and still looks great. Knotty Pine costs around $2.50 per square foot. For a typical 20×12 living room that’s about $600 to $1,200 for materials. Add another $20 for nails and glue if you need it.
Labor is a big savings if you install the tongue and groove yourself. If you hire someone to do it, a single room can easily cost $750-$1,000 just for installation. Then you’ll also have to pay for finish work like staining or painting. Installation typically costs around $2.50 to $10.00+ per square foot. This depends a lot on the difficulty of the ceiling, how high it is, the angle and design of the tongue and groove.
Keep in mind that installing a tongue and groove ceiling yourself takes tools and a ladder or scaffold. This is part of the reason installation costs can be high because carpenters generally supply all the tools and equipment needed to do the job safely and with high quality.
Some wood species, like cedar or oak, will cost you more than yellow pine or spruce. Each species of wood takes stain a little different. You should always decide on a look first and then select the right wood. If you’re painting the ceiling, you can get away with cheaper wood than if you’re staining.
If you’re painting the ceiling, it doesn’t matter as much which species of wood you use. Just make sure to buy a wood that’s smooth. The smoother the wood the better your paint will look.
Finish Work
Installing tongue and groove isn’t a messy job, especially compared to drywall. But most ceilings are finished with paint or stain. This means you’ll need some tarps and other finishing tools.
Tongue and Groove ceilings can be left natural, stained, or painted. Each method gives a completely different look.
The first thing you should do is fill all your nail holes and gaps. However, if you took your time when installing the boards you shouldn’t have any.
Around the edges of the ceiling where the planks meet the walls, many people install some molding. This hides where the tongue and groove butts up to the wall. Typically this is finished in the same way as the ceiling.
Many people finish the boards before they’re installed. This makes it easier because it can be hard to paint or stain inside all the grooves. It’s also easier to finish wood on the ground instead of up high. The higher you go, the harder and less safe the job usually is.
If sanding is involved, do it before you install the boards. Otherwise you’ll get sawdust all over yourself and the house.
To apply paint or stain after the ceiling is installed, use a roller or paint brushes. If your finishing the planks before installation, I recommend a sprayer.
Finishing Tools
Here’s a list of finishing tools you’ll probably need.
- Tarps: Whether you’re finishing the tongue and groove boards after or before installation, you should always tarp the area.
- Rollers & Brushes: Paint, stains and sealers can all be applied with rollers and brushes.
- Sprayer: I recommend using a paint sprayer if you’re finishing the planks before installation.
- Sander: Use a medium grit sandpaper to get rough spots smooth. It’s also useful to sand down fillers or spackle.
- Fillers: If you’re painting the ceiling I recommend Bondo for the joints and nail holes. For stain, I make my own filler out of wood glue and sawdust from the ceiling wood. This ensures the stained filler will match the color of the wood.
- Caulk or Spackle: If the walls aren’t perfect, a little caulk or spackle can help hide imperfections around the edges.
Tongue & Groove Ceiling Installation Step By Step
Installing a tongue and groove ceiling isn’t that hard to do. All you need are woodworking tools and a ladder or scaffold. A typical room takes a day or two to complete. Then you’ll probably spend another day or so finishing the ceiling with stain or paint. If you finish the wood prior to install it’s a bit faster.
Step 1: Determine the direction your ceiling joists are running.
Knowing which direction your ceiling joists are running is very important. The tongue and groove planks are installed in the opposite direction of the joists. Each board must lay across multiple ceiling joists. Butt ends should always land in the center of the joist.
This is easy if the ceiling is open but many people install tongue and groove over drywall. In this case, get a good stud finder.
You can also install tongue and groove on an angle but the same installation rules apply.
Step 2: Measure and cut.
Measure the room before you cut anything. If you measure the ceiling from wall to wall at different points, you’ll be able to tell if the room is square or not. If it isn’t you’ll have to adjust the boards a little to make them square.
Once you know if the room is square or not, figure out how many rows of planks you need to install the cover the entire ceiling. If you don;t land on a full plank, start with a rip. What you want are two equally sized pieces at each end of the ceiling. Not a big piece on one end and a small one at the other.
If you’re using molding to hide the edges, it’ll be easier to cut the planks. I usually cut them about 1/4″ short to make them fit easier. You can’t see that they’re a little small because that’s what the trims for. But if you’re not hiding the edges, you’ll have to cut each board perfectly. So take your time measuring.
Measure the ceiling and start cutting planks.
Step 3: Install the first board.
The first board is the most important because all your other boards run off this one. If the first board is right, your other planks will follow.
Use 18 gauge nails to secure the boards. Drive a nail or two through the tongue and into the joist. I usually use some glue for the first board because it doesn’t have support at both ends. If I’m painting the ceiling, I also drive a nail through the face to help hold the first board in place. However if I’m staining, I install a temporary 2×4 on the wall to hold the plank.
I generally use 2” nails because they provide a strong hold and are long enough to go through drywall if it’s there.
Drive nails at different angles to increase holding power. I almost never nail straight into the joist because the weight of the ceiling can pull the nails down. By nailing at different angles the chance of a nail coming loose is reduced.
If you always nail through the tongue, you won’t be able to see the nails because they’re hidden by the next board’s groove.
Step 4: Install the next boards.
Push the next board’s groove onto the first board’s tongue. This isn’t always easy so you may need to tap the board into place. Don’t hammer the wood plank directly. Instead, cut a wood block. Place the block next to the board and hammer the block. Hammering the block will bang in the plank without damaging it. If damage occurs it’ll happen to the block instead.
Sometimes you have to work the board in gradually. Start at one end and tap along the board every few inches from end to end until the entire plank slips over the first. Once the second board is in all the way, nail the tongue.
Make sure the board is fully in place, if not the planks can start to run off square.
Take measurements from the wall to the end of the plank every so often to make sure you’re staying square.
Long plank can be hard to install by yourself. I recommend getting some help if your boards are longer than 8 feet.
Never install two butt ends in line on the same joist. Always stagger the joints by at least two or three joists.
Keep installing boards until the ceiling is done.
Step 5: Install the last board.
The last board is tricky because you won’t have a tongue to nail through.You have to slip the groove end over the tongue as usual but how do you secure it to the joists?
Here are a few ways to do it.
- If you’re painting the ceiling, nail through the face. Cover the nail holes with Bondo and sand them smooth. Then prime and paint.
- If you’re staining the tongue and groove ceiling, secure the last board with glue. This leaves a much cleaner finish. Use a temporary 2×4 nailed to the wall to support the last plank as the glue dries.
You won’t be able to tap the last board in place because it’s up against a wall. If it won’t go in use a pry bar. Pry against the wall for leverage. But don’t put the pry bar right against the wall. Use a block instead. Prying against drywall or plaster can damage the wall and/or the paint.
Step 6: Trim the ceiling’s edges.
Once you’ve finished installing all your tongue and groove ceiling planks, it’s time to trim around the edges. This is a totally optionally step but most people do it.
Crown molding works great but these days styles are simpler. A simple 1×3 work great. Nail the edge trim into the wall studs with the same 18 gauge nails or glue them in place. If you choose to glue them, use some 2×4 blocks nailed into the studs to temporarily support the trim while the glue sets up. Once the glue hardens, remove the temporary blocks and patch the walls.
Step 7: Finish the tongue and groove ceiling with paint or stain.
The jobs almost done. All your tongue and groove ceiling boards are installed and the trims in. If you didn’t pre-finish the planks before installation, now’s the time to do it.
Pros & Cons Of Tongue & Groove Ceilings
Pros
- Tongue and groove boards are light and thin which makes them easier to install by yourself.
- Good looks.
- Versatile style. Tongue and groove ceilings look great in just about any home.
- An upgrade from drywall but use them sparingly.
- Affordable.
- Can be installed over drywall.
- Lots of finishing options.
Cons
- Difficult to paint because of the grooves. You can’t just roll them like a flat ceiling. Grooves need to be brushed or sprayed.
- Wood is not as sound proof as drywall.
- Wood doesn’t provide as much protection in a fire as drywall.
- Since tongue and groove is wood it can expand and contract. Gluing the planks in place can help with this.
What Kind Of Wood Is Used For Tongue And Groove Ceiling
Just about any wood plank can be used to make a tongue and groove ceiling. The most popular wood is pine, but they also come in cedar, oak and spruce.
Any wood board can be turned into a tongue and groove plank with a router. Use the router and different bits to create the groove and tongue ends.
My personal favorite is poplar or maple. The color is neutral and subtle which works really well in a variety of homes. Especially the white and black or Modern styles so popular at the moment. Not many people are installing dark or red woods these days. Those styles work better with oak or cherry woods.
Can Tongue And Groove Ceilings Be Put Up Without Drywall?
Yes, tongue and groove ceilings can be installed without drywall. The planks are nailed or glued directly to the ceiling joists or rafters.
Generally there’s no code requirement forcing you to install a layer of drywall under the T&G. But in some cases an air barrier may be needed or it might be required by fire code. In some cases two layers of 5/8th inch drywall is needed to pass fire code. In this case the T&G would be installed after the drywall.
To be sure, check with your local building department. Every situation and township is a little different.
Tongue And Groove Ceiling Gallery
Here’s a small gallery filled with some of my favorite tongue and groove (T&G) ceilings.

Thin tongue and groove ceiling stained a light brown with darker crown molding.

Stained tongue and groove vaulted ceiling with exposed wood beams.

Thin exterior tongue and groove ceiling stained dark brown.

Exterior porch T&G ceiling painted white.

T&G kitchen ceiling painted white with square recessed lighting.

Thin T&G sunroom ceiling with a natural finish.

T&G sunroom ceiling with exposed wood beams.
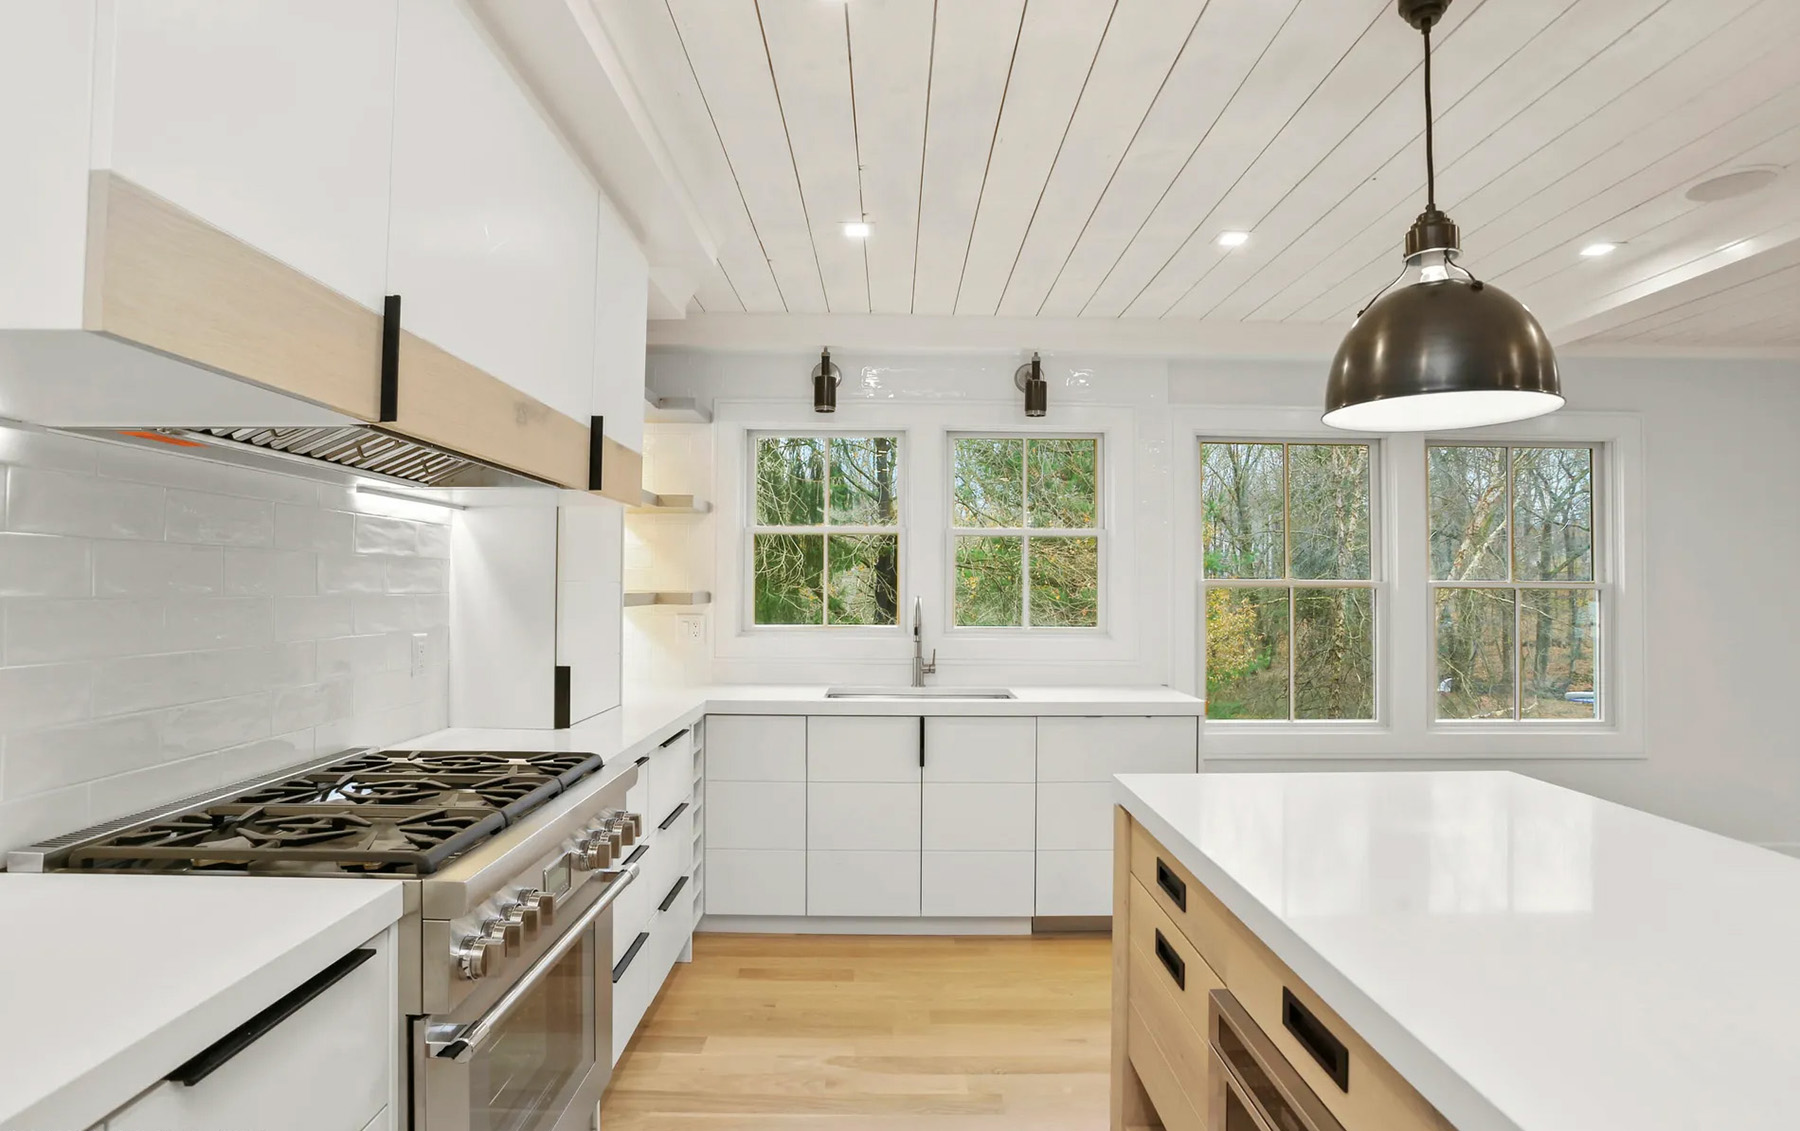
Tongue and groove kitchen ceiling painted white.
Summary: What Are Tongue And Groove Ceilings
A tongue and groove ceiling consists of long wooden boards installed side to side (tongue into the groove) across a ceiling. It looks a lot like hardwood floors. The boards are typically secured to the ceiling joists with trim nails. One nail per joist. I use at least an 18 gauge 2″ nail. You can also glue the wood planks to the joists for even more support. This is a good way to install tongue and groove ceilings if your planks are wide, long and heavy. The planks can be any type of wood. The most common is pine but I’ve installed oak, cedar, poplar and maple. Pine is great if you’re painting the tongue and groove ceiling white. Poplar or maple looks fantastic with a light or grayish stain or just a clear coat. Oak works really well when you want a deeper rich looking stain.
Tongue and groove ceilings are often refereed to as T&G. One side of the board has a tongue and one side has a groove. The tongue from the first board sits inside the groove of the next. Boards butt up to one another as they run across and cover the ceiling. It’s a great way to add natural wood elements to a home and a lot of style points. Tongue and groove is definitely an upgrade from the usual drywall ceiling. And they’re not that expensive. But I’d advise using them sparingly and not in every room.
Tongue and groove ceilings can be installed inside or outside. However, if you use them outside you’ll have to weatherproof them or use a wood that’s naturally weather resistant like cedar.
If you have any questions or comments about tongue and groove ceilings, email any time.