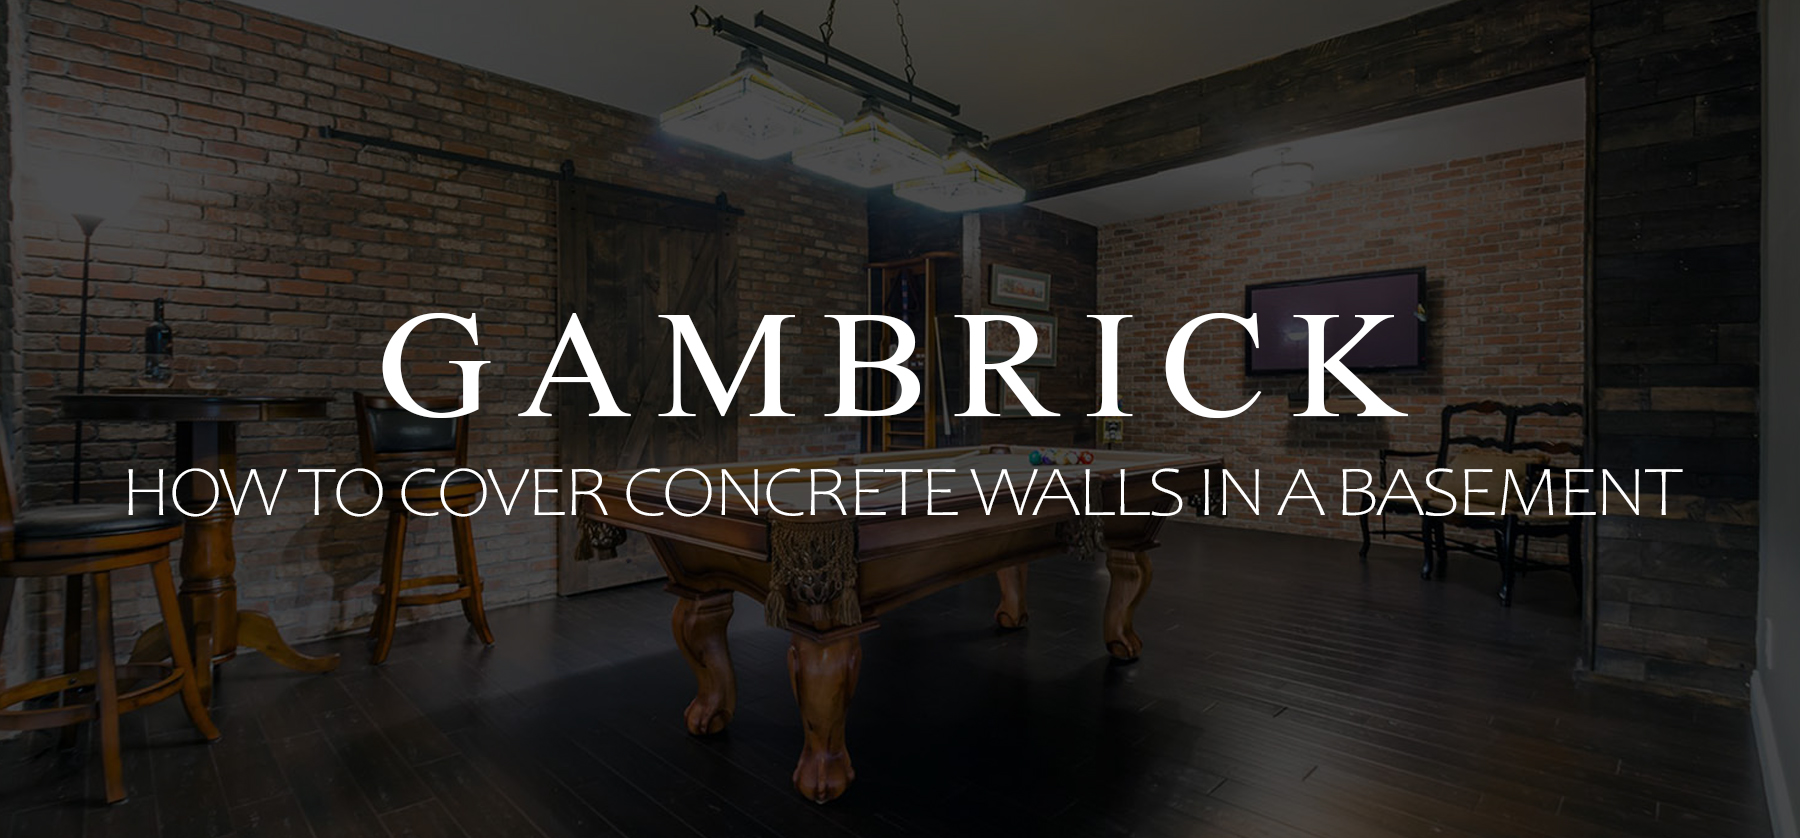
How To Cover Concrete Walls In A Basement
Most basements are built with either poured concrete or stacked cinder block walls. If you plan on finishing your basement then you’ll probably want to cover those concrete walls with a more attractive finish. So what’s the best way to cover concrete walls? What are your options and which materials work best. Can it be done cheap or does finishing concrete walls cost a fortune? How do you do it safely so that mold or mildew doesn’t grow behind the new finish.
The most common way to cover concrete walls in a basement is drywall. This involves sealing the concrete, installing a wood frame, insulating and then installing and finishing the drywall. But there are lots of other options. Things like wood paneling, stone and brick veneer, fabric, vinyl, tile or a cement parge coat all work great. And concrete wall finishes can be used in combination. There’s no reason to choose just one. Prices will vary greatly based on the type of material you use and who does the work.
Finishing a concrete basement wall can be done as a cheap DIY project or a very expensive undertaking that requires a professional’s help. If done right, a finished basement can transform a home by giving you another floors worth of living space. And it typically provides a nice ROI.
Before finishing your walls, consider how you’ll insulate a concrete wall, because once you finish the walls, it will be much harder to do.
Ahead we’ll take a look at all the most common methods we use to cover concrete basement walls along with some tips, builder tricks and pricing info.
Before You Finish The Walls
Before you begin finishing your concrete basement walls with any material, be sure to check for humidity and moisture inside the walls and the basement in general. It’s very bad to lock in moisture because once the walls are covered it’s trapped. This locked in moisture could eventually lead to mold growth.
Never finish the basement walls until everything is dry. Air flow and temperature control are the best ways I know to dry out a wet or damp basement. Try a de-humidifier and some fans to bring in fresh air that will dry moisture out. Heaters or air conditioners could also be used to regulate temperatures depending on what your basement needs to correct the problem.
If water consistently comes in through the concrete walls no matter what you do then you may have a problem outside the wall. In these cases there’s not much you can do from the inside. You’ll have to seal the wall from the outside.
If the concrete is freshly poured and still needs to cure, you should wait at least a month until the curing process is done.
Never finish a concrete wall until the concrete is completely cured and dry.
Before choosing a finish, consider the best ways to clean concrete basement walls. Each type of finish has different maintenance requirements. In many cases, it’s best to simply paint your concrete walls because it’s cheap, looks great, and is easy to maintain.
Drywall
The most common way to cover concrete walls in a basement is drywall, a.k.a. sheetrock. Drywall comes in panels panels made from calcium sulfate dihydrate or “gypsum.” Panels come in different thicknesses and sizes, the most common being 4′ x 8′ x 1/2″ thick.
Drywall panels come in a few different types which are noted by color. I like to use green drywall in a basement because it’s moisture resistant. This makes it better at preventing the growth of mold or mildew inside the wall. Below is a list of general steps to install drywall over a concrete wall.
- The first step to cover a concrete wall is to seal it. Concrete is porous and absorbs water like a sponge. This moisture can lead to mold and mildew growth. A good sealer can block the pores and prevent moisture from getting through. I like Drylok paint the best.
- Build a frame out of wood or metal. This frame can be secured right to the concrete wall or be built away from the wall.
- Fill the cavities with insulation. This can be batt or spray foam. Insulation helps regulate temperature and humidity levels.
- Hang the drywall by screwing it to the wood.
- Spackle and sand as needed.
- Paint or finish the drywall as needed.
Another way to install drywall is using furring strips with foam. This option preserves floor space by using thin strips instead of 2x4s. However, this method doesn’t leave room for electrical or insulation.
Drywall is a good way to cover concrete walls in a basement and is by far the most common method we use.
Most drywall installations also require wood trim around windows and doors as well as base and paint.
Shiplap
A great and very stylish way to cover concrete basement walls is with shiplap. You can install it either vertically or horizontally over a wooden frame. Just like with drywall, a frame should be built before installing the shiplap. The frame can be built and screwed right to the concrete or off the wall a bit. I prefer to build my walls about an inch or so off the wall. This bit of space is enough to allow air flow which can dry out dampness if moisture collects.
I prefer using wood for my basement walls but metal studs work too. Both materials allow enough space for plumbing and electrical lines to be run.
Make sure to seal the concrete before building the frame. This is an important step because you don’t want moisture collecting behind the wall. This could lead to mold and mildew growth.
I recommend insulating inside the wall cavities before installing your shiplap. This helps regulate the temperature inside your basement.
Once all your rough prep work is done start installing the shiplap. It’s very simple to do, I like to use one 18 gauge straight finish nail per stud. The nails are tiny but are strong enough to do the job.
When installing shiplap,make sure your lines are all uniform and level. The first course is very important because all the other planks run off the first. Take your time and make sure that first board is just where you want it. Once that’s set the others are fast and easy to install.
Shiplap can be used all by itself or along side other materials to cover those unattractive concrete basement walls. It works great as an accent piece or a complete wall covering. I’ve used it both ways with great success.
Parge Coat
A parge coat is a cheap way to cover up concrete walls both inside and out. A parge coat is a thin coating of cement that’s applied over masonry walls. It goes on kind of like the frosting on a cake. When finished, it’s smooth, level and easily painted. Although the texture feels a bit rough like medium grit sandpaper.
Another word commonly used to describe a parge coat is plaster.
Like stucco, a parge coat gives the concrete a more finished look.
You can buy premixed parge mixes or you can mix your own. Store bought mixes contain Sand, Portland Cement, and Lime in the correct ratios. Unless your experienced with mixing cement products I recommend using a premix.
Below is a chart detailing the mix we use to create parge coats in case you want to give it a try.
| Material | Amount |
| Sand | 3 parts |
| Portland Cement | 1 part |
| Lime | 1/4 to 1/2 parts |
| Water | The consistency should be like peanut butter or frosting. |
How To Install A Basement Parge Coat
Add water in very slowly as you mix, and make sure not to add too much. If the material appears watery then you’ve added too much water. If you add too little the material will be too thick to spread. The consistency should be like peanut butter or frosting. If the parge coat is too thin or too thick add water or mix to level things out.
Make sure you know what texture you want in advance. A parge coat can be made smoother or grittier by adjusting the sand or adding a texture to the mix. You can also add color into the mix.
It’s very important to moisten the concrete a little before you apply the parge coat. This is because concrete absorbs water like a sponge. If you don’t moisten the concrete it will suck water out of the parge coat which makes it dry too quickly, become brittle and crack.
The first layer should be about 3/8 of an inch thick. Let it dry for 24 hours then apply another 3/8-inch coat if you need it.I prefer using 2 coats rather than just one because it helps prevent cracking.
Some masons will moisten the parge coat once a day for 2-3 days after it’s applied to help it cure. I do it sometimes but it depends on the humidity level in the basement. Generally basements have enough moisture in the air that I don’t have to add any myself.
Wall Fabric
A concrete basement wall doesn’t necessarily require building something to cover it. You can use fabric.
There are a few ways you can hang fabric to cover your basement concrete walls in all sorts of creative ways. This method is cheap, easy to do, fast and makes a great DIY project.
An easy way to use fabric is just like wallpaper. Fabric sheets can be rolled out and glued right to the concrete.Liquid fabric starch, which you can create at home with just some corn starch and water,makes a great all natural glue if your fabric is light weight. But if your using a heavier fabric buy some wallpaper glue and roll it on.
Here’s how to make the glue at home.
- Pour 1 tablespoon of corn starch into 1/4 cup of cold water.
- Bring 4 cups of water to boil.
- Pour the mixture of corn starch and water into the boiling water.
- Cook mixture for 1 minute.
- Pour the mixture into a spray bottle.
Another way is to hang fabric from rods like curtains.
You could glue, tape or staple the fabric onto permanent light wooden wall frames instead of drywall.
You could also build moveable panels covered with fabric that can be adjusted as needed. I really like this option. It allows me to be more creative and flexible with the look. I can also place the panels far enough from the walls to allow for some storage. Removable panels also makes it easier to clean the fabric.
No matter what option you choose, make sure the fabric doesn’t get wet. This is another area where mold and mildew could grow.
Wall Vinyl
Vinyl is a thin, flat material that’s printed with all sorts of colors and designs. Most people are familiar with vinyl flooring but that same material can be used to cover a concrete wall.
Smooth surfaces are easier to apply vinyl too because it’s attached with glue. If your concrete has a textured or bumpy surface then you’ll need a special type of vinyl called Graphic Film that’s made for uneven surfaces.
When using vinyl on concrete you should always use something heavy duty. Stay away from cheaper vinyl because it tends to be thin and flimsy.
The concrete walls should be cleaned before any vinyl is applied. If there are bumps in the wall you can sand or grind them flat. The flatter the wall the better your vinyl will look.
If it’s installed correctly, vinyl can give your concrete walls a nice look without having to spend a fortune. Vinyl rolls are fairly cheap and come in hundreds of patterns and colors.
- Cut your vinyl sheets to size with a knife and straight edge.
- Smooth the concrete walls with sanding tools if needed.
- Fill holes in the concrete with cement.
- Make sure the surface is clean before applying vinyl. Brush away dust and wipe the wall down with a damp cloth.
- Treat the concrete walls with primer and allow it to dry completely.
- Apply glue.
- Roll the vinyl onto the wall. Make sure to press firmly and smooth out bubbles. I like to use a squeegee.
- But edges up as perfect as you can. Make sure to use enough glue at the edges because they tend to curl.
- Make sure when joining two sheets of vinyl together that the patterns match.
Covering a concrete basement wall with vinyl is pretty easy and makes a great DIY project.
Stone Veneer
There are two types of stone veneers to choose from, real stone or cultured.
Cultured stone is fake stone made from cement and colored to look like real stone. It’s the cheaper of the two. Real stone veneer is slices of actual stone.
Since cultured stone is man made it comes in a limited number of shapes, sizes and colors. On the other hand, real stone veneer is actually made from real stone so there are a lot more options.
Cultured stone is easier to install because most designs come with about 9 different stones that you install in a preset pattern. As long as you follow the pattern your stone will look great. However real stone has no pattern because the stones are all real. The shapes are varied so you have to create the design yourself. This takes a lot more time and effort but looks more natural.
Stones are stuck to the concrete wall with Type-N mortar. This is a sticky mortar that dries with a strong bond.
You can use stone veneer to cover all your concrete basement walls but I like it better as an accent. Try installing it in the back of a bar or as an accent wall. Make sure to not only consider the color stone you want but also the size and style. Stone veneers come in rounded shapes that are more rustic or angular designs that are more modern. Some have wide grout lines and some none at all. When it comes to stone veneer you’ll find hundreds of designs, colors, shapes and options. However the installation instructions are exactly the same.
How To Install Stone Veneer To A Concrete Wall
- Place the stones in the desired pattern on the floor before the wall. You may need to trim real stones to make them work since the shapes are varied.
- Clean the stones and wall.
- Mix your mortar until it looks like peanut butter.
- Apply half an inch of mortar to the back of a stone and stick it firmly to the wall.
- Push hard enough that some mortar comes out the sides.
- Remove excess mortar at the edges before it sets.
- As you install more stones make sure the joints are uniform in size.
- Once finished, apply the cement grout.
- Use a grout tool to shape a nice clean grout line.
- 4 or 5 weeks later apply a stone sealer.
Brick Veneer
Brick veneer is installed just like stone using Type N mortar. But brick is more precise. Most stone veneer designs are random with all sorts of shapes and sizes. Especially if your using real stone. But brick is uniform. Each brick needs to be set in the right position with matching grout lines.
Brick can be installed right on a concrete basement wall as long as there aren’t any bumps. Stone typically has different thicknesses so a bump here and there wont be as big an issue. And stone uses thicker mortar because it’s heavier, which can even out the bumps. However, bricks use a thinner layer of mortar and the faces all need to be uniform, so make sure the concrete is flat before you install your bricks.
You can use as little as a 1/4 inch of mortar to install brick veneer. Smear the mortar onto the back of the brick and then stick it to the wall or smear the mortar onto the concrete and then stick bricks too it. This method is similar to installing wall tile. Both work fine.
Take measurements and snap level chalk lines to give you a guide to follow. This will help you stay on track and keep the bricks level and uniform. I recommend using a tool to keep joint spacing even. You can buy brick jointing tools at any Home Depot.
If you don’t want to snap lines then buy a brick veneer system. Brick systems come with guides that screw into the concrete wall. Once the guides are hung the bricks are installed on the guide. This ensures all your spacing is correct.
Once all your bricks are installed use cement to fill the joints and a tool to shape them.
Fiberboard Wood Paneling
Fiberboard is a type of engineered wood paneling that’s made out of wood fibers.
There are three types of fiberboard: particle board or low-density fiberboard (LDF), medium-density fiberboard (MDF), and hardboard (high-density fiberboard, HDF). The most common type of fiberboard used to cover cement walls is MDF.
MDF is a great product because it’s very flat, smooth and hold paint really well. All sorts of wood like products are made from MDF including trim and cabinetry.
The majority of cabinets have MDF flat panels instead of real wood. This is mainly because MDF doesn’t expand and contract like real wood does. Since the panels don’t expand and contract, the paint stays like new for longer and doesn’t crack at the edges.
Since MDF and other fiberboard panels don’t expand and contract like wood, they’re great for covering concrete walls in a basement. Basements tend to be damper and cooler than living space but that doesn’t effect fiberboard.
- Apply a concrete sealer to the entire concrete wall before installing paneling. This is a very important step and shouldn’t be skipped because moisture behind the panels could grow mold.
- Cut the paneling to the size of the concrete wall. I recommend leaving at least 1/2 inch of space between the floor and paneling. You can cover the gap later with base trim.
- Apply adhesive to the back of the panels and then stick them to the concrete. Liquid Nails makes a great adhesive specifically made for paneling.
- Press the panel firmly and evenly against the concrete.
Paint Or Stain
Painting or staining concrete is another great option for covering up your concrete basement walls. Keep in min that paint or stain can be used on poured concrete, block or over a parge coat.
The main difference between painting and staining concrete is that paint is a surface coat while staining soaks deep into the concrete. Stain is considered a permanent coloring but paint can be removed.
Make sure to use masonry paint which is called elastomeric paint. It’s a special type of paint that can expand and contract with the concrete.
If your staining then make sure to use a stain specifically designer for concrete. This isn’t the same type of stain that you’d use on wood.
Before you paint or stain any concrete make sure it’s clean first. If the surface isn’t clean then whatever substance is on it will be locked in permanently. Also make sure the concrete is dry.
Both paint and stain can be applied with a roller, brush or paint sprayer. The process is basically the same. I like to roll or spray large areas and use a brush for details and edges.
Stains come in either acid-based or water-based stains. Acid stains have a more natural coloring while water based has more variety. But if it’s variety you want then opt for paint, the options are almost unlimited.
Paint:
- Clean the concrete surface before painting.
- Use a sealer on the concrete before paint.
- Apply a primer.
- Paint the concrete with several thin coats.
Stain:
- Clean the concrete surface before painting.
- Apply stain.
- Rinse the concrete with water.
- If you’re using an acid stain, you have to neutralize the stain with a base like baking soda or ammonia.
- Seal the concrete after the sealant dries.
Built Ins, Shelves & Cabinets
Another great way to cover a concrete basement wall is with built ins, shelves and cabinets.
Built ins are a great way to cover a small area of concrete wall. They’re an expensive option but can make a big impact, especially when paired with a combination of finishes like brick, stone or shiplap. Use built ins strategically to highlight areas of interest like where your TV is going.
If you can’t afford the high cost of built ins then use cabinetry or book cases. You can buy floor to ceiling cabinets or book cases that can completely cover a concrete wall for much less than a built in. Secure them tightly to the wall with concrete screws and create a built in yourself without having to actually build any cabinetry. Tie together multiple bookcases or cabinets with trim work to cover large areas and create the illusion of built ins. I’ve done this many time. If you trim and paint all the cabinets to match you can’t tell they’re not all one piece.
Shelves are another way to cover a concrete basement wall. It’s simple and cheap. What matters most when using shelves is what you place on them. Concrete is actually a nice backdrop for shelves because the color is so neutral and flat. Open shelving is a great way to bring color and variety to a basement.
Tile
Tile can be used to cover concrete walls just like stone and brick veneer. We don’t use tile that often as a wall covering here in the US but overseas it’s very common. European, South American, Asian and Middle Eastern homes use tile as a wall covering to bring color and design to bland walls.
Tile can be installed directly to concrete with some thinset or mortar. Smear 1/4 inch of mortar onto the wall first and then install your tile. Adjust the amount of mortar you use based on the weight of the tile. Large, thick stone tiles like Travertine or Marble will need more support then thin and light porcelain. For an even stronger hold, apply some mortar to the wall and back of the tile as you install.
Snap level guide lines on the walls to help you keep your tiles level and uniform. Use spacers to keep grout lines uniform. When the tiles are all installed and fully dry, fill the gaps with grout.
Stone Slabs
Another great way to cover a concrete wall is with a stone slab. This is a very high end option but it’s a beautiful look.
We use solid slabs as a kitchen backsplash or to cover our countertops all the time but occasionally we also use them on walls. This is most common in the bathroom but we’ve also used them as a wall covering on several occasions. But it is very expensive so use slabs sparingly unless you have a very high budget for the project.
Slabs are waterproof and very strong. They attach right to the concrete with type N mortar just like stone, brick or tile. However you’ll need a lot more than you will with brick or stone. Slabs are heavy and need a lot of support. I like to use at least 3/4 inch – an inch.
Butt multiple slabs right up against each other tightly or include a gap that’s filled with grout. I prefer the tight look.
Artwork & Photographs
One of my favorite ways to cover a concrete basement wall is with artwork and photographs.
Concrete basement walls are typically start off gray.You can paint them if you like but gray is a nice neutral and bland backdrop for a gallery wall. I like creating a gallery wall in a basement because they tend to be a lot less vibrant than my living spaces. A bold and bright wall filled with colorful art and photographs can add a lot of life to a dreary basement. And it makes a fantastic focal point to design other elements around.
I really like to use concrete wall coverings in combination. Even if I’m using drywall for most of the basement I still like to leave some bare concrete to create an art wall. I just like how it looks. The only exception to this is if I’m insulating. Some basements need it more than others.
Using a gallery to cover a concrete wall is also a great way to personalize your basement. Most people hang some art or photos throughout their living spaces but for some reason neglect the basement. If your going to spend time down there then take the time to liven it up with some personal touches. Basements tend to feel cold and uncomfortable because of a lack of windows so use color and personal items to add warmth. These little touches can make a big difference.
Summary: How To Cover Concrete Walls In A Basement
Most basements are built with either poured concrete or stacked cinder block walls. If you plan on finishing your basement then you’ll probably want to cover those concrete walls with a more attractive finish. So what’s the best way to cover concrete walls? What are your options and which materials work best. Can it be done cheap or does finishing concrete walls cost a fortune? How do you do it safely so that mold or mildew doesn’t grow behind the new finish.
The most common way to cover concrete walls in a basement is drywall. This involves sealing the concrete, installing a wood frame, insulating and then installing and finishing the drywall. But there are lots of other options. Things like wood paneling, stone and brick veneer, fabric, vinyl, tile or a cement parge coat all work great. And concrete wall finishes can be used in combination. There’s no reason to choose just one. Prices will vary greatly based on the type of material you use and who does the work.
Finishing a concrete basement wall can be done as a cheap DIY project or a very expensive undertaking that requires a professional’s help. If done right, a finished basement can transform a home by giving you another floors worth of living space. And it typically provides a nice ROI.
If you have any questions or comments about covering concrete walls Email any time.

John Mazzuca | About | More Posts |
Custom Home Builder
John Mazzuca is a custom home designer and builder at Gambrick with over 25 years experience in the construction industry. John has designed, built and/or remodeled hundreds of homes, small buildings, and commercial projects. He writes about business, real estate, home building, and household electronics. His work has been featured in Fox Business, Better Homes & Garden, House Beautiful, and more.