What Is Lath And Plaster?
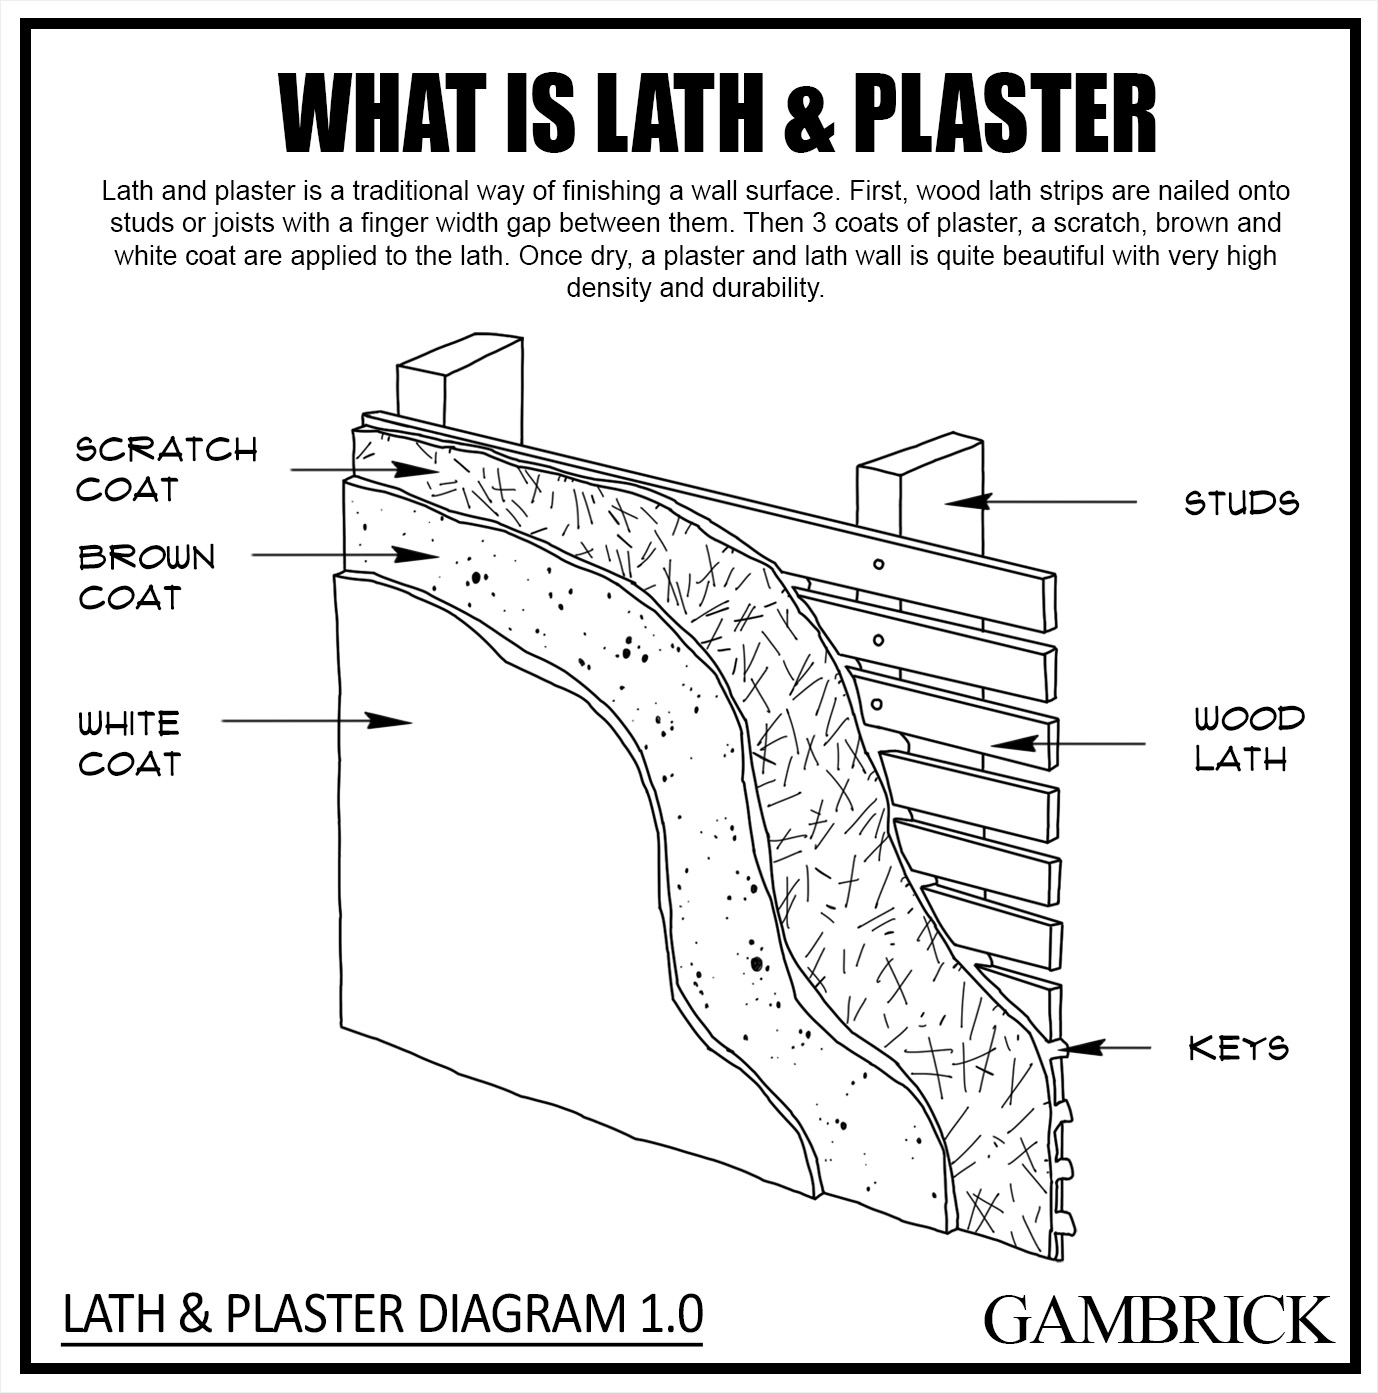
Lath and plaster is an age-old building technique used to finish interior walls and ceilings. To do it, builders first nail thin wooden strips of wood closely together to the wall studs and/or ceiling joists. They then spread multiple thin coats of plaster over the wood lath to form a smooth wall surface. As a final step, the plaster is carefully smoothed using trowels and a damp sponge. The plaster hardens over time, forming a strong bond between the lath and wall surface. It can be finished by the installer to be extremely smooth or textured depending on the look the designer is going for.
Once plaster dries, it can be painted or left it’s natural color. Ingredients are often added to the mixture to give it an extremely white color without requiring paint. This is how Venetian plaster is made.
Plaster is made by mixing sand, and cement and/or lime with water. When properly mixed it has a consistency like thick peanut butter and easily sticks to the lath. Once fully dry, it’s texture is a bit rough and it’s very dense.
Drywall panels were invented in the 1950s to replace lath and plaster because they’re easier, faster and cheaper to install. It’s not used much in Modern construction, but many older homes still use it to stay more original.
There are some big advantages to using plaster instead or drywall. The biggest being how strong and dense the material is. It’s very hard to damage, dent or scratch compared to much softer drywall.
Plaster also has great sound deadening which is an advantage in a noisy home. But due to its density, it blocks WiFi signals making wireless routers less effective.
What Is A Lath & Plaster Wall?
Lath and plaster walls are wall covered with 1-inch wide strips of wood nailed closely together followed by 3 thin coats of wet plaster. First, the strips of lath are nailed to wall studs or ceiling joists. Then plaster is applied to the lath in thin coats using a trowel. Once the final coat is applied, it’s allowed to dry for about 20 minutes before it’s smoothed with finish trowels and a damp sponge.
- Plaster can be finished in a variety of ways which includes smooth and textured.
- The texture is rough and gritty.
- Plaster walls are very dense and hard to damage.
- Because of how dense plaster is, it’s very sound resistant.
- New homes use drywall instead of plaster because it’s cheaper and faster to install.
Plaster has been used to finish walls and ceiling for thousands of years. Plaster dries to form a hard, smooth surface that can be painted or left its natural color. If you don’t plan on painting the plaster, pigment can be added to the mixture to change its color. This is how Venetian plaster is made.
Plaster and lath walls are rarely used in modern homes, however builders still use them in older homes to maintain an authentic appearance.
What Is Lath And Plaster Made Of
Lath and plaster are two different materials used together to finish a wall or ceiling surface. Lath is made from wood and plaster is a combination of sand, cement, lime and water. The purpose of lath is to provide a stable structure that the plaster can stick to. Plaster is a masonry product made by mixing sand, cement and lime with water. Pigments can also be added to change the plaster’s color. This is how White Venetian plaster is made.
- Lath is a series of thin wooden slats about 1/4-inch thick x 1-inch wide that are nailed to wall studs or joists. They create a strong and stable base for the plaster can adhere to. Spaces about 1/4 to 1/2-inch are left between slats so that plaster can ooze between the slats and grab hold. This gives the wall strength and helps prevent cracks.
- Plaster is made by mixing together sand, cement, lime and water. If you mix it correctly, the substance will feel like gritty peanut butter and will be sticky but easy to spread. When it’s applied to lath in thin coats, it will stick and dry hard. Then more coats can be spread on top of the last and smoothed.
- Colorants can be added to the plaster mix to change its color. This is how White Venetian plaster is made.
- Water is an essential ingredient is making plaster. Add too much and the plaster will be too watery to stick. But add too little and it will be brittle and weak.
You can buy plaster premixed in bags which can be mixed with water and made on site. Or you can supply your own ingredients and make a custom batch.
Different Types Of Lath
The most common type of lath is wood. But lath can be made out of a variety of materials. Each has its own pros and cons which make them better or worse for various situations.
Wood Lath
Wooden lath has been used for centuries in construction and remains a popular choice today. It’s the most popular material used to make lath and plaster walls. Wood lath is made from thin strips of wood about 1-inch wide x 1/4-inch thick. It’s nailed closed together on a wall or ceiling to form a grid-like pattern. Plaster is applied in thin coats directly to the lath and into the small seems between the wood.
When the plaster dries it creates a very strong and durable surface.
Wood lath is a versatile option that can be used for interior and exterior finishes on both walls and ceilings. It’s also the most cost-effective type of lath. However it does have some drawbacks which include its susceptibility to rot and infestation by termites if not treated correctly.
Expanded Metal Lath
Expanded metal lath is made by expanding and flattening thin sheets of metal, forming a diamond shaped pattern. It’s a strong type of lath that can hold heavy stucco, making it suitable for large-scale commercial buildings.However it’s rarely used in residential homes or as an interior finish.
Expanded metal lath has high tensile strength and can resist water damage. However, it’s costly when compared to other types of lath and can be challenging to cut.
Paper Back Lath
Paper Back Lath is made by bonding paper to gypsum. The paper ensures better adhesion and facilitates easy anchoring. It’s light weight, making it easier to install, and it can be used as an alternative to metal lath. However, paper back lath is not the most durable option because it can quickly disintegrate when exposed to moisture or extreme temperatures.
Rock Lath
Rock lath is a popular material used to create a stable and long-lasting base for plaster walls and ceilings. It’s made of thin, metal strips that are woven together to create a sturdy surface. What makes rock lath so appealing to builders is its extreme durability. Unlike other types of lath, which can deteriorate over time, rock lath can hold up in even the most demanding of environments. This makes it an excellent choice for both residential and commercial projects.
Diamond Mesh Lath
Diamond Mesh Lath is another type of metal lath that’s commonly used in plastering and stucco construction. It’s made from small diamond-shaped openings that allow better keying of the base coat material. When looking at it from afar, it looks like a screen. Diamond Mesh Lath is durable and resistant to moisture and temperature extremes. However, it’s more expensive to purchase than wood lath and can be challenging to install.
Advantages Of Using Lath And Plaster
Plaster and lath may seem like an old-fashioned building technique, but don’t underestimate its benefits. For starters, plaster walls tend to be a sustainable choice, as they’re made from natural materials like cement, sand, lime and wood. Additionally, plaster and lath provide a superior level of insulation, helping keep your home warm in the winter and cool in the summer.
Here are some additional benefits of lath and plaster:
- When plaster dries it becomes very hard, dense and durable. This is why lath and plaster walls are so much tougher than drywall. They’re very hard to scratch, cut or dent. However they are susceptible to cracking.
- Because of how dense plaster is, it offers great sound insulation. This can be a big benefit if you live in a crowded home or building.
- Lath and plaster is a beautiful finish that’s generally considered superior to drywall. It’s only due to the low cost that drywall is more popular in modern homes.
- Plaster is more fire resistant than drywall because it’s thicker and more dense.
- Lath and plaster is a higher end finish than drywall.
- Because of how thick lath and plaster walls are, they provide more insulation that drywall.
If you’re looking for a reliable and long-lasting wall finish, plaster and lath might be the perfect choice.
Disadvantages Of Lath And Plaster
For all its advantages, there are still some disadvantages to a home with lath and plaster. The biggest in modern homes being how thick and dense the plaster is. It makes running new wires or plumbing difficult and WiFi is a nightmare. It can also interfere with cell signals and Bluetooth connectivity. Plaster walls are so thick and dense, it’s very hard for signals of any kind to pass through them like they can with drywall.
- Plaster is extremely dense and hard which makes it susceptible to cracks. This is very common when the house settles.
- It’s much harder to run new wires or plumbing in plaster and lath walls vs drywall.
- Plaster and lath are more expensive to repair than drywall and there are less companies that do the work.
- It’s harder to hang pictures on plaster vs drywall because of how dense the material is.
- Plaster has a rougher and more natural appearance vs drywall which some people don’t like.
- Trim work like crown molding is much harder to install on a plaster wall than drywall.
- Lath and plaster is more expensive than drywall.
Although plaster and lath is a fantastic wall finish that’s been around for centuries, there are still some disadvantages worth considering before you use it instead of drywall.
How To Install Lath And Plaster
Installing lath and plaster takes several days because of how long it takes plaster to dry and cure. While it may seem like a daunting task, with the right steps and tools, anyone can do it. Before beginning, make sure you have all the necessary materials, including lath strips, plaster, trowels, and a mixing bucket. Start by installing the narrow strips of wood lath horizontally on the surface you want to plaster. The strips are nailed into the wall studs or ceiling joists using 1 1/4-inch lath nails. Leave a small gap of about 1/4 inch between each strip for the wet plaster to adhere to.
Next, mix your plaster according to the package instructions. Apply the first coat evenly to the lath in sections about 1/2 inch thick. Make sure to avoid air pockets.
Use a trowel to smooth and level the plaster as you work. Let the plaster dry completely before applying a second coat of about 1/4-inch.
Generally a plastered surface takes about 3 coats. The first coat is the roughest and the thickest. The second coat is a little smoother and the third coat is the finish which is generally the smoothest. However, some designers make the final coat rough for appearances. Each coat should get a little thinner than the last. If a 4th coat is needed, it’s applied very thin just to even out the surface and make it smooth.
If you’re going for a smooth surface, use a finish trowel and damp sponge on the last coat to get it as smooth as possible.
With practice and patience, anyone can master plaster and lath installation and create a beautiful, long-lasting wall or ceiling.
Here’s a step by step breakdown of how to build a lath and plaster wall.
1. Nail Lath To The Framing
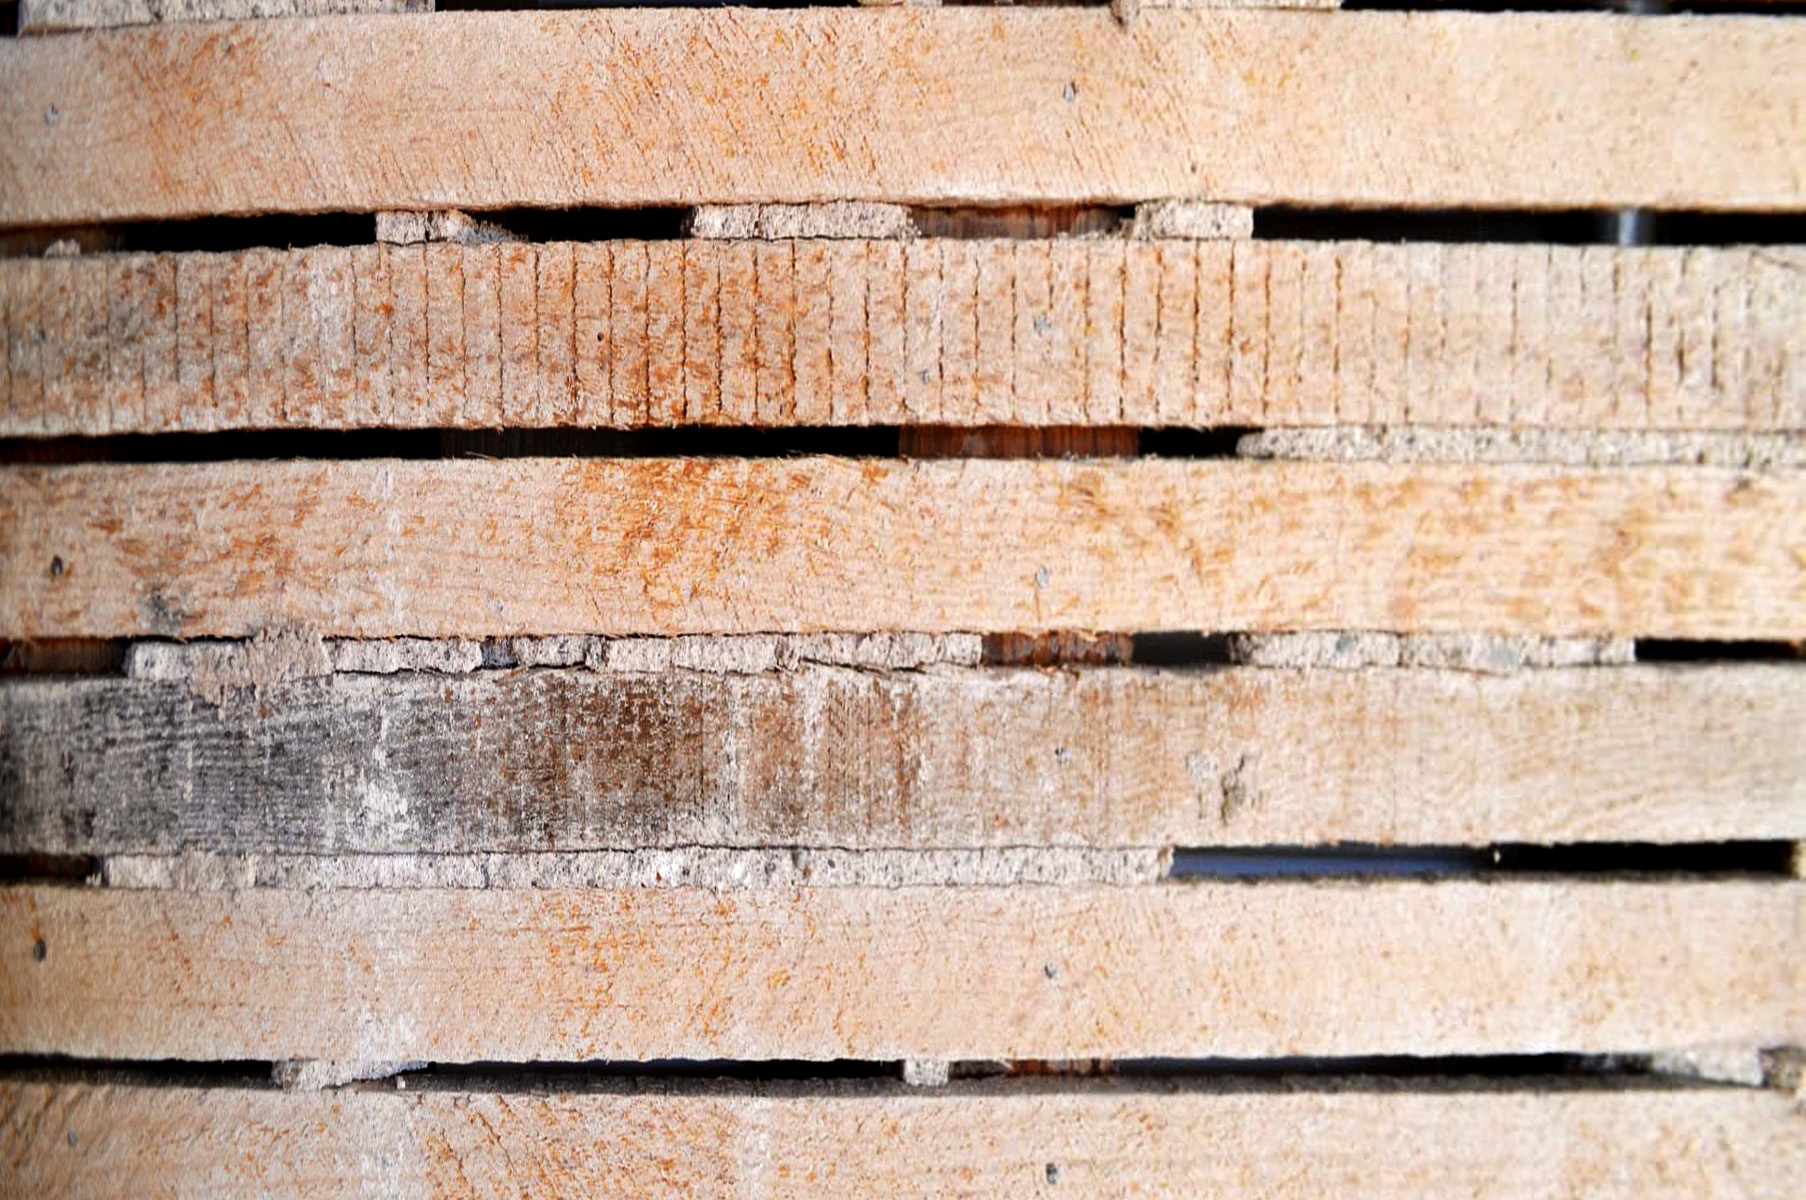
Lath and plaster can be used to finish any surface including walls and ceilings. The first step is to nail your lath to the framing with 1 1/4-inch lath nails. Run your lath horizontally against the direction of the studs leaving about 1/4-inch between lath strips. When complete, you’ll have a grid made of lath.
Lath is rough wood about 1-inch wide, 1/4-inch thick and about 4 to 6 feet long. Lath is cheap to buy because it’s unfinished rough wood of lower quality and may have knots. The more textured it is the better because it gives the plaster a place to grab onto.
When driving in the nails, make sure the nail head sits flush with the surface of the wood. Don’t have to drive them too deep into the lath because you could split it or make the hold weaker. Remember lath is only about 1/4-inch thick.
2. Mix The Plaster
Once the lath is installed, mix your plaster. I mix my plaster inside of a 5 gallon bucket with a drill and mixing tip. It’s a similar process to mixing thinset or mortar. Plaster dries out quickly so you don’t want to mix too much at a time.
Follow the directions on the plaster package carefully and don’t add too much water. Water is a secret ingredient to using plaster. Add too much, and it will be too watery. Add too little, and the plaster will be dry and brittle.
Colorants can be added to the plaster to change its color. This is an important step to consider if you’ll be leaving the plaster its natural color rather than painting it. When white color is added to the mix in addition to other white ingredients, like white sand, you can create Venetian plaster.
3. Apply Plaster
Use a trowel to apply a 1/2-inch first coat onto the lath. Try to keep the plaster even. Apply pressure to work plaster into the gaps between lath strips.
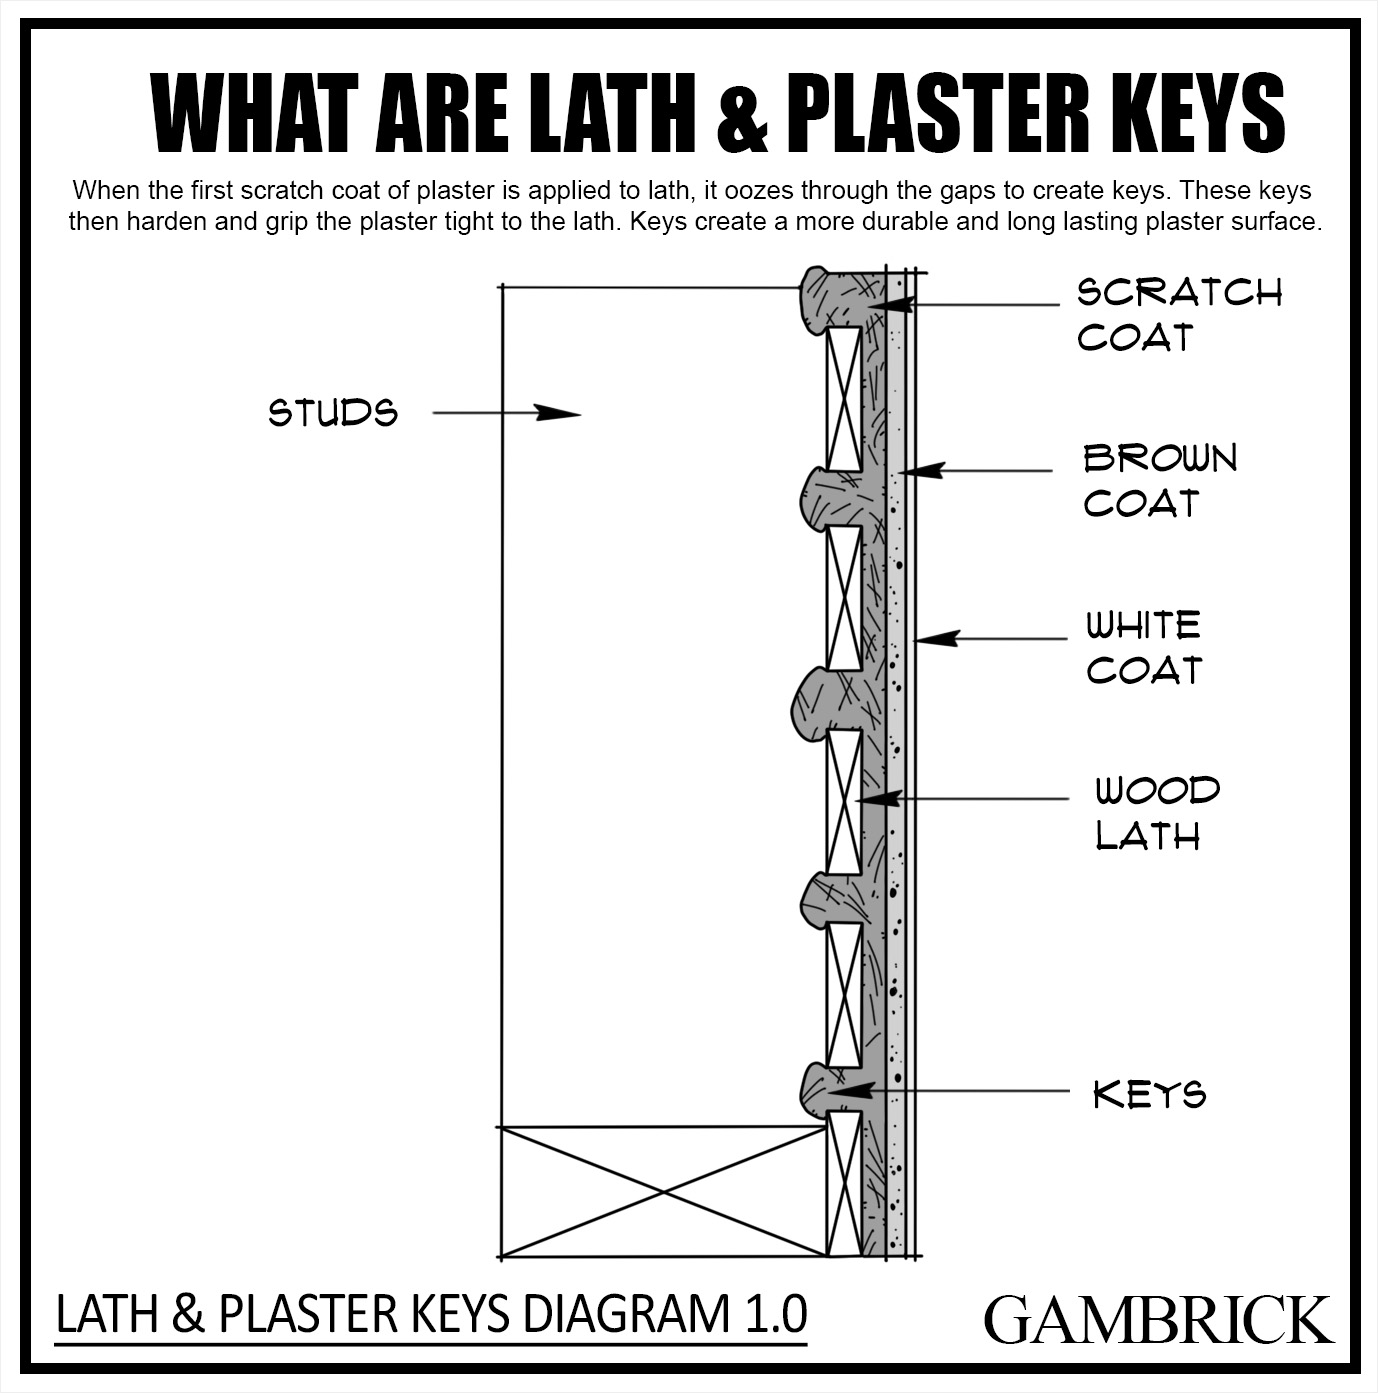
Plaster is typically applied in 3 layers: scratch coat, brown coat, and white coat.
The scratch coat is rough and forms the plaster keys and a base coat for the finish coats to come. The brown coat is thinner and helps smooth out the surface. The white coat is even thinner and provides a smooth surface for painting or wallpapering. Sometimes, the white coat is textured.
In total, a plaster and lath wall is about 1 1/4 to 1 1/2-inch thick which is 1/4- inch of lath and 1 to 1 1/4-inch of plaster.
4. Keys Develop Behind The Lath
When the first coat of plaster is applied to lath, it will ooze through the spaces between lath strips. These gobs of plaster are called keys. When they dry, they create thick sections of plaster that grip the lath and support the plastered surface. These keys and lath help keep a plastered wall and/or ceiling strong and in place.
It’s important to apply pressure to the plaster when you apply the first coat because it creates the keys. If you apply the first coat of plaster with insufficient pressure, the keys won’t form properly and your wall will be weak.
4. Finish Work
Once the wall is complete and plaster is dry, it can be primed and painted. Plaster is a very porous cement based material so you should always prime it before painting. Once primed, any type of standard paint can be used.
Because plaster is a cement based material, it can also be tinted. If you’d prefer a subtle translucent tint rather than an opaque paint, use a masonry tint instead of paint. If you don’t like the look you can always paint over it later. However unlike paint, there’s no way to remove a masonry tint as it permanently changes the color of the plaster.
Plaster and lath is a unique material because it can be left its natural color. If you don’t plan on painting or staining the wall, make sure the plaster’s color is what you want for the finished surface. You can adjust it based on the ingredients you use in the plaster mix. You can also add colors to the mix to tint it or make it white.
Lath And Plaster Vs Drywall
Lath and plaster is the way wall and ceiling surfaces have been finished for centuries. But since the 1940s modern homes have been using drywall instead. Mainly because it’s cheaper, lighter and easier to install.
In this section we’ll compare lath and plaster vs drywall and compare some of the biggest differences you should know about.
Thickness
Lath and plaster is thicker than drywall sheets. The thickest drywall sheets you can buy are 5/8-inch thick. But plaster and lath is much thicker averaging about 1 to 1 1/4-inch of plaster plus another 1/4-inch of lath and the plaster keys. This added thickness has some benefits but also a few drawbacks.
Drywall has consistent thickness across the entire sheet. Because of this it adheres tight to the studs. If there’s any variance to the studs you’ll see the drywall pull in or push out based on what the studs do. But plaster is applied in layers that can be adjusted thicker and thinner in places. This is better when the studs are not perfect.
A thicker wall surface provides the following:
- Better soundproofing
- More insulation
- A denser surface that’s hard to damage or scratch
- Plaster is more fire resistant than drywall
Soundproofing and Insulation
Lath and plaster walls are denser and thicker vs drywall. This provides better soundproofing because sound waves bounce off the surface rather than penetrating through like they do with drywall.However, because plaster blocks sound waves, it also blocks WiFi and other radio signals. This makes wireless routers less effective and can interfere with cell signals.
Lath and plaster walls have a slightly better insulating R-value than drywall which can be helpful if you’re building an energy efficient home.
Cost
The main reason why drywall has replaced lath and plaster as a wall finish is cost. Drywall sheets are much cheaper to buy, hang and finish vs plaster. In fact, almost no modern homes use plaster to finish walls and ceiling vs drywall. It’s primarily used in older homes to make repairs or keep the home accurate to the period it was built.
However, this is mainly true for just the United States. In most foreign countries, they’re still using lath and plaster because it’s a better material that lasts longer, is more durable and provides some additional R-value to the home.
Lath and plaster is actually cheaper than drywall when you compare just the cost of materials. However, when you factor in the added expense of labor, it’s end up being a lot more expensive. Plaster takes a skilled worker to apply properly. But almost anyone can hang drywall, apply mud and sand.
Repair
It’s more expensive to repair lath and plaster than drywall. Even though lath and plaster materials are very cheap, it’s just thin strips of wood and plaster, the labor is very expensive. Because not many people use it anymore, its become a specialty. Finding someone who specializes in plaster repair is harder than a drywall company. This specialization adds a lot to the cost of repairs.
Repairing plaster is technically something you can DIY. But I would call a professional. The hard part is properly finishing the final coat and smoothing it into the old plaster. It’s as much an art form as it is construction work.
Durability
Plaster is far more durable and long lasting than drywall. In fact it’s not even close. Drywall is very soft, easy to scratch and dent. It’s not a very durable material, but it’s cheap, smooth, easy to paint and look good.
Lath and plaster is extremely durable and dense because it’s a cement based masonry product. When fully cured, it’s hard like cement and can’t be easily scratched, dented or damaged.
One drawback of how dense plaster is however is that it cracks. If you hang pictures on a plaster wall, you have to be careful about cracking it because it’s such a rigid material. It’s also prone to cracking if the house moves or settles. Which they tend to do over time.
Fire Resistance
Because plaster is a cement based masonry product, it provides greater fire resistance compared to drywall. This can be a huge benefit in the event of a house fire. Masonry walls can delay a fire from spreading from room to room because they’re non-flammable and deal with heat better than some other materials.
If you want even more fire resistance from your plaster, use metal lath instead of wood. This will cut down on the amount of flammable materials used inside the home.
Texture
A big advantage lath and plaster has over drywall is it’s appearance. Drywall is always smooth. There’s no option to change its texture, so the only way you can change its appearance is with paint. However, plaster can be finished in a variety of ways including smooth, rough and textured. It’s a very artistic way to finish a wall surface that can be customized to fit the style of the home.
How Expensive Is Lath And Plaster
In general, the cost to install lath and plaster is about $10 to $20 per square foot for the plaster work in addition to another $5 per foot for lath. The exact cost depends on where you’re installing it, if you add color and the finish. In general, ceilings are more expensive than walls. And the higher you go up on both walls and ceiling the more expensive the job gets. It’s also more expensive to plaster extremely large areas vs smaller ones because its harder to keep the surface perfectly level and smooth over a long distance.
The cost to install lath and plaster can vary depending on the size of your project and the quality of materials you choose. However, overall the cost is higher than drywall to both install and repair which is mainly due to the high cost of labor.
- Lath and plaster is as much an art form as it is construction work. The coats must be smoothed and finished by hand over long distances. This is much harder to do than hanging sheets of drywall and applying mud.
- It takes a lot longer to install lath and plaster vs drywall. In the time it takes to hang all the individual lath strips on a single wall, you can have an entire room covered in drywall.
It’s important to keep in mind that plaster and lath is a durable and long-lasting option, so the investment may be worth it in the long run.
Tips For Working With Lath And Plaster
Working with plaster and lath can be difficult at times, but with the right techniques, it can be a rewarding process that adds character and charm to any space. Before beginning, it’s important to make sure you’re prepared with the proper tools, including a plaster mixer and trowel, as well as safety equipment like gloves and eye protection. One of the most important tips is to work in small sections. Apply plaster in thin layers and allowing each to dry before adding the next.
- Use a long trowel to apply plaster because it creates a more even surface
- Make sure to mix the plaster properly. Follow the directions on the package
- If your inexperienced working with plaster, buy it premixed instead of mixing your own batch
- Use a sponge on the last coat to create a really smooth surface
- Let the plaster dry for about 20 minutes before using a sponge to smooth it
- Work in smaller sections at first, as you get more experienced expand your work area
- Mix small 5 gallon bucket sized batches of plaster at a time
- Make sure your lath has about a 1/2-inch wide gap between slats which is about the size of a finger
- Apply pressure on the first coat of plaster to create keys
If you use these tips, building a lath and plaster wall is fairly easy once you get the hang of it.
Alternatives To Lath And Plaster
If you’re renovating a home or building a new one, you may be looking for alternatives to the traditional plaster and lath construction method. One option is drywall, which has become a popular choice due to its cost-effectiveness and ease of installation. Another alternative is plasterboard, which is a type of pre-fabricated plaster panel that is hung on walls and ceilings. They offer a similar look to plaster and lath, but with less mess and labor.
- Paneling
- Trim work
- Stone
- Brick
- Tile
- Slabs
Each of these can add texture and character to a room. Whatever choice you make, it’s important to consider the pros and cons of each and to choose the option that fits your project’s needs and budget.
How Many Coats Of Plaster Are Used?
Three coats of plaster are generally used to build a plaster wall or ceiling. The first coat, also known as the scratch coat, is applied to the lath and serves as a base for the subsequent layers. The second coat, known as the brown coat, is then applied to even out and strengthen the surface. Finally, a third coat, the finish coat, is applied for a smooth and aesthetically pleasing appearance. While the process may seem labor-intensive, the end result can be a beautiful and durable finish that stands the test of time.
In some cases, a very thin fourth coat can be applied on top to even out very small imperfections. It’s generally smoothed out with a damp sponge instead of a trowel and may be applied to small sections of wall or ceiling rather than an entire area.
What Are Plaster Keys?
Have you ever wondered how plaster is able to stick to walls and ceilings? The answer lies in a little-known component called plaster keys. Plaster keys are plaster that penetrates into and through the gaps between lath strips. When the first scratch coat of plaster is applied to lath, it oozes in between the gaps between lath strips. It then hardens in place, gripping the lath tightly. This gives rigidity and strength to the wall and helps hold the plaster in place.
Plaster is a very heavy material when it dries. It’s applied in 3 layers which are about 1 to 1 1/4-inch thick. Plaster keys help support all that weight by griping the lath tightly.
You can;t control how the plaster keys are formed because they’re behind the wall. However, you can ensure they form correctly by applying adequate pressure to your first coat of plaster. Make sure when applying the scratch coat to apply enough pressure to push plaster into all the gaps between lath strips.
If you merely apply enough pressure to apply plaster to the surface of the lath, and not push it into the gaps, your plaster wall and/or ceiling will be weak and prone to cracking.
Most Older Homes Have Plaster And Lath
If a home was built before 1940 and the walls and ceiling are original, they’re most likely plaster. Drywall wasn’t used until after 1940 and it took some time to completely replace plaster and lath. So even some homes built in the 50s and 60s may still have plaster walls. One way to tell is to knock your knuckles against the surface. Plaster is much harder and denser than drywall. It makes a completely different sound and feels rougher.
Plaster and lath is a part of the charm of owning an older, possibly historical, home. The best way to ensure the plaster remains in good shape is to regularly inspect it and repair cracks as soon as you notice them. Plaster and lath is actually quite easy to repair DIY if the cracks are small. But for large areas I would hire a professional.
Patching plaster walls usually require skimming new material over small cracks with a trowel. Then smoothing them with a damp sponge. Pay special attention to the edges where new materials feathers into the old.
If repairs are more involved and require removing loose sections of plaster and/or replacing lath, I would hire a pro. The bigger the area the harder it gets to create a smooth surface. You also need more specialized tools and large trowels.
If you make the repairs yourself, use a standard Three-Step Plaster Method. Once the new lath is installed, apply a 1/2-scratch coat of plaster followed by a 1/4-inch 2nd coat and a final 1/4-inch finish coat. Let each coat dry before applying the next and smooth the finish coat with a sponge.
Lath And Plaster Can Be Changed To Drywall
Lath and plaster walls can be converted to drywall in a few different ways. The easiest being installing drywall directly on top of the plaster. This is typically done as part of a remodeling project which may also include updated wiring, plumbing, HVAC and duct work. If this is the case, cut out or drill through sections of plaster to run your new mechanical work prior to installing fresh drywall. Once all the mechanical work is done, hang fresh drywall with long 2 1/2 to 3-inch course screws.
Because you’ve got the old plaster underneath the drywall, you can use thinner sheets than usual. This is beneficial because it doesn’t take much space away from the room. For jobs like this we generally hang 1/4 drywall sheets.
The best way to update a plaster and lath wall to drywall is to completely remove all the old plaster and lath. This is a very messy and labor intensive job but it may be worth it if you have extensive mechanical and insulation work to do. Once the studs are exposed, it’s much easier to run new electrical wiring, HVAC, plumbing, vents and insulation. Then you can install fresh drywall like a new house.
The downside of demoing plaster and lath to convert to drywall is that the studs and joists may not be perfect. Plaster and lath is more forgiving than drywall because it’s applied in several layers which can make up for framing imperfections. If there are low spots or high spots in the studs, your drywall will dip in or pop out.
Once the demo work is done, check your frame to make sure the studs and joists are level. If they’re not, correct the problem before installing drywall.
Modern Homes Still Use Plaster And Lath
Although it’s not as popular as it used to be, many modern homes are using plaster and lath instead of drywall. It’s a beautiful way to finish a wall or ceiling that provides more durability, longevity, fire resistance and R-value vs drywall. However the work is a lot more expensive and it’s harder to find qualified installers.
Be prepared to pay $20 or more per square foot to have plaster and lath professionally installed. In general, the price goes up the higher the installation surface is. For example, cathedral ceilings are a lot more expensive to install than a standard 8 foot high wall section.
Compare that to the cost of professionally installed drywall, which averages about $2 to $5 per square foot.
- Modern plaster walls are built by smoothing at least 3 coats of plaster over lath.
- Contemporary plaster contains a mixture of clay, lime, acrylic components, and colorants to create a surface that can be left as is or painted.
Plaster and lath is more labor intensive than hanging and finishing drywall. In general, plaster and lath installation takes 2 to 3 times longer than the typical drywall project. This is one of the main reasons why it costs so much more to do plaster work vs drywall.
Plaster And Lath Is More Environmentally Friendly Vs Drywall
Plaster and lath is generally considered a more environmentally friendly product than drywall because of how long it lasts. When well maintained, plaster and lath can last decades longer than drywall. The Gypsum Association states drywall has a 50-year lifespan. But plaster and lath can easily last over 100 years. In fact, there are examples of plaster walls all over the world which are centuries old and still in good condition.
Another huge benefit of using plaster instead of drywall is its resistance to mold growth, better soundproofing, additional R-value, and better fireproofing. These benefits can reduce the need for other building materials to be used in the home.
Manufacturing also plays a role in plaster Eco-friendliness vs drywall. Processing plaster releases carbon dioxide. But producing gypsum releases sulfur dioxide, nitrous oxide, and carbon monoxide. These gases are generally considered worse for the environment then carbon dioxide alone.
When it comes to recycling, plaster is generally considered the better material. Drywall can technically be recycled, but there aren’t many places that do it. And the disposal of drywall in landfills can cause chemical leaching and the creation of hydrogen sulfide gas.Plaster is a more natural cement based material and doesn’t produce harmful gases when it breaks down.
However, older plaster may be painted with lead based paint, so be careful about this when you recycle it.
Lastly, plaster can be made yourself using sand, lime and cement mixed with water. These materials are readily available throughout the world and are generally considered greener than drywall.
Summary: What Is Lath And Plaster?
Plaster and lath is an age-old building technique used to finish interior walls and ceilings. To do it, builders first nail thin wooden strips of wood closely together to the wall studs and/or ceiling joists. They then spread multiple thin coats of plaster over the wood lath to form a smooth wall surface. As a final step, the plaster is carefully smoothed using trowels and a damp sponge. The plaster hardens over time, forming a strong bond between the lath and wall surface. It can be finished by the installer to be extremely smooth or textured depending on the look the designer is going for.
Once plaster dries, it can be painted or left it’s natural color. Ingredients are often added to the mixture to give it an extremely white color without requiring paint. This is how Venetian plaster is made.
Plaster is made by mixing sand, and cement and/or lime with water. When properly mixed it has a consistency like thick peanut butter and easily sticks to the lath. Once fully dry, it’s texture is a bit rough and it’s very dense.
Drywall panels were invented in the 1950s to replace lath and plaster because they’re easier, faster and cheaper to install. It’s not used much in Modern construction, but many older homes still use it to stay more original.
There are some big advantages to using plaster instead or drywall. The biggest being how strong and dense the material is. It’s very hard to damage, dent or scratch compared to much softer drywall.
Plaster also has great sound deadening which is an advantage in a noisy home. But due to its density, it blocks WiFi signals making wireless routers less effective.
If you have any questions or comments about lath and plaster, email any time.