How To Pour Concrete Footings For A Retaining Wall
Solid masonry retaining walls like poured concrete, cinder block, real stone and brick need a concrete footing to rest on. They can’t be built on a compacted gravel base like paver blocks can because they’ll crack. Solid masonry walls are very stiff and rigid. If the footing they’re built on shifts, heaves or cracks, the wall could be damaged. It’s not that hard to pour concrete footings for a retaining wall, but not all footings are created equal.
Soil conditions, weather, wall material, and the height of the wall all effect what type of footing you’ll need to build. Retaining walls are designed to retain the soil behind them. They’re a great way to level ground that’s naturally sloped. But all that soil creates a lot of pressure on the wall. So they need to be built stable and strong. The higher the wall, the stronger it needs to be.
Although the exact concrete footing design may vary based on the wall you’re building, the basic steps are the same.
- Layout where the footing will go.
- Excavate the trench where your footing will be poured.
- Pour and compact some gravel at the base of your footing. I generally use about an inch.
- Install steel rebar.
- Pour the concrete.
When you’re building a retaining wall it’s important to make them sturdy. A retaining wall is used to stop soil from sliding down to a lower area. This creates a lot of pressure so the footing needs to be really strong. Solid masonry walls don’t simply rest on the footing, they’re generally anchored to it using rebar or other structural supports. This means that if the footing fails, the wall probably will too.
Footing Basics
A concrete footing is basically a big chunk of concrete with square edges buried under the ground. Usually concrete retaining wall footings are rectangular in shape. The average size footing we build is about 1 foot deep by 2 foot wide. But sizes may vary based on the wall material, height and soil conditions.
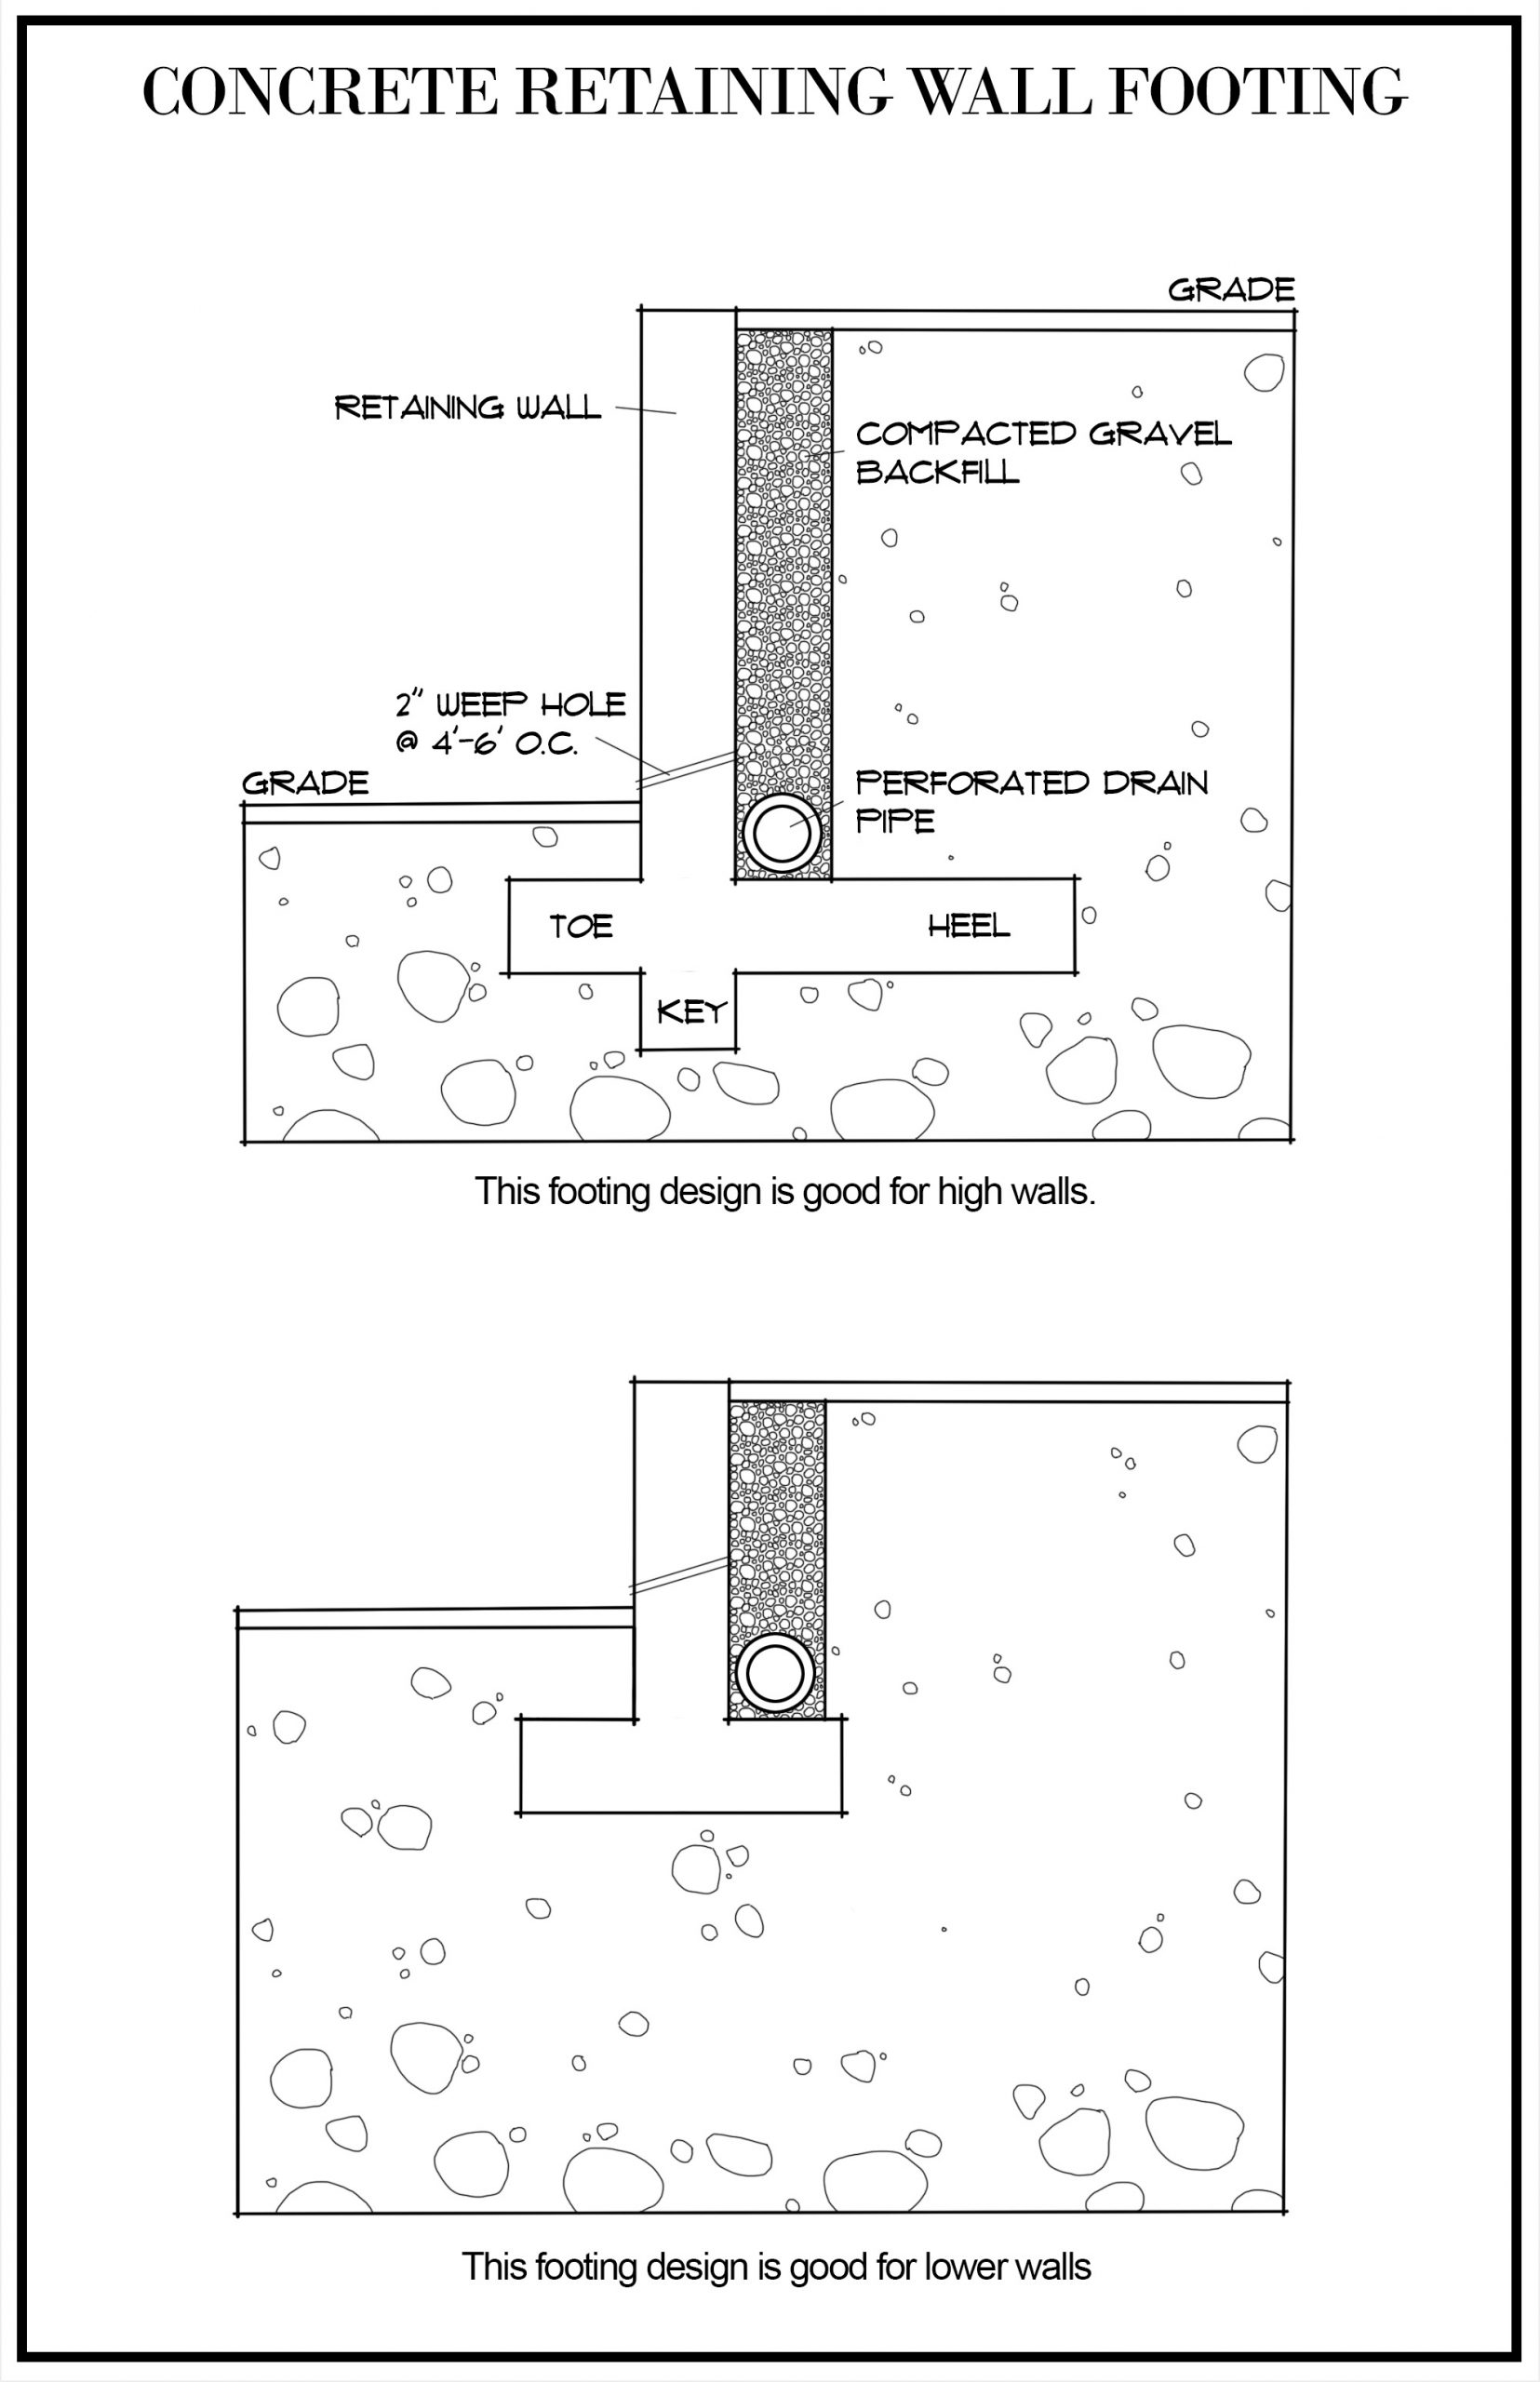
Footings are not all the same shape. Some have a small section that drops below the footing which is called a key. This helps stabilize the footing.
The retaining wall can sit in the center of the footing or more towards the front side. This creates two sections called the footing toe and heel. Just like a foot, the tow extends towards the front of the wall while the heel is back.
Concrete footings with a toe and heel are good for high retaining walls. The dirt behind the wall presses down on the heel which helps support the wall.
Drainage is very important for a retaining wall. Water that collects behind the wall adds pressure which can eventually cause a failure. We always install gravel behind the wall, a 4″ perforated drain pipe on the footing, some weep holes and a 4″ perforated drain pipe every 3 feet up the wall.
Inside the footing is steel rebar that runs horizontally and vertically. Vertical steel rebar go from the footing up the center of the retaining wall. This ties the entire structure together.
Pouring A Concrete Retaining Wall Footing
Solid masonry retaining walls generally require a concrete footing to support the wall. Footings spread the weight of the wall over a large area which helps support the wall’s weight. They also help stabilize the wall which prevents it from toppling over.
Building a concrete footing for your retaining wall isn’t that hard to do if you have basic masonry skills. But it takes a fair amount of manual labor. You’ll have to excavate a large trench, compact gravel, bend and tie together rebar, and move a lot of concrete.
Here’s a list of basic tools you’ll need:
- Shovels: I always bring a spade and flat head shovel.
- Pick: A pick-axe can be really helpful for breaking up hard ground as you dig.
- Hoe: These are great for shaping the footing and spreading concrete.
- Concrete Spreader: I use my concrete spreader not only to move wet concrete but also to clean up loose dirt around the footing.
- Boards & Stakes: Used to create a form for the concrete footing.
- Hammer & Nails: Used to secure the forms in place.
- Pliers: You’ll need pliers to tie the rebar lengths together.
- Safety: Don’t forget safety equipment like gloves and goggles.
- Mixer: If you’re mixing your own concrete, bring a mixer or a tray.
- Wheel Barrow: Great for hauling material or bags of concrete around.
- Saw: If you have to cut the form boards you’ll need a saw.
In additional to basic tools, you’ll also need lots of concrete, gravel, steel rebar, and a 4″ perforated drain pipe. We’ll go over all this in more detail in the step by step instructions ahead.
1. Layout The Footing
Before you start digging, it’s very important to layout where the footing will go. If you dig in the wrong place your wall won;t be built correctly. This is a very hard mistake to correct later so take your time.
First, mark on the ground where your retaining wall will be built with some paint. Then outline where the footing will go. Most solid masonry retaining walls have to rest on a specific part of the footing. Check out the diagram above.
You need to make sure the entire will be supported by a solid concrete footing in the correct place. How the footing relates to the wall effects where you should dig because not all walls rest on the center of the footing.
2. The Footing Trench
The footing needs to be dug down below the frost line. This can vary depending on where you live. here in the North East it’s about 3 foot below grade. If you pour your footing above the frost line, the ground below can freeze and heave the wall out of place. In areas that don’t freeze, you can dig a much shallower footing.
Soil weight can help stabilize the footing and retaining wall. Check out the diagram shown above. Soil puts pressure not only on the back of the wall but also on the footing heel. This downward pressure helps hole the wall in place. So sometimes it’s advantageous to dig a deep footing, even if you’re not worried about frost.
Footing Depth
When I’m building a footing for a solid masonry wall, I always make my footings at least 1 foot thick. But a footing’s thickness can vary. I never go less than a foot but I’ve poured thicker footings many times.
Your footing’s thickness will be set by the engineer designing your wall. A high wall typically needs an engineers plan to be approved by the town. This is usually above 3 feet. But low walls you can usually design yourself.
Keep the depth of the footing in mind because this will help you figure out how much concrete you need.
Footing Width
Concrete footings should be wider than your retaining wall.
For a 12″ wide concrete retaining wall, I usually pour a 2 foot wide footing for a wall no more than 3 foot high. But as the wall gets higher, I change the footing. High walls work better when you build a footing with a tow and heel section. These footings are generally at least 3 foot wide.
Soil conditions matter too. If the soil is bad I may pour a 3 foot wide spread footing even if the wall is only 3 foot high. Wide footings can help stabilize the retaining wall in bad soil conditions because they spread the walls weight out over a large area.
3. Excavation
Once the wall and footing location is marked with your paint and you understand how wide and deep the footing trench needs to be, you can start digging.
I use a pick to soften up the ground before I start using the shovel. This is especially helpful if the ground is hard. I recommend using a spade shovel for digging and a flat shovel for moving concrete and loose soil and for shaping the footing.
The side walls of the footing should be dug vertical. This is where the flat head shovel comes in handy. It’s great for shaving and shaping the footing walls.
Make sure you shovel the dirt where it won’t get in the way of your work building the wall. If you put it in the wrong place you may have to move it which makes work much harder. I’ve made this mistake plenty of times.
If you’re using forms to shape the footing, dig the hole about a foot wider than the forms. This will give you enough room to work and stake the forms in place.
Digging a footing trench is hard work. consider renting a machine or hiring someone to do it for you. You can rent a small backhoe for around $350 a day or an excavator for around $500 a day. That’s just to dig the hole though. You’ll have to rent the machine or hire an excavator again to do the back-fill.
Remove all small plants and large roots from the hole.
I spread about an inch of gravel on the bottom of my concrete footings and compact it hard.
Note: Before you dig always call utility for mark-outs. You don’t want to risk hitting a power or gas line.
4. Concrete
Before you start mixing any concrete, it’s important to figure out how much concrete you actually need. The footing should be poured in one pour. Not broken up into multiple pours. So you can’t run out of concrete in the middle of the job.
Remember that concrete is a volume calculation, not simple square footage. To calculate how much concrete you’ll need, multiply the length x width x depth of the space where you’ll be pouring concrete.
If you’re measuring in feet, this will tell you how many cubic feet of concrete you need. For example, if you’re pouring a 3′ x 3′ x 7′ footing, you’d need 63 sq. ft. of concrete.
Once you’ve figured out the cubic feet of concrete you’ll need, you have to convert that number into cubic yards.
To figure out cubic yards, simply divide the cubic feet you need by the number of cubic feet in a cubic yard (27). This gives you the number in cubic yards (63 cubic feet ÷ 27 = 2.333 cubic yards).
Once you know how many cubic yards of concrete you need, calculate how many bags of concrete you have to order. Here’s a link to a chart showing how many yards of concrete are in a bag based on its weight. For example, an 80lb. bag of concrete contains .0222 yards of concrete.
Mixing Concrete
Once you know how many bags of concrete you need and get it delivered, it’s time to start mixing.
I recommend placing the bags right by the footing. You don’t want to be mixing concrete and then moving it to the hole. Have all your tools ready and a water supply on hand.
The most important part about mixing your own concrete is getting the water right. Too much water will weaken the concrete. Carefully follow the direction on the bag.
Concrete that’s been mixed properly has a consistency like thick oatmeal. You should be able to pick it up and mold it with your hands like a snowball.
- If the concrete is dry and powdery, you need more water. Add water slowly until all the dry powder is mixed.
- If it’s too watery to hold, you need to add some more dry mix until the consistency is right.
Wet concrete should be pasty and sticky. Not dry and not watery.
For a concrete retaining wall footing I usually use at least a 3500 PSI concrete.
If you really want to get complicated mix your own concrete out of sand, cement, stone and water. Vary the ingredient ratios based on the concrete strength you need. Most masons mix their own concrete because it’s cheaper than buying bags or ordering it from a truck and you have total control over the mix.
Buying Concrete
If your pouring concrete footings for a retaining wall, you’ll need a lot of concrete. If you don’t want to mix your own, then get it delivered by a concrete truck. It’s super convenient and you won’t have to worry about water levels or ingredient ratios.
Let the plant know exactly what strength concrete you need and they’ll make it for you.
Get the site prepped prior to delivery, it’s best if the truck can back right up to the footing trench.
If the trench is hard to reach, pump trucks can shoot concrete almost anywhere. They’re more expensive but come in handy if your retaining wall is in a hard to reach area.
Buying concrete from a truck is convenient but expensive. It costs more than mixing your own and buying bags. However, it takes almost no labor. The truck will shoot or pump the concrete right into the trench. All you have to do is spread it around.
As a professional, I almost always buy concrete from a truck, the time and labor it saves are worth the extra expense. But for small jobs or when I need a custom mix, I use bags or mix my own concrete. In the end, it doesn’t really matter which option you choose as long as the concrete is correct for the footing.
5. Building Forms
If you plan on pouring concrete directly into the dirt you can skip this step. But I generally recommend building forms to hold the concrete. This is especially important if your footing has a lot of dimension. Some times the wall changes shape, has built in steps or flower beds. The more complex the wall, the more footings can help you lay it out.
When pouring concrete footings for a retaining wall, it helps to have forms. They not only define the shape of the footing but they also keep the footing level and dictate a height. As long as your forms are the right size, level and the proper height, you really can;t mess anything up when it comes time to pour concrete.
Forms are made from planks of wood. For a concrete retaining wall footing I generally use some 2×8 or 2×6 lumber cut to size. I also use a lot of plywood left over from building homes to make forms. Scrap wood is great for form building.
Use framing nails or screws to secure the forms together.
Use stakes driven into the ground to hold the forms in place. Once the stake is driven, nail the form to the stake.
Drive all your nails, screws and stakes on the outside of the forms. The inside is just for concrete.
Be aware of nominal sized lumber. If you need a 12″ form don’t use a single 2×12. Most 2×12 lumber is actually 11 1/2″ to 11 3/4″.
Don’t forget to account for gravel. I always compact some gravel on the bottom of my concrete footings.
6. Pouring The Concrete
Once the concrete is mixed, pour it directly into the hole. This could mean dumping wheel barrows right into the hole or shooting it in with a concrete truck. However you do it, get it to the bottom of the trench without disturbing the side walls or causing a dirt cave in.Any dirt that caves into the hole can weaken the concrete.
Use a hoe, concrete spreader or shovel to move the concrete around. Tamping down on the top of the concrete is a good way to make it spread and level itself.
If I’m not using forms, I usually make a few height marks before I start pouring the concrete so that I know how much to pour. For example, if you’re pouring a 1 foot thick footing, make a 1 foot mark on a few of the vertical rebars. You could also stake a few marks in the side of the footing wall.
If you pour too much concrete it’s generally OK, but you don’t want to pour too little. This is especially important if you have horizontal rebar inside the footing. Horizontal rebar needs to be a set distance from the edges of the concrete. If it’s too close to the edge the footing can crack.
If you’re pouring into forms the jobs easier. Simply pour concrete until you reach the top of the form.
7. Tamp The Concrete
Once the footing is full of concrete, go around and tamp the top with your hoe or spreader. Tamping will help release air bubbles and fill voids. This creates a stronger more dense footing. It also helps level the top surface of the concrete. This is important because you’ll be building the retaining wall directly on top of the footing.
You can leave the top of the footing rough or trowel it smooth. Either way works fine. But I prefer to leave it rough because it helps when I start building masonry wall. Whether I’m pouring more concrete or using mortar to install stone or cinder blocks, it’s easier to bond mortar to a rough surface than a smooth one.
8. Curing
When pouring concrete footings for a retaining wall, it’s important to let the concrete cure properly. You don;t want to start building the wall too soon because the weight could crack the footing.
I generally wait at least a few days after pouring a footing to start building the retaining wall. Fresh concrete takes about 28 days to fully cure, but after 2-3 days it’s usually strong enough to support the wall. Also it takes a long time to build a large retaining wall, so as I work building the wall, the footing is still curing. By the time I reach the top of the wall it may be completely cured.
It’s important to pay attention to weather conditions when you pour and cure concrete. Never pour concrete in the rain or when rain is possible the same day as the pour. If you pour a footing in the morning and it starts to rain before the concrete is hard, cover it with a tarp. Extra water will weaken the concrete.
Once the concrete sets up and hardens, it can get wet. Concrete doesn’t have to be fully cured in order to be rained on.
Never pour a footing in freezing temperatures. Concrete contains a lot of water that needs to evaporate out. If its freezes before it evaporates out, the water will expand and possibly crack or deteriorate the concrete. I’ve seen entire slabs ruined because water froze inside the concrete. If it gets really cold, use a concrete blanket to keep the footing warm.
After a few days of hardening, concrete should be strong enough to resist internal pressure do to freezing. At that time you can remove the blankets.
9. Drainage
Don’t forget to install the footing drain. Every retaining wall needs a perforated pipe behind the wall to drain water from the footing.
Water in the soil will drain down the back of the retaining wall and rest around the footing. It’s very important to get rid of excess water because it creates pressure. This is especially important if you live in a cold climate because that water could freeze.
I recommend at least one 4″ perforated drain at the footing depth and then another every 3 foot up the wall.
I also recommend pouring gravel behind the wall as you build the wall and back-fill.
Weep holes are another feature you can add to your retaining wall that helps drain excess moisture.
Frequently Asked Questions
Here are some frequently asked questions about retaining wall concrete footing. If you have any more let us know and we’ll answer and add them to the list.
Do You Need A Concrete Footing For A Large Retaining Wall?
It depends on the type of material you’re using to build the wall.
If the wall is made from retaining wall paver blocks, you usually don;t need a concrete footing. Generally these types of walls are placed on a compacted gravel footing.
Another type of large retaining wall is built with gravity blocks. These retaining wall blocks are huge and extremely heavy. The sheer weight and size of them is enough to retain the soil behind it. Like paver blocks, gravity blocks are stacked on top of a compacted gravel footing.
If the large retaining wall is solid masonry, like poured concrete, cinder block, brick or stone, you probably need a concrete footing. Solid walls don;t have any flexibility so they need a very stiff and stable footing.
Large stacked stone retaining walls are usually built on compacted gravel footings.
Soil conditions make a big difference too. If the soil is bad, your wall could benefit from a concrete spread footing.
How Do You Measure a Footing for a Retaining Wall?
Measuring a retaining wall footing is pretty simple. But it’s important to understand what type of measuring you want to do. Here’s a breakdown of common measurements you’ll need to take and how to take them.
- Height: This one is a linear measurement. Simply measure from the bottom of your trench to the top of the footing. Another way to look at a height measurement is depth.
- Width: This is another linear measurement. Measure from one side of the footing to the other.
- Length: This is another linear measurement. Measure from one end of the wall to the other.
When measuring a footing for your retaining wall, remember the footing should always be wider than the wall. I generally pour concrete footings for a retaining wall at least 1′ to 18″ deep x 2′ to 3′ wide x however long the wall is.
How Deep Do Footings Need To Be for a Retaining Wall?
The depth of your footings will depend on a few factors such as the width, height, and length of your wall, the wall material, soil and weather conditions and the design of the wall.
If you live in a cold climate, I recommend building your footings below the frost line. If water gets below the footing and freezes, it could crack the footing and cause the wall to fail.
Are Concrete Footings Necessary for Small Retaining Walls?
Whether or not concrete footings are required for small retaining walls depends on the the wall material. And just to note, a small retaining wall is under 3 feet in height.
If you’re building the wall out of paver blocks, large stones or stacked stones, then the answer is usually no. You can build it using compacted gravel. The only exception I know of is when soil conditions are bad. Even some small walls may benefit from a concrete spread footing. In general, as long as the retaining block material is stacked you can use a compacted gravel footing. This is because there’s a little flexibility in the wall construction.
If your building a solid retaining wall like poured concrete, cinder blocks, brick or stone held together mortar, then the answer is yes. A solid masonry retaining wall isn’t flexible so it needs a strong and stable foundation to rest on.
Summary: How To Pour Concrete Footings For A Retaining Wall
Solid masonry retaining walls like poured concrete, cinder block, real stone and brick need a concrete footing to rest on. They can’t be built on a compacted gravel footing like paver blocks can because they’ll crack. Solid masonry walls are very stiff and rigid. If the footing they’re built on shifts, heaves or cracks, the wall could be damaged. It’s not that hard to pour concrete footings for a retaining wall. But not all footings are created equal. Soil conditions, weather, wall material and the height of the wall all effect what type of footing you’ll need to build. Retaining walls are designed to retain the soil behind them. They’re a great way to level ground that’s naturally sloped. But all that soil creates a lot of pressure on the wall. So they need to be built stable and strong. The higher the wall, the stronger it needs to be.
Although the exact concrete footing design may vary based on the wall you’re building, the basic steps are the same.
- Layout where the footing will go.
- Excavate the trench where your footing will be poured.
- Pour and compact some gravel at the base of your footing. I generally use about an inch or two.
- Install steel rebar.
- Pour the concrete.
When you’re building a retaining wall it’s important to make them sturdy. A retaining wall is used to stop soil from sliding down to a lower area. This creates a lot of pressure so the footing needs to be really strong. Solid masonry walls don’t simply rest on the footing, they’re generally anchored to it using rebar or other structural supports. This means that if the footing fails, the wall probably will too.
If you have any questions or comments about retaining walls or footings, email any time.

John Mazzuca | About | More Posts |
Custom Home Builder
John Mazzuca is a custom home designer and builder at Gambrick with over 25 years experience in the construction industry. John has designed, built and/or remodeled hundreds of homes, small buildings, and commercial projects. He writes about business, real estate, home building, and household electronics. His work has been featured in Fox Business, Better Homes & Garden, House Beautiful, and more.