Does HardieBacker Board Need Waterproofing?
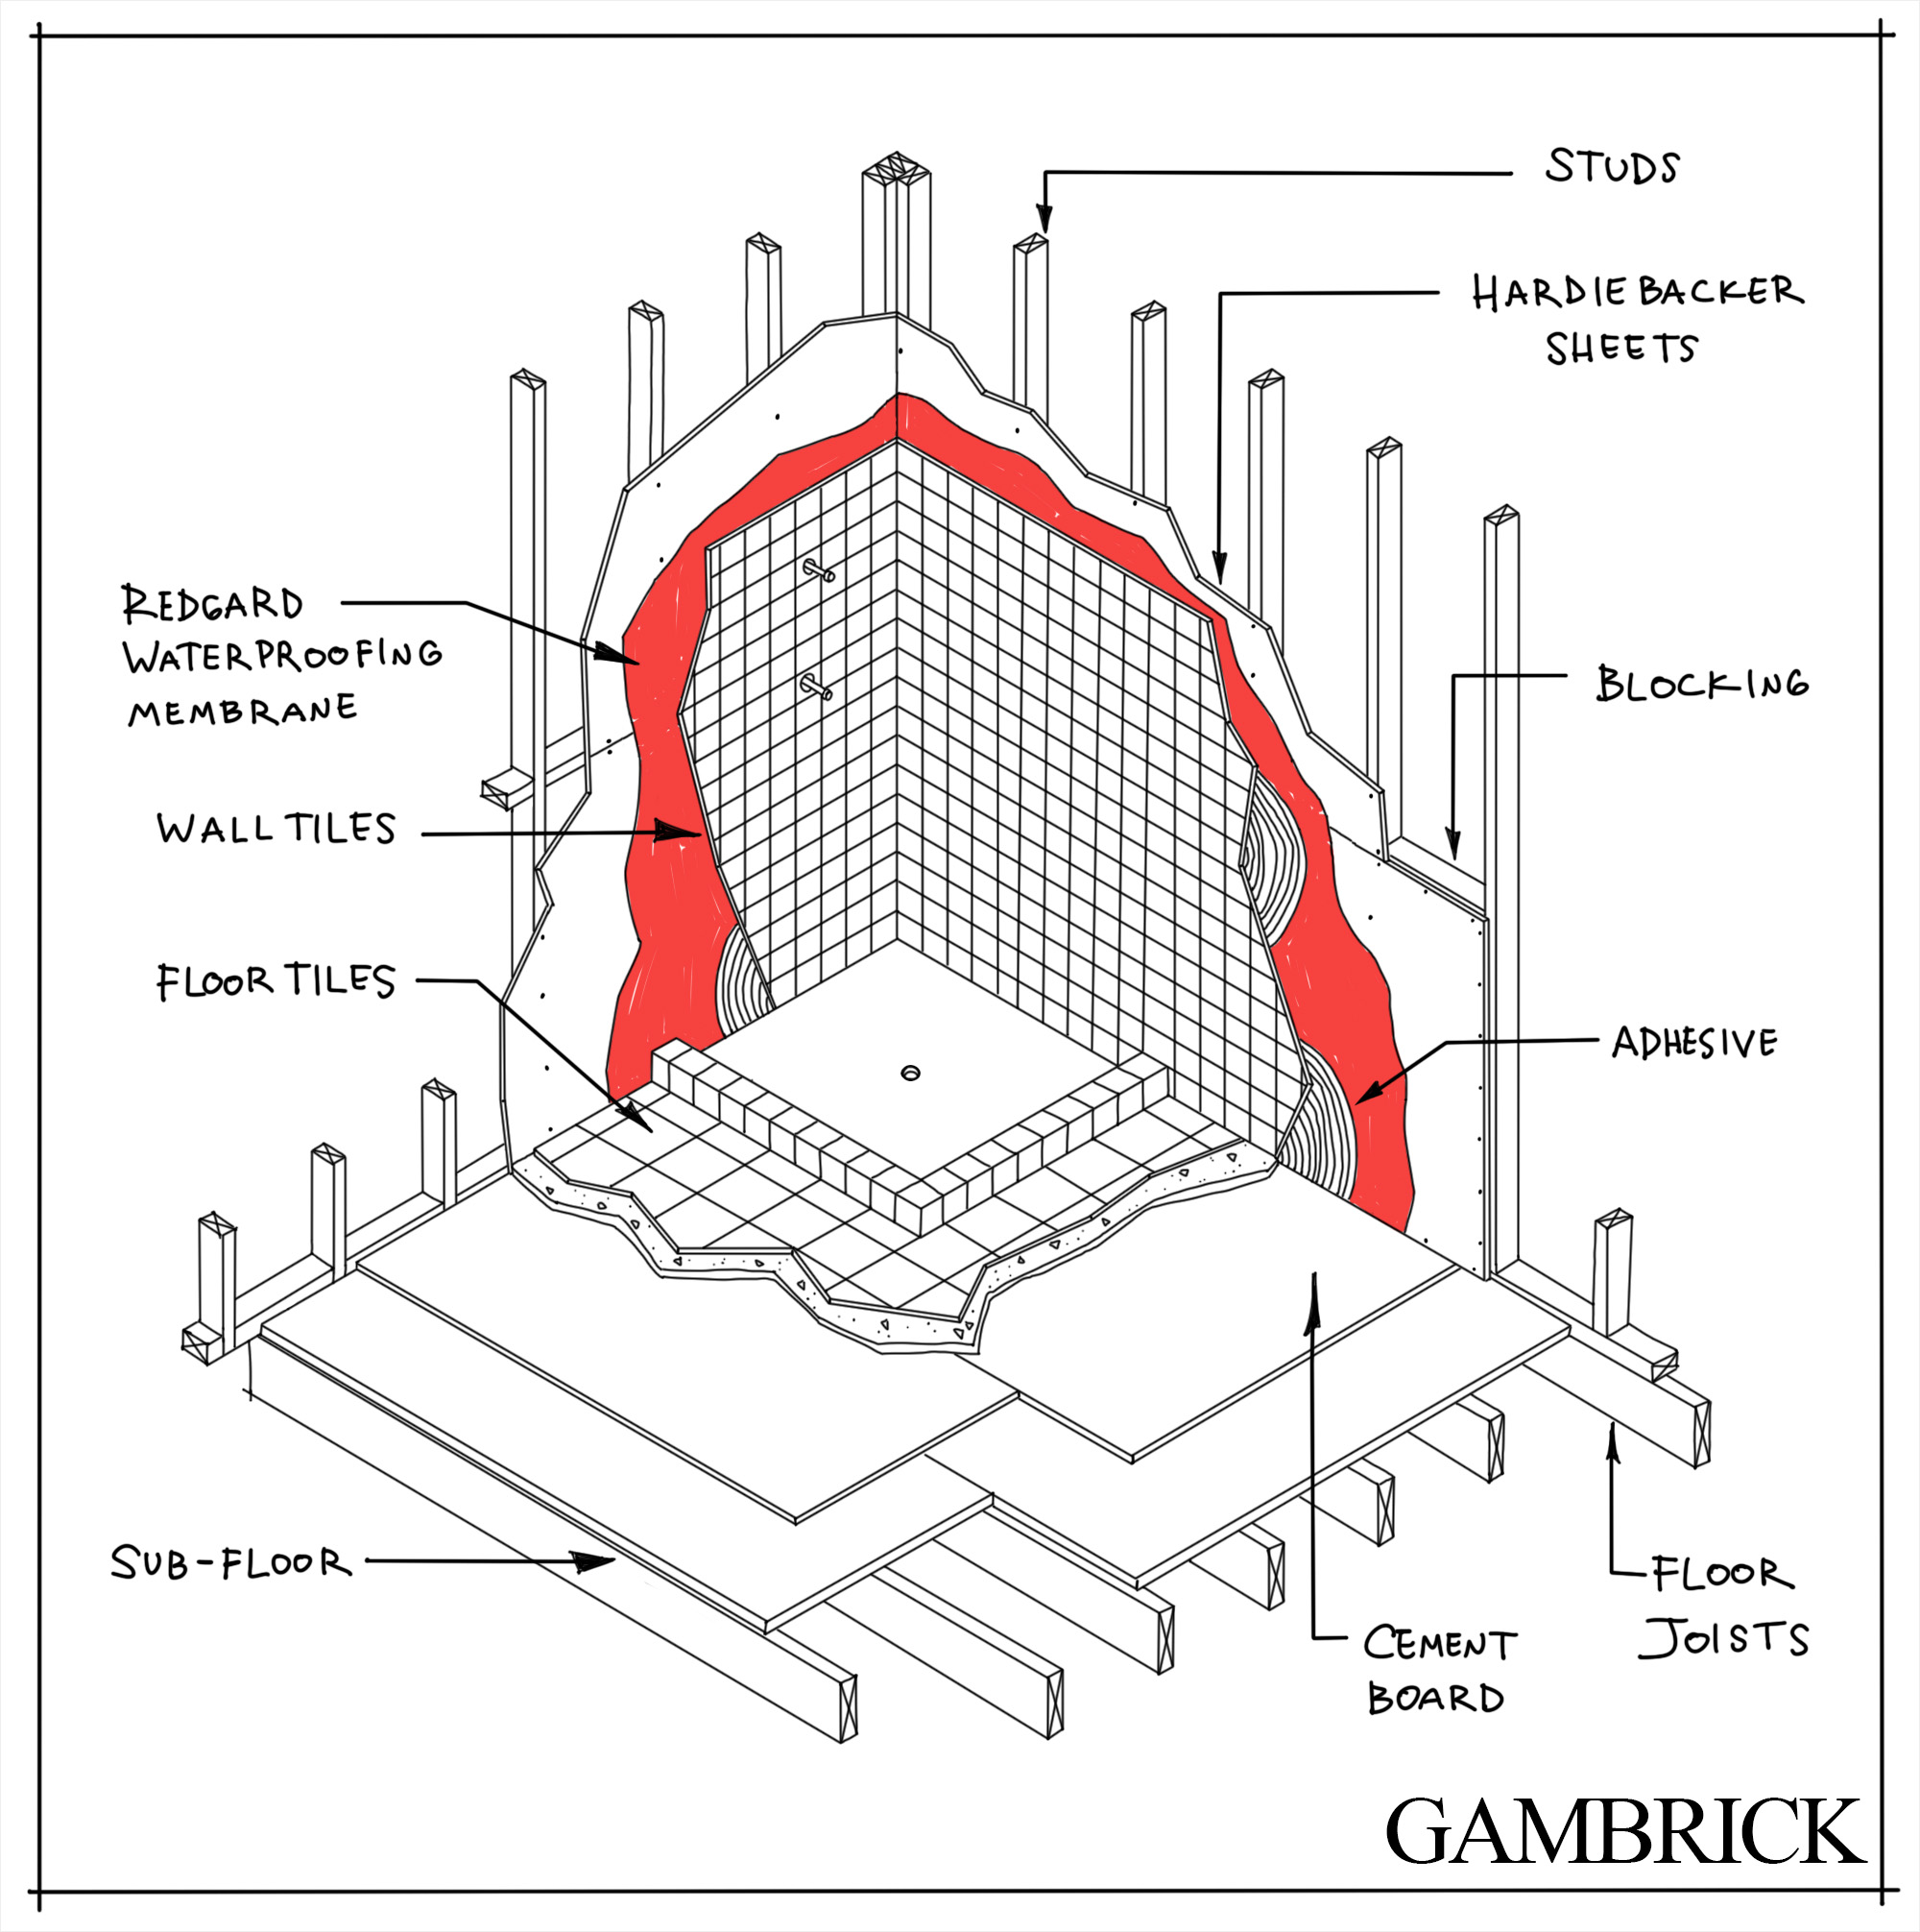
HardieBacker board is a cement based product that comes in either 3′ x 5′ or 4′ x 8′ sheets 0.42″ thick. It’s used as a sub-material behind tiles in wet areas like a shower or tub surround. HardieBacker sheets are secured directly to wall studs with water resistant green screws called Backer-On. The screws have specially designed threads which can drive through cement board. There’s a common misconception that cement board is totally waterproof because it’s designed for wet areas, but it isn’t. While the boards themselves are water resistant, the seems, inside corners, edges and screws are vulnerable to water penetration. This means HardieBacker board needs waterproofing.
Before you install any tiles, all the seams, cracks, screws, edges and inside corners need to be properly sealed and waterproofed. Most tile installers even recommend sealing all the large flat areas as well. This ensures no water can penetrate through the cement board and onto the framing which helps prevent rot, mold, mildew and deterioration.
HardieBacker board is very dense and water-resistant so it won’t deteriorate when exposed to water. This is ideal for areas like bathrooms and kitchens that have high amounts of moisture and water. However the seams, screws, edges and corners are still vulnerable and need waterproofing before you tile.
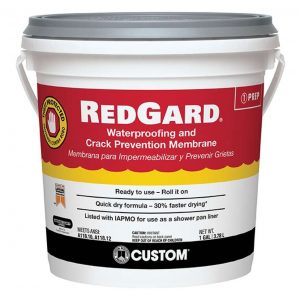
Simply installing HardieBacker or other cement boards on your shower walls does not make it waterproof. There will be seams between boards and in the corners as well as screw holes that are vulnerable to water penetration. For this reason, you must always use a waterproofing membrane like RedGard on top of HardieBacker before you tile.
Why Waterproofing HardieBacker Board Is Important
Even if your wet surfaces are tiled, it doesn’t means they’re waterproof. Mortar and grout are both cement based masonry products that absorb water. They’re also very stiff so tiny cracks can occur when the walls shift, expand or contract. If you don’t install backer board behind your tiles with waterproofing, the interior of your home may be susceptible to the following…
Moisture Damage
Moisture can come from both direct and indirect sources. This could mean direct splashing from a shower nozzle or indirect moisture due to steam or humidity.
If moisture penetrates the surface of your tile and reaches the interior framing, the wood can buckle, swell and deteriorate or mold and mildew can grow.
The leading cause of damage to most homes is water. It’s very important to waterproof your bathroom properly to prevent future damage.
Mold
Moisture penetration can quickly turn a bathroom into a breeding ground for mold. Once mold spores are inside your home, they grow and thrive on the combination of:
- Direct exposure to moisture from showers, steam, and plumbing leaks.
- A food source like paper or wallboard.
- Warm temperatures. If mold is left untreated, it can colonize and release millions of airborne, breathable spores.
Mold can be very dangerous to have in your house and spreads quickly. It’s extremely important to prevent mold by properly waterproofing the cement board used behind your tiles. Any water that penetrates through the tiles will be stopped by the waterproof layer before it can reach the frame of your home.
Did You Know?
Water damaged or moldy areas are typically not easily accessible which makes them hard and expensive to repair. If water reaches the frame of your home, it may become necessary to completely remodel the bathroom in order to get to the damage.
- Untreated moisture damage can cause expensive structural damage to wood studs and support beams.
- Standard homeowner’s insurance policies rarely cover the cost of mold testing or removal.
- Mold removal can cost well over $20,000 for an entire home.
- Once water damage is found in the house frame, demolition and replacement is usually required.
While no system is completely mold proof, you can help protect your family and home by using HardieBacker board and a waterproofing layer behind your bathroom tiles.
HardieBacker Board Needs Waterproofing
HardieBacker is a fantastic material for wet areas because it’s extremely water-resistant. It helps prevent mold and won’t deteriorate when wet like drywall and many other cement boards can. However it still has some flaws. HardieBacker board comes in sheets that are screwed directly to the wall studs. This means there are seams between boards and lots of screw penetrations. These are all potential areas that water can penetrate which is why you must waterproof it before you tile.
- HardieBacker board is a great backing material for tile because it’s water-resistant and very stiff. It doesn’t flex much which makes cracked and/or popped tiles less likely. However, all those seams, corners and screw holes need to be sealed. Once HardieBacker board is installed, it needs waterproofing.
When you use HardieBacker board in a wet area, there are some very important steps to follow.
- Fasten HardieBacker board with approved screws that are waterproof and won’t rust. I recommend Backer-On.
- Once installed, use a liquid waterproofing membrane like Redgard on all cracks, seams, cirners and screw holes.
- I recommend waterproofing all the large flat areas as well. When complete your HardieBacker will be completely red.
- Apply at least two thing coats of waterproofing.
- Always apply waterproofing in thin coats. Many people assume more is better but it isn’t. If you apply RedGard too thick in the corners it’s more likely to crack.
It’s especially important to waterproof cement board in extremely wet areas like showers and tub surrounds.
Waterproof HardieBacker Board Seams & Corners
Once all your HardieBacker board is hung, it’s very important to seal and waterproof all the seams and corners. These are the most likely areas that see water penetration. I use a liquid waterproofing sealant like Redgard. It’s applied directly to the cement board with a roller, trowel, sprayer or brush.
- Apply waterproofing sealant to all the corners and seams first.
- Use a trowel and/or roller to apply product and then a brush to work it into all corners, seams and cracks.
- Apply waterproofing about 6 inches on each side of a corner. Make sure you have a good amount of product in the corner seam. Work the waterproofing into the cracks with your brush and smooth the surface.
- Multiple thin layers of waterproofing works best.
- Don’t apply liquid waterproofing in thick coats or it will crack.
- Smooth the waterproofing with a trowel or brush as much as possible. This makes tiling easier to do.
Fiberglass mesh can also be installed in the corners and seams for even more waterproofing protection.
- Cut the mesh to length and push it into the wet waterproofing layer. It’s done just like applying drywall tape to wet spackle.
- Once the fiberglass is in place, cover it with another layer of waterproofing.
- Use a trowel or spackle knife to push tape tight in the corners.
Waterproofing sealants like Redgard take about 60-90 minutes to dry. You’ll know it’s dry because the color turns from pink to red.
Once all the corners and seams are sealed, go ahead and waterproof all the screw holes and flat areas.
Make sure you also waterproof any shelves, seats, curbs and/or other decorative areas you may have built into the shower.
Once you’re all done, the shower should be completely red.
How To Waterproof HardieBacker Board
The best way to waterproof HardieBacker board is with a liquid waterproofing membrane like Redgard. Apply Redgard directly to your cement board with a brush, roller, trowel or sprayer. You can use fiberglass mesh on the seams and corners along with a liquid waterproofing membrane for even more protection.
- Once the HardieBacker board is installed, mask off areas you don’t want waterproofing with tape. The most common areas are the tub or shower pan. I recommend using a painters tape called Frog tape. It has a special design that cuts down on bleeding.
- Next, use some silicone based caulk to seal any areas where cement board meets any other surface that doesn’t get waterproofed. This is usually a tub or shower pan.
- Apply thin layers of waterproofing to the corners, seams and screw holes first. Push material into the cracks, seams and corners with the brush. Then smooth the surface.
- After the first coat of waterproofing, when its still wet, apply the fiberglass mesh. Push it into the waterproofing layer just like taping wet spackle. Smooth it out and then apply another thin coat of waterproofing on top.
Once all the seams, screw holes and corners are waterproofed, allow the material to dry. This usually takes 60-90 minutes.
- Once the first layer of waterproofing is dry, apply a coat on all screw holes, corners, seams and flat areas.
At this point all your HardieBacker board should be pink. Allow the area to completely dry before installing any tile. You’ll know when Redgard is dry because it turns color from pink to red.
Waterproofing HardieBacker Board With Tile
The way you apply your mud, tile and grout can help waterproof HardieBacker board in wet areas. However, it’s not a replacement for waterproofing. It’s something you do in addition to correctly installing the cement board and waterproofing.
Properly waterproofing a shower or other wet area is a combination approach.
- First you install cement board to the studs with special Back-On screws.
- Then you waterproof it using a liquid waterproofing membrane like RedGard.
- I also recommend using fiberglass mesh tape on all the seams and corners for even better protection.
- Finally, you correctly apply mortar, tile and grout.
Each step adds to the water-resistance of the area.
When it’s time to install tile, I recommend using a hardener if you mix your own mortar. It helps the mortar adhere to both the cement board and tile. This creates a stiffer bond that’s not easy to break. But this isn’t necessary if you use a pre-mixed mortar because there’s already hardener in it.
Trowel adhesive onto the walls evenly with a v-notch trowel. Then press the tiles firmly in place one at a time.Pressing the tiles in place collapses the spaces created by the v-notch which creates a better bond for your tiles.
Work in small areas at a time rather than covering an entire wall with mortar. This prevents the mortar from drying out on the wall.
Make sure and use the correct type of grout.
- For very thin grout lines use un-sanded grout.
- For wider grout lines use sanded.
Press the grout hard into the grout lines so that it penetrates all the way down to the mortar. This eliminates small spaces where water can collect behind the tile.
Installing HardieBacker Board Correctly Helps Improve Waterproofing
If you want your HardieBacker board to be as waterproof as possible you need to install it correctly. Before you install cement board, check that the walls are not bouncy, weak or rotted. HardieBacker board is strong and stiff with high compressive strength. But it has low tensile strength and needs to be installed on a solid foundation.
If the frame you install cement board onto is weak or moves, it could crack the waterproofing layer and tile.
Concrete board should be applied directly to the framing with screws. I recommend using a screw that’s designed to penetrate cement-board like Backer-On. They have special grooves that make screwing into and through cement board easier.
Make sure the screw head is flush with the surface of the cement board when you drive it in. If a screw head sticks up from the board’s surface, it’ll interfere with the waterproofing layer and tile.
Once the boards are all installed, press the walls and all surfaces covered by cement board. If the boards are installed correctly and the frame is strong, you should feel no movement. If your boards flex or bounce, remove the cement boards and fix the issue before applying waterproofing.
Make accurate cuts. Each board seam and corner should touch the next board without large gaps. Large gaps are harder to waterproof with a membrane than tight ones.
Make sure to use enough screws. The great thing about HardieBacker board is that the screw holes are marked for you.
Sealing HardieBacker Board With Caulk
There are some places a waterproofing layer can’t be used, like where cement board touches a tub flange. In this case, you need to use a flexible sealant instead. A.K.A. caulk.
- Mask off areas where you don’t want caulk with tape. I recommend Frog tape. It creates a nice edge with very little bleeding.
- Apply a silicone based caulk to areas where cement board comes in contact with the tub flange or any other material where you can’t use waterproofing.
- Apply the caulk and push it into the cracks with your finger. Smooth the surface as well as possible. Really push the caulk into the cracks with a decent amount of pressure. The further down the crack you can get caulk the better the waterproofing will be.
- Caulk should be applied before the waterproofing layer.
- The waterproofing layer is applied on top of the caulk.
- Use a silicone based caulk.
Apply your waterproof layer right over the caulk. Make sure not to get any on the tub. This is where tape and masking comes in handy.
FAQ
Here is a list of questions we’re commonly asked about waterproofing cement boards like HardieBacker.
Do I Need To Waterproof Cement Boards like HardieBacker In A Shower?
Yes, when cement boards like HardieBacker are used in a shower they should always be waterproofed before you install tile. Tile, mortar and grout are water resistant but not waterproof. Grout and mortar are both masonry products which can absorb water. Usually the water doesn’t penetrate very far and dries out. However, over time moisture can work it’s way below the tiles and onto the cement-board. It can then penetrate through the seams, cracks and screw holes onto the wood frame. This can eventually cause rot, mold and deterioration of the wood.
Once water hits the cement-board it needs to be stopped by a waterproofing layer.
Do You Need Waterproofing Over HardieBacker Board?
You need to apply waterproofing over HardieBackker board in wet areas such as a shower or tub surround. However, in areas that don’t get wet you don’t need it.
Mortar, tile and grout provide some protection against water as well as the cement board itself. It’s enough to resist water in areas that don’t get that wet like a tiled floor. However, showers are constantly in contact with large amounts of direct water and moisture. In these areas you should always install a waterproofing layer on top of the cement board before you tile.
Can You Tile Directly On HardieBacker Board?
You can tile directly on top of HardieBacker board in areas that don’t get that wet. For example, if you’re using cement board as a sub-floor in a bedroom that will be tiled. However, in areas that get extremely wet, like a shower or tub surround, you should always apply a layer of waterproofing on top of the cement board before you tile.
Extremely wet areas like showers not only deal with lots of water but also humidity. This amount of moisture is too much for cement board, mortar, tile and grout to handle alone because there are seams and screw holes which are vulnerable to leaks. In these areas you need a waterproofing layer in between the cement board and mortar. Any moisture that penetrate through the mortar will be stopped by the waterproofing.
Is HardieBacker Board Good For Showers?
HardieBacker board is a great material to use in a shower. It’s very stiff and strong with very little flex. This makes is a great backer material for tile and stone slabs. However, you have to apply a waterproofing layer over the cement board before you install tile or stone.
Tile and stone are installed using mortar and typically have grout. Mortar and grout are both cement based products that absorb water. In highly wet areas, water will absorb through the grout and mortar down to the cement board. It can then penetrate through the seams and screw holes created when you hung the HardiBacker.
Once water penetrates through the HardieBacker it reaches the home’s wood frame where it can cause mold, rot and deterioration. A waterproofing layer is essential to stop leaks.
Summary: Does HardieBacker Board Need Waterproofing?
HardieBacker board is a cement based product that comes in either 3′ x 5′ or 4′ x 8′ sheets 0.42″ thick. It’s used as a sub-material behind tiles in wet areas like a shower or tub surround. HardieBacker sheets are secured directly to wall studs with water resistant green screws called Backer-On. The screws have specially designed threads which can drive through cement board. There’s a common misconception that cement board is totally waterproof because it’s designed for wet areas, but it isn’t. While the boards themselves are water resistant, the seems, inside corners, edges and screws are vulnerable to water penetration. This means HardieBacker board needs waterproofing.
Before you install any tiles, all the seams, cracks, screws, edges and inside corners need to be properly sealed and waterproofed. Most tile installers even recommend sealing all the large flat areas as well. This ensures no water can penetrate through the cement board and onto the framing which helps prevent rot, mold, mildew and deterioration.
HardieBacker board is very dense and water-resistant so it won’t deteriorate when exposed to water. This is ideal for areas like bathrooms and kitchens that have high amounts of moisture and water. However the seams, screws, edges and corners are still vulnerable and need waterproofing before you tile.
Simply installing HardieBacker or other cement boards on your shower walls does not make it waterproof. There will be seams between boards and in the corners as well as screw holes that are vulnerable to water penetration. For this reason, you must always use a waterproofing membrane like RedGard on top of HardieBacker before you tile.
If you have any questions about waterproofing cement board, email any time.