How To Build A Wall On Concrete
To build a wall frame on concrete, first mark out where you want the wall, then take some measurements. Check the length of the wall and the height at several points. Don’t just measure height at one spot because the ceiling and floor may not be level. Remember a wall needs one bottom plate and two top plates. That’s 4 1/2 inches of wood that lays flat against the ceiling joists and concrete slab. Lay your plates on the ground and mark the studs every 16″ o.c.
Before building your walls, check the slab for level. If it’s out of level, consider resurfacing high spots or using self leveling concrete to fill low areas. You can also use some concrete crack fillers to make small repairs.
Building walls on concrete is the same as framing on wood except you’ll have to anchor the wall to the concrete slab. Concrete floors are solid, so it’s difficult to install anchors. But they’re very important because they secure the walls to the slab.
I’ve been a mason for over 25 years and can tell you firsthand that Tapcon concrete anchors or Ramset concrete nails are best.
Tapcon anchors have a much stronger hold but require predrilling. Ramset nails are super fast and easy to install but very loud and the gun’s expensive.
Make sure your bottom plate and any wood that touches concrete is treated. Any untreated wood that touches the slab could rot or become moldy from moisture.
Concrete basement walls need waterproofing to prevent mold before wood walls can be built. I usually use sheets of plastic and some waterproofing paint to create a moisture barrier between the concrete and wood.
The Importance Of Planning The Wall Frame
Building a strong wall frame is important because they’re essentially the bones of a house. All your electrical, HVAC, insulation and plumbing are installed inside the wall frame. And your finishing materials like drywall and trim are hung on the frame. Other things like pictures, mirrors and TVs are also secured to the frame. So you need them to be strong and stable.
Wall frames can either be structural or non structural. If they’re structural, they hold the weight of the floor above them. Luckily, when most wall frames are built on concrete they’re not load bearing because the house is usually built before the basement is finished.
The first thing that you need to do when building a wall on concrete is the mark-out. I use a chalk line to snap lines everywhere I want to build a wall. Then I start taking measurements. Each bottom plate, where the wall rest on the concrete is a single horizontal piece of wood, each top plate is a double. Then studs are installed vertically at each corner and 16″ o.c. from there.
Planning is important which is why I lay out the frame first and snap lines. The lines on the ground will dictate where my walls eventually are framed.
Once the walls are marked, I walk around the space and envision where the walls and doors will be. I can feel if a bathroom or closet is too small or if a doorway should be moved. Designing on paper doesn’t provide the same feel as walking around the space.
A common reason to frame walls in a basement is creating a bathroom. Planning is very important because plumbing and drains will go in around the wall frame. This makes things more complicated so proper planning is essential.
The Tools You’ll Need
Building walls on concrete requires a fair amount of tools but nothing too expensive. If you’re a handy DIY kind of person then you’ll probably already own everything you need to build the wall. But you may not own the tools needed to secure it to the floor.
One of the most important parts about building a wall frame on concrete is securing the bottom plate to the concrete. This requires a concrete anchor or a concrete nail.
- Concrete Anchor: I prefer using Tapcon screws. To install them, you have to drill through the wood bottom plate using a wood drill bit. Then drill into the concrete with a masonry bit. And finally install the anchor.
- Ramset: Concrete nails can be driven through the wood plate and into the concrete using a powder actuated nail gun made by Ramset. You can buy a kit at Home Depot or Lowes that has everything you need. Ramsets are cheap and easy to use once you own the gun but the gun is expensive. And they’re very loud so wear ear plugs.
Here are the tools you’ll need:
- Saw. A table, hand or circular saw will all work fine.
- Untreated lumber. Usually 2×4 or 2×6.
- Treated lumber for the bottom plate.
- Carpenter’s speed square.
- Chalk line.
- Tape measure.
- Carpenter’s pencil.
- Level.
- Shims.
- Hammer.
- Framing nails. I use a nail gun but you can drive them by hand if you don’t have one.
- Ramset powder-actuated nail gun, nails and loads.
- Concrete anchors.
- Wood and masonry drill bits.
- Hand drill. Preferably one with a hammer feature.
- Sawzall and blades. I always carry one with me whenever I frame a wall just in case.
1. Mark Where The Wall Is Going
When building a wall frame on a concrete floor, the first step is the mark-out. With your tape measure and pencil, take measurements and make marks exactly where the wall will go. Then use your chalk like to snap lines to indicate all your bottom plates.
Once you’re done with the mark-out, all the walls should be outlined on the floor in red or blue chalk.
If the concrete floor is finished, use blue chalk because it’s not permanent. If the concrete will be covered with tile or other flooring, you can use red.
2. Cut The Wall Plates
Plates are the pieces of lumber that run horizontally across the top and bottom of a wall frame. Studs are run vertically between these horizontal pieces of wood.
The top of a wall has two plates made from untreated wood. The bottom has a single plate made from treated wood. The reason why the top plate is doubled is because they lock together at the corners. This creates a much stronger and more stable wall frame.
Now that all the walls are marked on the floor, you can take plate measurements.
Cut a treated piece of lumber for each bottom plate and lay them into the marks you made on the floor. Do all the bottom plates first.
Then cut two pieces of lumber for each top plate and lay them on top of the bottom plates. You should now have 3 pieces of lumber stacked on top of each other laying on the floor where your walls will be framed.
3. Measure The Wall Studs & Mark The Plate
Next, measure from the top of your lumber stack to the ceiling joists above. This will give you the exact height you need to cut the vertical studs. The 3 plates should equal about 4 1/2 inches. But I always measure from the stack of plates to the ceiling because wood dimensions can vary. This method gives you a more exact measurement.
Take measurements at several locations along the wall your framing because the floor or ceiling joists may not be level. If they’re not level, you can either use shims to make up the difference or vary the length of your wall studs.
Studs should be installed 16″ o.c. along the wall starting from a corner. It doesn’t matter which corner you start from.
Corners should have more studs to create support for drywall.
As you measure each stud, mark where they go on all 3 plates. This will save you a lot of time later when it’s time to start building the wall.
If you’re floors or ceiling aren’t level and you’ve decided to vary the wall stud lengths rather than using shims, number the studs as you measure and mark them. Start with stud #1 from whichever corner you started at, measure from the top of the stack to the ceiling and make a note of the measurement. Then go to stud 2, stud 3, 4, 5, etc. If your floor is badly out of level each stud can be 1/8″ or more different. When it comes time to frame, knowing which studs goes where will save you a lot of time.
4. Cut & Install The Wall Studs
Once you’ve measured and marked all your studs, it’s time to cut. This parts pretty easy. Just cut each stud to size based on the measurements you took.
When it comes time to build the wall sections you do it on the floor and not upright. Walls are framed on the floor and then lifted in place later.
Lay out your bottom plate, top plates and studs on the floor exactly how they’ll go when lifted upright. Check to make sure the wall is level and square.
Once you’ve confirmed that the wall is square, start nailing the studs into the plates. I drive two nails into each stud through the top and bottom plate. Once that’s done, I nail the second top plate to the first.
At this point the entire wall frame should be nailed together and still resting on the floor.
Pro Tips: Don’t build wall sections heavier than you can handle. Eventually you’ll have to lift them off the ground and nail them in place. If you’re working alone, build smaller sections and secure them together later when the wall is upright.
If you’ll be securing the wall to the concrete slab using Tapcon anchors, drill the pilot holes through the bottom plate now. Don’t wait until the wall is upright because hitting the concrete with your wood drill bit head can damage it.
I recommend one anchor at each corner and one every 3 or 4 feet.
5. Lift The Wall Frame & Secure It In Place
This step can be heavy depending on how long the wall is. Make sure you don’t frame walls heavier or longer than you can handle.
Lift the wall off the ground and set it in place on top of the marks you made on the floor. If you measured and cut all your joists correctly, the wall should slide into place. If it’s tight, use a hammer to bang it in place. Don’t hit the wall directly with your hammer because you could damage the wood, instead, use a wooden block or a rubber mallet.
Double check your wall to make sure it’s level, plumb and on your marks. If it is, nail it to the ceiling joists first. This will hold the wall in place. Nailing the wall to the ceiling joists is easier than securing it to the concrete slab.
If you’re using shims to level the wall, now’s the time to insert them. I always lay my bottom plate on the floor and shim the top.
If you’re securing the wall to the concrete slab using Tapcon anchors, your pilot holes should already be drilled. But if you forgot to do it while the wall was on the floor, drill them now. Be careful when you get to the bottom, if you press a wood drill bit into concrete you’ll damage the bit.
Once the pilot holes are done, use a masonry bit to drill into the concrete. Make sure to use the correct depth and diameter bit for the anchor you’re using.
Finally, secure the anchor.
If you’re using a Ramset nail gun the work’s much easier. Just mark where you want nails and start nailing.
I recommend one nail/anchor at each corner and one every 3 to 4 feet along the plate.
Weather Resistant Fasteners
Whenever you build a wall frame on concrete, I recommend using all weather resistant fasteners.
The bottom plate of a wall frame is treated wood because it touches the concrete. Concrete is porous and absorbs moisture. And basements tend to be damper than the rest of a home. Anything that coming in contact with or penetrates into concrete should be weather resistant which includes the wood and fasteners.
I also recommend using weather resistant nails to fasten the wood frame together. If the basement is damp, a weather resistant fastener will help prevent rust.
Waterproof The Concrete Walls
Basements tend to have more water issues than the rest of a home. Their underground which means ground water can be a problem and they can be damp. You never want to build a wall frame right up against a concrete wall unless the entire wall is built out of treated lumber.
I recommend using treated lumber for the bottom plate and standard lumber for the vertical studs with a waterproofing layer over the concrete walls.
Moisture that seeps in from the ground or through the concrete walls and can lead to mildew, mold, and water damage. I always apply a roll-on waterproof seal directly on the concrete. If any outside moisture penetrates through the concrete, the waterproofing layer will help prevent it from reaching the newly framed wall.
If you have a more serious ground water issue then you may need a french drain or sump pump. You should also consider dealing with the water issue from the outside. The leading cause of water damage in basements that I see are caused by improperly sealed exterior basement walls, gutters or a grade that slopes towards the house. Non of these issues can be fixed from the inside.
Foam Insulation
If you plan on insulating the basement, I recommend using foam instead of batt.
Install some extruded polystyrene (XPS) foam directly onto the walls. XPS is a good insulator and water resistant so it adds an additional layer of protection.
Once the waterproofing layer is dry, you can glue the foam right to the concrete wall. Use some sealant where foam boards meet. Use some more sealant and spray foam on all the small cracks and gaps.
Foam boards come in long lengths similar to drywall. Install them vertically and not horizontally. The seams should all run up and down. If you stack the boards it creates a horizontal seem where water can collect.
Owens Corning rigid foam sheets provide about R-5 worth of insulation per inch of thickness.
Keep The Foam Off The Framed Wall
I recommend keeping at least 1/2 inch of space between the new wall frame and the foam insulation. This provides some air flow in case moisture should penetrate through the foam.
Insulate The Wall Cavities
If I need even more R-value than foam can provide, I use batt inside the wall cavities. I do this in addition to the foam.
The Owens Corning rigid foam I use provides about an R-5 per inch. I don’t like to get all my R-value from foam because it adds too much additional thickness to the wall. Instead, I use an inch of foam and at least an R-13 in the wall cavities. This adds up to an R-18 which is usually enough for a basement.
The Best Ways To Attach A Wall Frame To Concrete
The best ways to secure a wall frame to a concrete slab is using a concrete anchor, a shield and bolt or concrete nail.
I prefer using concrete nails shot from a powder actuated nail gun made by Ramset. There are a few manufacturers that make concrete nail guns. Hilti is another that works really well. But my favorite is Ramset. They’re fast and easy to use. If you’re finishing a large basement, using a Ramset to nail down all the plates will save you a lot of time and money vs anchors or bolts.
My second favorite method are concrete anchors made by Tapcon. They’re basically a screw that drill down into the concrete through a hole in the plate. They’re a grate way to secure a wall plate to concrete, but take a lot more time and effort than shooting a nail. You have to drill pilot holes through the plate with a wood bit and then into the concrete with a masonry bit. If I need a stronger hold, then they’re worth the extra effort. But in most cases the nails are enough.
Lastly I use concrete shields and bolts, but only in structural applications. Most basement walls tend to be non-structural so I don;t use the shields and anchor bolts that often.
Below we’ll discuss the best ways to secure a wall frame to concrete in more detail.
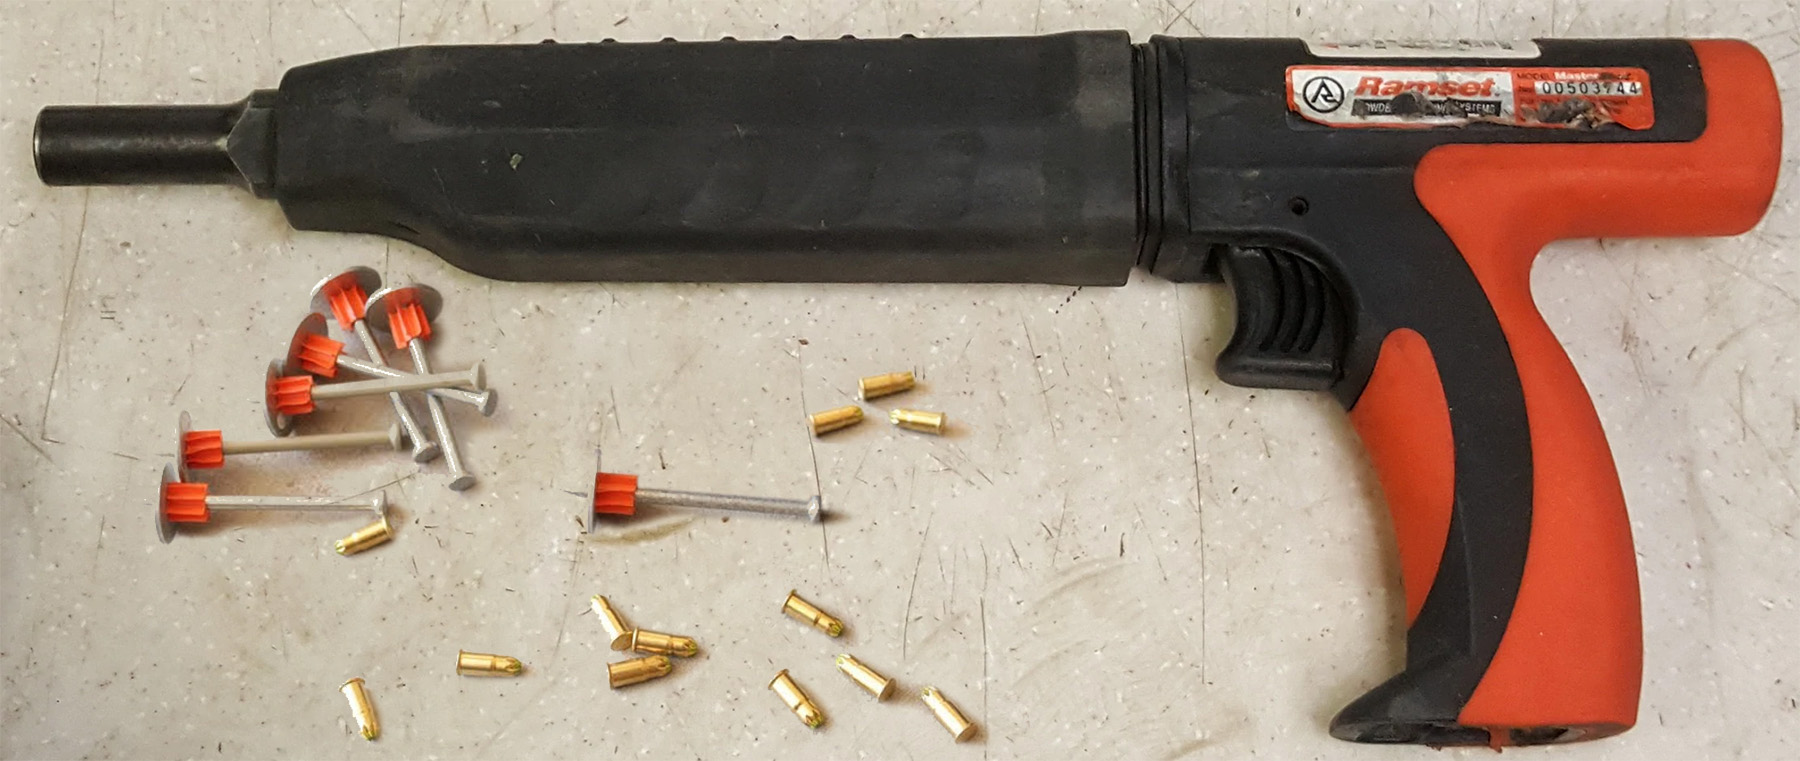
Concrete Nails
I don’t recommend trying to hammer a concrete nail through the bottom plate and into solid concrete by hand. Instead, use a powder actuated nail gun by Ramset. These guns work just like a hand gun. They use powder loads to shoot very strong nails through wood and into concrete.
Concrete guns are very loud and potentially dangerous so use safety gear like goggles and ear protection.
Use at least a 3″ nail so 1 1/2″ penetrates into the concrete.
Concrete guns are great because they’re very fast and provide good sheer strength. This is the strength a fastener has to resist snapping. When I finish an average size 1500 sq. ft. basement, I can nail down all the plates in about half an hour. It would take a day to do the same amount of work with concrete anchors. Drilling all those holes into solid concrete takes time, effort and a lot of expensive drill bits.
Concrete guns are expensive. But once you own the gun the nails and loads are relatively cheap. And they install fast which saves time and money. If you own a Ramset, concrete nails are the cheapest option.
Concrete Anchors
My concrete anchor of choice are Tapcon screws. They’re great at securing a wood wall plate to a concrete slab. But they’re not cheap and take more effort to install.
First you have to drill pilot holes through the wood plate using a wood bit. I do this before the walls are even framed. After the wall is framed and upright, I drill through the pilot and into the concrete using a masonry bit.
Make sure you use the correct length and diameter bit for the anchor you’re installing.
It takes time and effort to drill holes into a solid concrete slab. Especially if you hit a stone. Buy extra drill bits because you’ll need them.
I use at least a 3″ anchor so 1 1/2″ penetrates into the concrete.
Anchor screws not only provide good tensile strength, but they’re also very hard to pull out of the concrete.
Overall, concrete anchors provide a better hold than nails. However, they take a lot more time and effort to install which makes them more expensive to use than nails.
Lag Shields & Bolts
Lag shields and bolts are a way to anchor a wood plate to concrete in a much more secure way. I almost never use lag shields and bolts unless the wall frame is structural.
Lag shields need to be installed into the concrete before the wall is lifted in place. When you drill the pilot holes in your plate, mark the floor where the holes are.
Once the shield locations are marked on the floor, remove the plate. Drill pilot holes in the concrete and clean out all the dust and debris. Then screw in the shields.
Once the shields are in place, build and lift your wall frame and nail it to the ceiling.
After the wall is upright and nailed to the ceiling, you can install the lag bolts. Screw them down into the shields. Leave about an inch of the bolt above the top plate. Place a washer over the inch of bolt sticking out from the plate and then screw on a nut. The nut will tighten the plate to the floor.
Summary: How To Build A Wall Frame On Concrete
To build a wall frame on concrete, first mark out where you want the wall, then take some measurements. Check the length of the wall and the height at several points. Don’t just measure height at one spot because the ceiling and floor may not be level. Remember a wall needs one bottom plate and two top plates. That’s 4 1/2 inches of wood that lays flat against the ceiling joists and concrete slab. Lay your plates on the ground and mark the studs every 16″ o.c.
Before building your walls, check the slab for level. If it’s out of level, consider resurfacing high spots or using self leveling concrete to fill low areas. You can also use some concrete crack fillers to make small repairs.
Building walls on concrete is the same as framing on wood except you’ll have to anchor the wall to the concrete slab. Concrete floors are solid, so it’s difficult to install anchors. But they’re very important because they secure the walls to the slab.
I’ve been a mason for over 25 years and can tell you firsthand that Tapcon concrete anchors or Ramset concrete nails are best.
Tapcon anchors have a much stronger hold but require predrilling. Ramset nails are super fast and easy to install but very loud and the gun’s expensive.
Make sure your bottom plate and any wood that touches concrete is treated. Any untreated wood that touches the slab could rot or become moldy from moisture.
Concrete basement walls need waterproofing to prevent mold before wood walls can be built. I usually use sheets of plastic and some waterproofing paint to create a moisture barrier between the concrete and wood.
If you have any questions about framing walls on concrete, email or leave a comment below.

John Mazzuca | About | More Posts |
Custom Home Builder
John Mazzuca is a custom home designer and builder at Gambrick with over 25 years experience in the construction industry. John has designed, built and/or remodeled hundreds of homes, small buildings, and commercial projects. He writes about business, real estate, home building, and household electronics. His work has been featured in Fox Business, Better Homes & Garden, House Beautiful, and more.