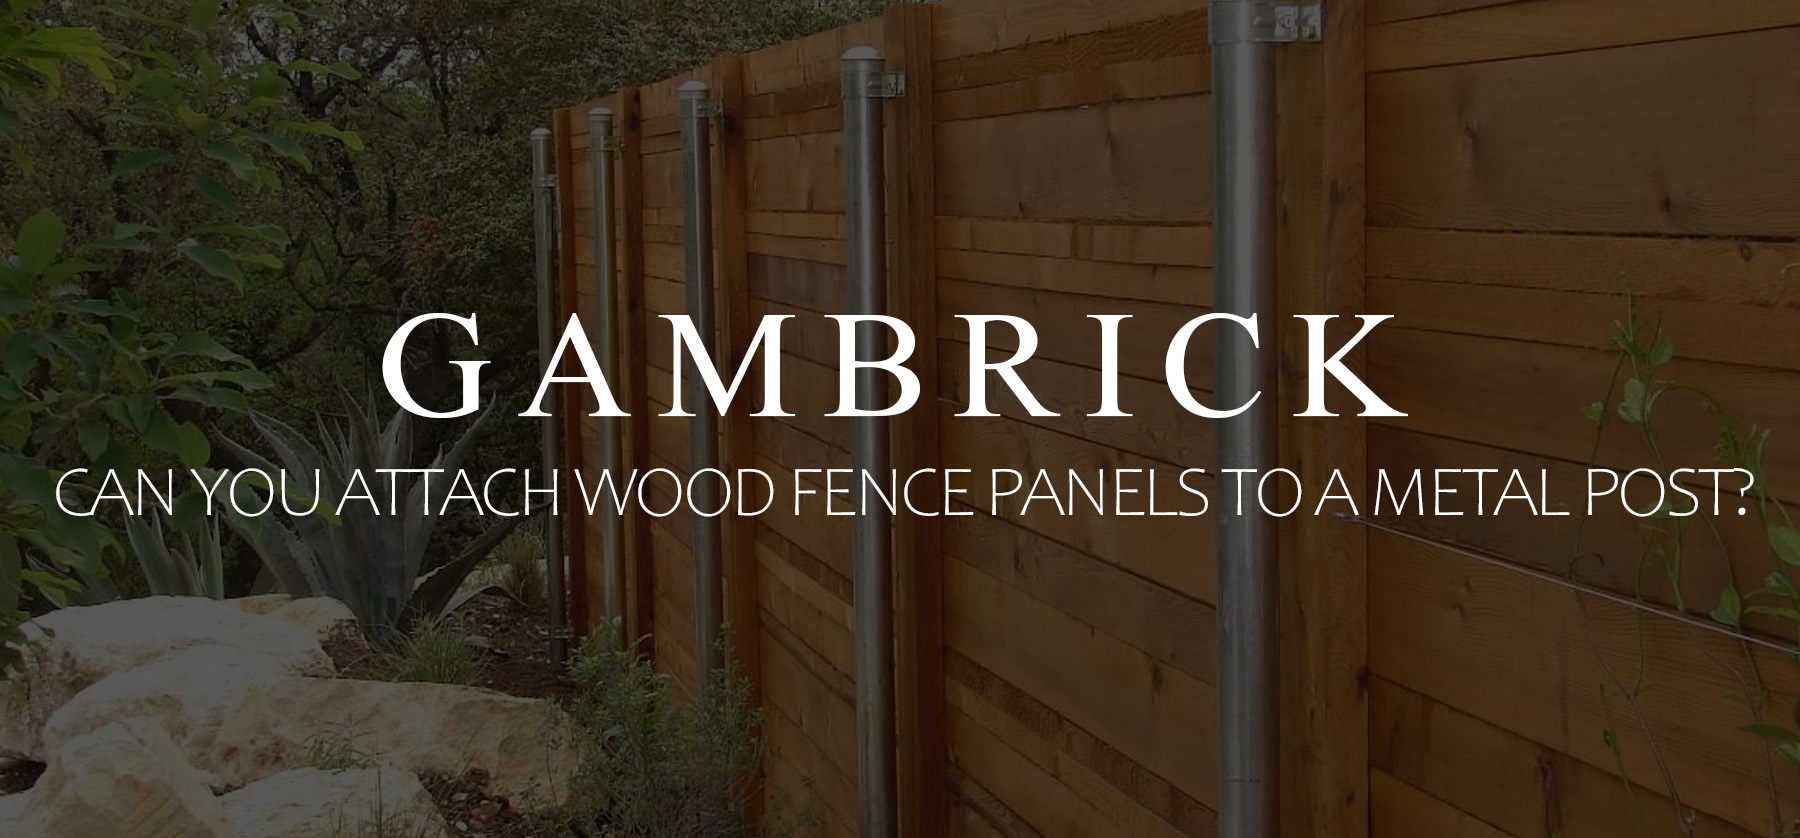
Can You Attach Wood Fence Panels To Metal Posts?
It’s easy to attach wood fence panels to metal posts. Galvanized metal fence posts are more durable than wooden fence posts and don’t decay, so using them to support your wooden fence makes sense. Especially if you’re replacing a chain-link fence with a wooden fence and want to re-use the posts. Building a wooden fence with metal posts is easy thanks to brackets and screws. They’re what secures wood panels to metal. You could also build a sleeve out of 4 pieces of wood and wrap it around the metal post. This hides the metal post but retains it’s strength. Lastly, you could screw your wood fence panels directly to the metal posts.
People like wood fences because they’re beautiful, traditional, affordable, strong, and easy to install. But the main issue with wood fences is that they rot over time. And the main place they rot is at the post base. This issue is eliminated when you use a metal post instead. Pressure-treated fence posts can help but they can eventually rot too. Then there are animals and bugs to consider. Nothing bites or boroughs inside a metal fence post.
Fence posts, on the other hand, should last a long time:
- Wood fence posts usually last 15 to 20 years.
- Galvanized metal fence posts can last 50+ years.
Metal fence posts add strength and durability to the fence while wood offers beauty. By using wood panels with metal posts you get the best of both materials.
In this article we’ll explain how.
How To Attach Wood Fence Panels To Metal Posts
The majority of residential fences are made of either wood or metal. Wood fences, often referred to as “privacy fences,” are typically built of wood panels connected to wood posts.They’re strong, durable, attractive, provide privacy, but rot.
Metal fences are generally chain-link attached to metal rails and posts. Metal is stronger than wood and won’t rot but they don’t provide and privacy and aren’t typically considered an attractive fence. Generally chain link fences are built to keep people animals in or out and although they don’t rot, they an rust. But what if you combined the two.
Attaching a wood fence panel to a metal post is very easy. When you build a fence this way, you gain the benefits of wood panels with the strength and durability of metal posts. It’s really the best of both materials and a surprise more people don’t build fences this way.
Metal posts come in three main types, Square Posts, Round Posts, T-Posts or U-Channel. But luckily attaching wood to them is the same no matter what style or size post you have.
There are three ways I attach wood to metal.
- Brackets & Screws.
- Wood Sleeves.
- Direct Connection.
Below we’ll go over each method in detail.
Brackets & Screws
The main way to attach wood fence panels to metal posts is with brackets and screws. The bracket you use will be determined by the type of post you have because a round post will need different shaped brackets than a square one.
The brackets function the exact same way no matter their shape. Essentially a bracket acts as a middle man securing two things together that aren’t actually attached to one another. For example, the bracket is screwed into the post and then into the panel, but the panel and post are never attached to each other. The bracket does all the work.
No matter the type of bracket you use, you’ll need both metal screws and wood screws. You should also bring a drill and metal bit to make pilot holes in the metal. A pencil will come in handy to mark the holes and a tape measure to help line things up. Bring a level to make sure both the post and panel remain level and plumb as you install the brackets.
Make sure the brackets and screws you buy are for outdoor use. If not they’ll eventually rust.
Use brackets and screws that are strong enough to support the fence panels you’re attaching. Since they’ll be bearing the weight of the panels they’re a point of possible failure.
A helper or two will come in handy. Your helpers can hold the panel in place while you secure the brackets. If you’re working by yourself the job gets harder. Screw the brackets to the posts first and then secure the panels. If you screw the brackets to panels first, you’ll have a hard time slipping them over the posts.
Where To Buy Brackets
Most home and garden retailers like Home Depot, as well as fencing suppliers, carry the brackets you’ll need. You can also order them online.
Most fence brackets are designed to fit around a galvanized post with a diameter of 1 5/8 or 2 3/8 inches because that’s the most common size. But you can order brackets in all sorts of sizes. The bigger and less common the bracket size, the more expensive it will be.
Some use a tension bolt to hold them in place, while others simply fit over the post and are secured when the wood fencing is installed. But I prefer the brackets that actually screw into both the metal and wood. Tension attachments can loosen over time but some good screws won’t.
Attaching Wood To A Round Metal Post
Round posts are the most common metal fence post because they’re used to build chain link fences. When using a round post, you have a few bracket choices. The most straightforward is a pipe rail tie. This wraps around the round metal post and can be screwed into both sides of the post’s wood panels.
A bolt or screw on some pipe rail ties allows the bracket to be tightened around the round post. The stronger the connection, the less it wobbles.
If you don’t want to use brackets, try attaching the fence panels directly to the posts with metal screws. It’s hard to screw a flat piece of wood to a round post because there isn’t much surface contact. To fix this you can buy or make a mounting block. One side of the block is flat while the other is rounded. Screw the round side to the post and the flat side to the fence panel. Mounting blocks make it easier to attach flat objects to round surfaces because one side of the block is rounded. Just make sure the inside radius of the block matches the outside diameter of the post.
Attaching Wood To A Square Post
Attaching wood fence panels to a square post is easier than a round one because they’re flat. Either a bracket and screws or just screws works great.
When attaching wood to metal, make sure you use metal screws and pre-drill the holes. This will make the job a lot easier. You could also use self tapping screws that drill into the metal by themselves. They work fine if the metals not too thick but I prefer pre-drilling.
If you decide to use a bracket there are lots to choose from. They range in size from light to heavy duty. Make sure to use a bracket designed for exterior use and that it’s sized properly for your panels. Undersized brackets or screws can eventually fail.
If you use self tapping metal screws, I recommend pre-drilling into the wood. Self tapping screws work great for metal but won’t go through wood. This also helps ensure the screws will be on the correct location when you go into the metal.
Make sure you account for the thickness of the wood when you buy your screws because you don’t want them to be too short. This is a very common mistake. If the fence panel is 2 inches thick then don’t buy a 2 inch or even a 2 1/4 inch screw because that won’t leave enough in the metal. I’d recommend at least a 3 inch screw so that a full inch penetrates into the metal.
Attaching T-Posts Or U-Channel
T-Posts and U-Channel are basically the same thing. The standard t-post or U-channel will be studded or plain metal without holes. You have two choices, use metal screws and drill holes in your post or use a post bracket.
One thing to keep in mind about t-posts and u-channel is that they’re generally used for temporary fencing or to keep in animals. Residential fences typically don’t use them because they’re not that attractive and not as strong as a a more permanent fence post. They’re also not generally installed in concrete. This doesn’t mean that you can’t use them permanently, they just aren’t very often.
The one good thing about both t-posts and u-channel is that there’s a flat end. Make sure this is the end that touches the fence panel. Mounting two flat surfaces is much easier than when you secure flat to round.
Wire works really well with both t-posts and u-channel when they have slots,holes or studs. You can use these to helps secure the wire tightly.
Securing Techniques
The way you attach your wood fence panels to the metal post will have a big impact on how stable they are. The stability of your fence panels is also determined by how you secure your fence post.
There are two main ways to secure your metal posts, in the dirt or in concrete. Pounding a post into the dirt works fine for lighter fences, but if you’ve got a heavy fence I recommend using some concrete around the post base.
This is also effected by the design of the fence. Chain link doesn’t need as stable a post because wind goes right through it. But a solid fence acts as a sail and catches the full force of the wind. The lateral forces can be extremely high in a wind storm. If you’re installing solid wood fence panels then I recommend using concrete.
Insert the metal post into at least a two-foot-deep hole. Pound it down with a post driver, then fill the hole with dirt while pushing it down to ensure a tight fit.
Instead of filling the hole with dirt, fill it with concrete if you want your post to be stronger.
Whatever method you use to secure the fence or posts, make sure it’s very strong without any wiggle. Any amount of play will be amplified over time or in a storm.
Metal Fence Posts
If you’re switching from a chain-link to a wooden fence, you won’t need to install posts because that will already be done for you. But if your building a new fence you’ll have to layout and install the posts first. Once the posts are in place you can start installing the wood panels.
Remember, as a rule of thumb about a third of the posts total length should be in the ground. For example, if you want a 6 foot post above ground then you’ll need an 8 foot post total.
Generally posts should be spaced about 6-8 feet apart. But actual measurements will depend on your fence design. If the wood panels are 10 feet then space the posts accordingly.
The depth and amount of concrete you’ll need has a lot to do with the weight of the fence, the fences design and the soil.
- If the wood panels are solid then use more concrete. Solid fences are like a sail and catch the full force of the wind. They’ll need the extra support.
- Fences with holes don’t need as much support because wind goes through them. The more holes there are l=the less concrete the posts need.
- When installing a fence in sandy soil use more concrete because the dirt doesn’t offer as much support.
- Remember about 1/3 of the total post height is below ground. When the fence is high go deep.
- The heavier the fence the more support it needs.
Setting Metal Posts
The first step in building a fence is setting the posts. If you’re converting a metal fence to wood then you’re in luck because this step is already done.
Setting posts involves digging a deep hole for the posts to set into and then filling that hole with concrete or dirt after the post is in place. Be careful as you work to ensure that all the posts are in a straight line and that they are all exactly plumb. If the concrete dries and the posts aren’t perfect you’ll have a hard time attaching or building the wood panels later.
In order to ensure that the posts are in a straight line, tie a string at the bottom and top of the posts at the corners. All the center posts should align with the string. At the same time, check each post with a level as it’s set and as you fill the hole. This ensures that it remains plumb.
You may also need to use some temporary braces to hold the fence posts in place while the concrete is setting and being poured.
As a general rule, about 1/3 the total length of the post should be below ground. For example, if you want 6 foot of the post above ground you need about an 8 foot post with 2 foot buried.
Alter the amount of concrete you use based on the height of the fence, size of the fence and soil conditions. Bad or soft soil like sand needs more concrete. So does a heavier or higher fence. And the design matters too. If your fence is solid it needs more concrete because of wind. Hollow fences aren’t effected as much by wind because it goes right through them.
Wrapping Metal Posts With Wood
One of my favorite ways to attach wood fence panels to metal posts is by wrapping the posts with wood.
If you like the look of an all-wood fence but want the strength of metal posts, then wrap the posts in wood. You’ll get the best of both materials without seeing any metal.
Special mounting brackets allow you to entirely conceal the metal posts by wrapping them in lumber. The brackets have one flat side and one round side. First, screw the brackets onto the posts. Then, screw 4 planks of wood to the brackets to form a box, also called a column wrap, around the post.When you’re all done you won’t see any metal.
You accomplish this without mounting brackets. Build the wrap first out of 4 planks of wood and then slide it over the metal post. Screw through the wood and into the metal. Make sure the inside diameter of the wrap is just a hair larger than the outside diameter of the metal post. By doing this, the wrap will fit tightly over the post without too much wiggle room. Use some shims to hold the wrap tight against the post.
Make sure to use outside wood for your wraps so they don’t rot.
The post wraps and fence panels don’t necessarily have to be made out of the same wood. It all depends on the look you want.
When it comes time to install the fence panels, you can either screw them into the wood wraps or into the metal posts underneath.
Build The Wood Fence Panels
Whenever you build a fence, the posts are installed first. Without strong fence posts the panels don’t accomplish much. Panels make up the majority of a fence but it’s the posts that provide support.
If you’re building a fence from scratch without pre-made wood panels then here’s a simple steps by step guide to help.
- Measure, layout and install all the posts. Make sure the posts are the right depth to support the fence. Determine if you need concrete or not.
- Once the posts are set, install horizontal fence rails that run from post to post. Secure these wood rails to the metal posts with metal screws. You can also use brackets to tie the rails to the posts.
- Next, install fence pickets to the rails. This is a wood to wood connection so either nails or screws will work. You can install pickets to just one side of the fence but I recommend installing them on both sides. The result is a more secure and better looking fence.
- Finally, install the last decorative pieces like post caps.
You can also build fence panels separately and then attach them later in one piece. This is the same process as if you bought the panels factory made. In this case follow the instructions we discussed above.
Finally, install or build the gate.
Some builders use two fence rails rather than three. When the fence is first built it doesn’t make much of a difference. But as the fence ages it does because the pickets can warp. With only two fence rails, it’s more likely which can result in gaps and an ugly fence. A third center rail helps keep the fence panel strong.
Install The Gate
To take advantage of the galvanized post’s strength on the hinge side of the gate, attach the gate to it with the same gate hinges you’d use on a chain-link fence gate. To lighten the gate, start by making a metal gate frame out of thinner steel pipes than you used for the posts.
With galvanized steel corner brackets, assemble the frame parts. Drill holes through the top and bottom rails of the gate frame and attach wooden rails with carriage bolts, then hang the gate frame to the post hinges.
Fence planks are screwed to the rails to complete the gate.
Wire
Another great way to attach a wood fence panel to a metal post is with wire. It’s cheap and easy to install. Although I don’t recommend this as a permanent solution. If you’re building a permanent fence then use a bracket or screw the wood directly to the post.
All you’ll need for wire work is the wire, some pliers and a wire cutter. To make things even easier use a wire cutter/pliers combo tool.
Make sure you use outdoor wire that won’t rust and a thick gauge. If you under size the wire it could snap.
I recommend a wire connection at least every 18 inches up the post.
To secure the wire, simply wrap it around the panel and post. Then twist the wire until it’s very tight. Finally snip the excess wire. 3 or 4 twists is usually plenty.
If the fence panel doesn’t have a space to run the wire through, you’ll have to drill small holes yourself or mount a small bracket shaped like a U to run the wire through.
Installing Metal Fence Posts As A Repair
An existing wood fence with rotted posts can be repaired by replacing the existing posts with galvanized steel.
First, the section of fence resting on the rotted post needs to be disassembled. You want to save and re-use the panels so be careful. Ideally, all you’ll be replacing is the post.
Removing the rotted fence post means also removing the concrete that’s in the ground. If there’s no concrete then your in luck. But if there is then you’ll have to dig it out.There’s no easy way to do it. Dig on either side of the concrete and push the post back and forth. Once it’s loose you’ll have to pull the post out of the hole. A jack or lever and fulcrum can help get it out of the ground.
Once the post and concrete are out of the ground, set the new metal post in place. A little gravel at the bottom of the hole helps. Use a tube to hold the concrete in place since the hole will probably be very large.
Make sure the new metal post is aligned with the other posts. String a line between the far corner or end posts to be sure.
When the new metal post is in place, slowly pour the concrete, Check the post for plumb as you go.
When the concrete is set, secure the wood panels to the new metal fence post.
Summary: Can You Attach Wood Fence Panels To Metal Posts?
It’s easy to attach wood fence panels to metal posts. Galvanized metal fence posts are more durable than wooden fence posts and don’t decay, so using them to support your wooden fence makes sense. Especially if you’re replacing a chain-link fence with a wooden fence and want to re-use the posts. Building a wooden fence with metal posts is easy thanks to brackets and screws. They’re what secures wood panels to metal. You could also build a sleeve out of 4 pieces of wood and wrap it around the metal post. This hides the metal post but retains it’s strength. Lastly, you could screw your wood fence panels directly to the metal posts.
People like wood fences because they’re beautiful, traditional, affordable, strong, and easy to install. But the main issue with wood fences is that they rot over time. And the main place they rot is at the post base. This issue is eliminated when you use a metal post instead. Pressure-treated fence posts can help but they can eventually rot too. Then there are animals and bugs to consider. Nothing bites or boroughs inside a metal fence post.
Fence posts, on the other hand, should last a long time:
- Wood fence posts usually last 15 to 20 years.
- Galvanized metal fence posts can last 50+ years.
Metal fence posts add strength and durability to the fence while wood offers beauty. By using wood panels with metal posts you get the best of both materials.
If you have any questions or comments about recycling vinyl fencing Email any time.