Should I Caulk Or Grout Shower Corners?
Shower corners should be caulked instead of grouted. Use a 100% silicone caulk that’s mold resistant. Caulk is flexible and creates a water tight seal between corner shower walls which helps prevent leaks. Grout is also a great material for sealing a shower corner but it’s stiff with zero flexibility. If the shower corner walls move independently of one another, the grout can crack and fall out. This can cause leaks. To use grout in a shower corner you must first frame the two walls together to form a single strong unit. Then use a strong concrete backer board followed by a water proof membrane. Pay special attention to waterproofing the corners because this is where most leaks occur. If the corner walls move together rather than independently there’s less chance the grout will crack.
Caulk is a better material than grout for sealing the corners of a shower. But you need to use the right caulk. Buy 100% silicone waterproof caulk with mold resistance. Normal caulk is prone to mold growth which is common in showers because of their humidity and warmth.
You should never caulk over grout in shower corners. Silicone caulk does not bond well to grout. It peels which allows moisture to rest between the grout and caulk. This eventually causes mold and mildew growth.
If you want to caulk the corners of your shower, remove all the old grout or caulk that’s already there. Then apply new material. Don’t cover up old grout or caulk with new caulk. The same is true of applying new grout. Never grout over old grout or caulk. By applying new material to tile, you’ll achieve a longer-lasting seal with a more professional look.
In this article we’ll discuss using caulk vs grout in a shower corner.
Best Caulk For Shower Corners
The best caulk for shower corners is 100% silicone with mold resistance. Silicone caulk is waterproof, flexible and creates a water tight seal in the corners. It bonds tight with tile and because it’s flexible won’t crack or fall out when properly installed.
Make sure the shower caulk you use says 100% silicone and water-proof. Water-resistant and water-proof are different. For a shower corner you want a water-proof product. That’s why 100% silicone is best.
Make sure the silicone tube also says crack, shrink and mold resistant. These are all very important qualities for a shower.
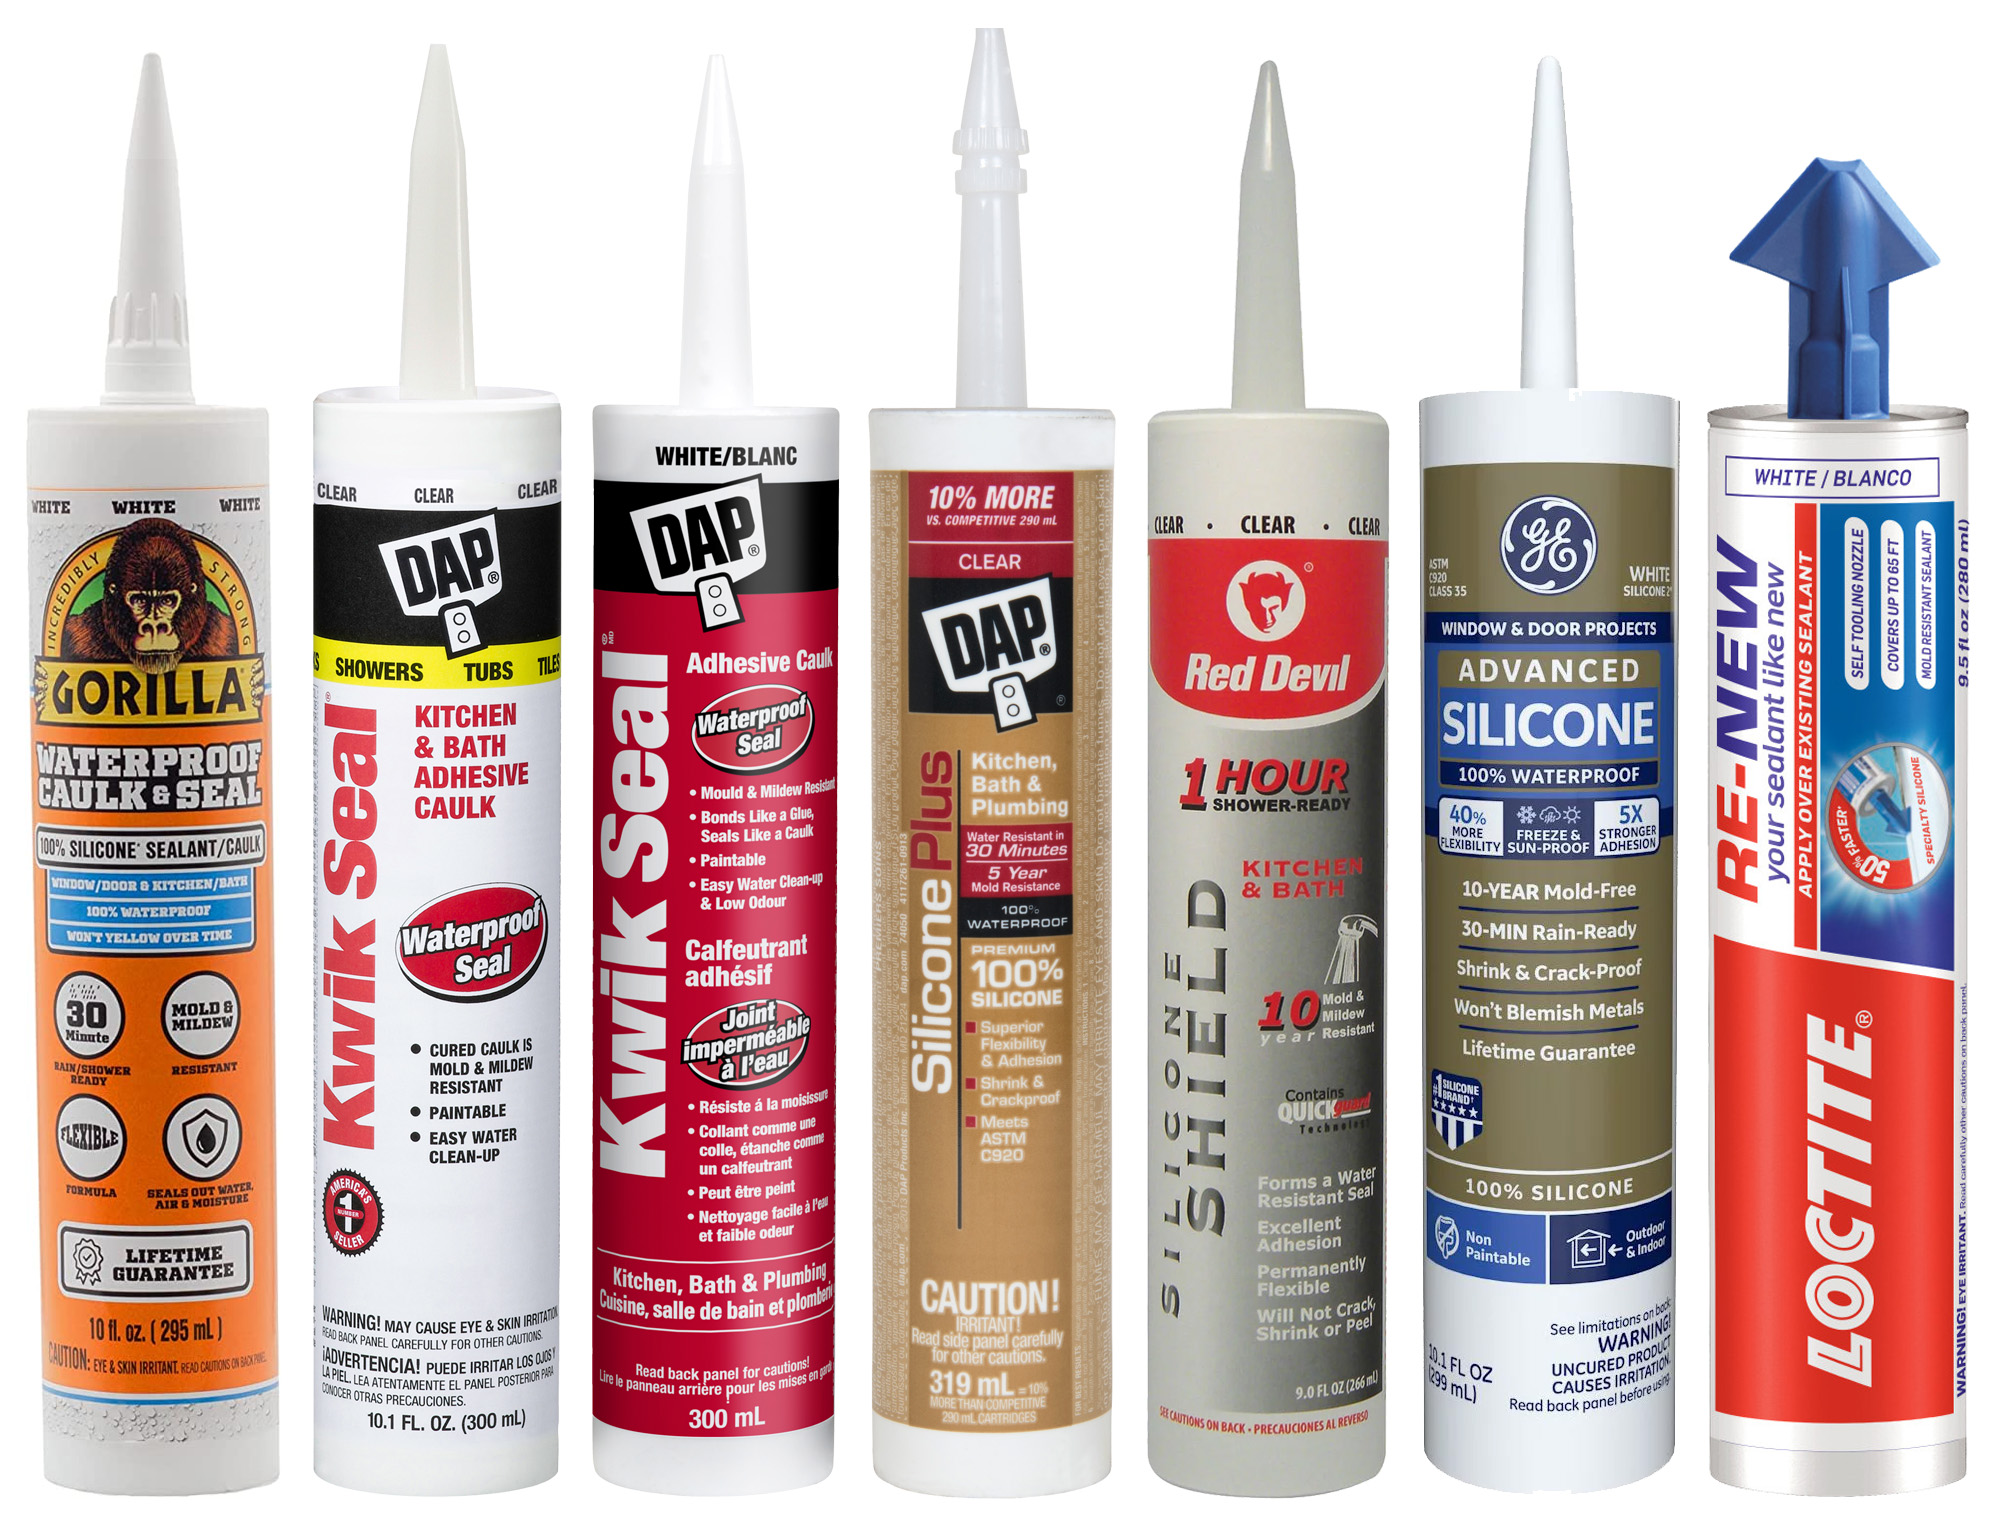
Here’s a list of my favorite caulks for shower corners in order:
- Gorilla: I love Gorilla Waterproof Caulk & Seal for showers. It’s 100% waterproof, mold and mildew resistant, doesn’t yellow and won’t crack.
- Dap: Dap makes a variety of silicone caulks that are great for shower corners. Kwik Seal is my favorite.
- Red Devil: I like the product a lot but it’s hard to get because they don’t stock it in most stores.
- GE: This is a great silicone but it’s not specifically made for showers so it’s last on my list. But it works great, is mold, shrink and crack resistant and is 100% silicone.
- Loctite: Loctite is great for sealing shower corners because it comes with a nozzle designed to shape the corner for you. It’s a good choice if you’re a homeowner that doesn’t own a corner shaping tool or aren’t confident enough to shape the corner with your finger.
All the products on this list are great caulks for a shower corner. Remember when buying a shower caulk, look for 100% silicone, crack, shrink and mold resistance and water-proof.
Can You Caulk Over Grout In Shower Corners?
No, you should never caulk over existing grout in shower corners.
Caulking over cracked grout will only temporarily fix the problem. You should only use 100% silicone caulk in a shower because it’s waterproof. It creates a tight seal with tile, but it doesn’t bond well with grout. Eventually the caulk will start to peel off the grout which allows water to penetrate.
Once caulk starts to peel away from the grouted corners, water can seep between the caulk and grout. Once moisture gets between the grout and caulk, it’s very hard for it to dry out. This eventually leads to mold and mildew growth.
Mold and mildew can grow in a few months or a few years. It depends on the humidity and temperature of the bathroom and shower. But eventually caulked grout will start to separate and either mold or mildew will grow.
- Caulk over grout in a shower corner will peel over time because caulk does not bond well with grout.
- Mold and mildew can form between the caulk and grout.
- Mold and mildew that grows in your shower can spread to the walls behind your shower tile and then throughout the home.
Grout is water-resistant but not waterproof. It’s actually a porous material that can absorb some water. However silicone caulk is 100% water-proof. If you caulk over grout, moisture that absorbs into the grout will be trapped by the caulk. This create mold growth in the space between the caulk and grout.
If you use clear silicone caulk in a shower corner you can actually see mold and mildew as it grows between the caulk and grout. But you won;t be able to clean in without removing all the caulk. The mold can then spread behind the shower tile and potentially into your home.
Why Use Caulk Instead Of Grout In Shower Corners?
Silicone caulk works better in shower corners than grout because it’s flexible and 100% waterproof. When grout is used to seal a shower corner it’s prone to cracking and falling out. This is because grout is very stiff with no flexibility.
A shower corner is made of two walls that meet in a corner which creates an angle. The two walls that make a corner can move independently which can cause cracks. If the walls move, caulk can move with them because its flexible, but grout cant. This is why cracks in the corner of a shower are so common.
Shower walls can move due to expansion and contraction, settling, drying or vibration.
An area that’s especially prone to cracks are shower corners on an exterior wall. They’re more susceptible to movement because of expansion and contraction or strong wind.
When the tiles of a corner shower wall expands and contracts with temperature changes or move from settling, drying or vibration, the grout can’t flex with the movement. This causes grout cracks up and down the corners. Silicone caulk provides flexibility and a waterproof seal that won’t crack.
- Grout in shower corners can crack and fall out due to movement.
- Silicone caulk forms a waterproof, flexible seal in shower corners.
- Always use silicone caulk in shower corners or any place where tile meets another hard surface such as a tub edge, wall, window, fixture, door, shelf, seat, etc.
When sealing your bathroom, use caulk in corners and wherever tile meets another hard surface. This includes walls, floors, tubs, fixtures, shelves, seats, windows, doors, etc.

Why Use Grout Instead Of Caulk In Shower Corners?
Grout is better than caulk for sealing a shower corner because it matches the texture, grit and color of the tile joints. When the joint grout flows seamlessly into the corners it creates a more cohesive look. In just about every case, grout looks better than caulk in the corners. But it’s prone to cracking. The only reason why builders use caulk in shower corners instead of grout is to avoid leaks because grout cracks.
However, if you can fix the reasons why grout cracks in a shower corner you can use grout without worrying about cracks.
So why does grout crack when used in a shower corner? Here are the reasons:
- Stiffness: The biggest reason why grout cracks in shower corners is because the two shower walls are separate and don’t move as one. Grout is very stiff with zero flexibility o when the walls shift the grout cracks.
- Expansion & Contraction: One of the reasons why the shower walls move is expansion and contraction.
- Settling: Uneven settling can cause corner cracks.
- Movement: Wind, walking, vibration and doors can all cause the walls of a shower to move.
If both shower walls move as one unit, or don’t move at all, the corner grout won’t crack.
Showers built on a slab can use corner grout because the slab won’t move. But if your shower is built on wood, here are some tips you can use to strengthen it:
- Double up floor joists and use engineered lumber to prevent settling.
- Tie the corner framing together tightly.
- Use thicker wood to form shower walls. 2×6 instead of 2×4.
- Use plywood under the concrete backer for more stability.
If the shower is built strong and the corner walls are tied together, they’ll move as one unit which helps prevent corner cracks.
Grout Caulk Vs Silicone Caulk
Grout caulk is grout mixed with some silicone to help it adhere and resist cracking when used in a shower corner. It comes in a variety of colors and has some grit like real grout. But it’s not as good a sealant as 100% silicone. If you want the look, texture and color of grout but are worried that it may crack, try grout caulk. But if you want the best possible seal in your shower corner use caulk. However caulk isn’t as nice as grout and won;t blend in with your tile grout.
Which is best, grout caulk vs caulk depends on the shower. If the shower is built on a weak floor that moves a lot. You’ll need the flexibility of silicone caulk. Grout caulk is less flexible and can crack if the walls and floors move.
Grout caulk is stiffer than silicone caulk with less flexibility but it looks better. Use it if the shower is well built and doesn’t move much.
Do You Caulk Or Grout Inside Corners?
You should always caulk inside shower corners or anywhere else tile meets another hard surface. Grout is a cement-based material that’s very rigid. It’s great for filling the gaps between tiles. But it isn’t flexible enough for corners. In areas where you need some flexibility the best material to use is caulk.
Showers tend to crack in the corners because the two walls move independently from one another. This can be caused by settling, expansion and contraction, walking on the floor, wind, etc. When the walls move, grout has no flexibility so it cracks. But caulk has great flexibility and can flex when the walls shift.
Caulk works best when it’s used to seal he area between two surfaces. But not three. You should never caulk over existing grout. If you have grout that’s cracking, remove it first and then caulk the corner.
You should never caulk over old caulk. When it’s time to re-caulk the corner of a shower, remove the existing caulk first. Then apply fresh caulk to the corner.
Use 100% silicone mold resistant caulk for the best results.
How Do You Seal A Shower Corner?
The best way to seal a shower corner is with caulk. Use 100% silicone mold resistant caulk. Try to match the color of the caulk with the grout as best you can. Apply caulk into the corner and then smooth it into the tiles. Don’t apply caulk over grout. Caulk is flexible and creates a water tight seal that won’t leak or crack. But it doesn’t last forever and will eventually need to be redone.
Grout can also be used to seal a shower corner. However the shower has to be built very stiff so that the two walls are connected. The reason why grout cracks when used in the corner of a shower is because the two walls move independently. This movement cracks the grout because it’s very stiff with zero flexibility. But if you build the shower strong and stiff by connecting the two walls, grout will work.
In most cases caulk is the best way to seal a shower corner. But not always.
- When I build a new house I use grout to seal the inside shower corners. It looks better because it matches the grout between the tile gaps. I can use it because I frame the shower myself which ensures the two walls are connected and move as one unit. When the two shower walls are connected and move as one, the corners don’t crack.
- When I remodel a house where I didn’t build the shower, I use caulk. Most showers are not framed strong enough to use grout in the corners.
As a rule, I use caulk to seal shower corners when someone else built the shower. But when I build it myself I use grout.
How To Remove Old Shower Corner Grout
If your shower corners have old grout that’s cracked, chipped, falling out or mildewed and you want to switch to caulk, the first thing you have to do is remove the old grout. it won’t be easy because grout dries hard and adheres tightly to tile.
Never caulk over old grout. You have to remove all of it first and then apply fresh caulk into the corner over tile.
Here are step by step instructions on how to do it:
Step 1. Remove The Grout
The first step in caulking a shower corner that has old grout is removing the grout. This can be done with a grout removal tool, by cutting it out, or both. I generally recommend trying the removal tool first because power tools can potentially damage the tile.
If the grout is in really bad shape a hand removal tool can usually scrape it all out. In some showers I’ve actually been able to remove some of the corner grout by hand.
If the grout is stuck hard to the tile you can cut it out with an oscillating tool and a grout removal blade.
Gently slide the tool into the corners a little at a time. Let the blade do the work and don’t force it. With a fresh blade you’ll cut right through the grout. Be careful not to hit any of the surrounding tiles.
An oscillating tool is great for removing grout because it’s gentle enough to break corner grout without damaging tiles.
- Use an oscillating tool with a grout removal blade to cut through grout in shower corners.
- Cut into the corner from both angles.
- Don’t press the blade into the center of the corner.
- If you don’t have an oscillating multi-tool tool try a rotary cutter (Dremel) with a grout removal wheel.
- Do not use an angle grinder to cut grout. It’s too strong and can easily damage the tile.
If you don’t have an oscillating tool try a rotary cutter tool (Dremel) with a grout cutting wheel. Both tools are gentle enough for detail work and won’t damage the tiles if you take tour time.
Don’t use a high-powered angle grinder to remove grout. They can easily damage the surrounding tiles.
Step 2. Remove Remaining Bits of Grout
Once you’ve removed the bulk of the grout from the shower corners using a power tool, there will probably be some small bits remaining. I use a grout removal tool for these and scrape them all off one by one.
A grout-remover is great for scraping off loose bits of stuck on grout. They have a small steel triangle with teeth that fits into tight corners to grip and tear off stuck on grout.
- A grout-remover is a hand tool designed to remove grout.
- The triangle shaped head can fit into tight corners.
- Work slowly and carefully to avoid damaging the tiles.
- Be especially careful if your shower uses soft stone inlays because they scratch easily.
When removing grout from the corners, try not to press directly against the tiles. Place the tool against the grout and push or pull.
Do not pry or twist with the tool because you could loosen a tile. Use the tool in an up and down motion. Push and pull small bits of stuck on grout off the tiles.
Step 3. Remove Grout Residue
After all the grout and small bits are removed, there may still be some residue left on the tiles. To clean this off, you need a scraper equipped with a razor blade edge. Press the blade flat against the tiles and scrape until all the residue is removed.
When your shower corners are clean and free of grout the caulk will bond tight to create a waterproof seal.
- Use a razor blade scraper to remove remaining grout residue from tile surfaces.
- Caulk bonds best to clean tile free of grout and residue.
When you caulk a shower corner it’s very important to apply caulk directly onto clean tile. This ensures the best possible bond and a water proof seal. If there’s grout or residue still stuck on the tile, the seal won’t be as good as it could be.
Step 4. Clean Up
Following grout removal, wipe the tiles with a damp cloth or sponge to remove any grout dust. You can also take this opportunity to vacuum up any bits of grout that fell into your shower pan.
- Wipe the shower seams with a damp cloth or sponge to remove grout dust prior to caulking.
- Vacuum grout pieces out of your shower pan or tub.
- Do not directly spray the cleaned seam with water or another liquid.
Do not use the shower or another source to spray water directly into the corner seam to clean it. Without any grout or caulk in place, it is very easy for water to infiltrate your wall and cause moisture damage.
Step 5. Caulk The Shower Corners
Use a caulk gun to apply a bead of 100% mold resistant silicone caulk to the corners of your shower.
Apply a bead from the top of the corner to the bottom. Try to run one continuous bead instead of small sections.
Apply just enough to seal the corners but still leave a sharp angle. A mistake I see a lot is over caulking the corner. More caulk doesn’t necessarily make a better seal. If you cleaned the tiles properly all you need is a small bead.
For a cleaner application, apply some tape to either side of the corner. Then apply your bead of caulk. The tape will prevent caulk from getting onto the tiles later on when you remove it.
Use only 100% Silicone caulk with mold resistance for showers because it won’t shrink or crack over time and it won’t get moldy.
- Caulk shower corners with 100% silicone caulk.
- Don’t use latex or other non-silicone caulks.
- Color-match the silicone caulk to your grout as close as possible.
- Don’t use too much caulk.
Try to match the color of the caulk to the grout as best as possible. Silicone caulk comes in a variety of colors. White or grey caulk and grout are the most popular choices.
Step 6. Smooth The Caulk
After applying a bead of caulk to the corners of your shower, smooth the bead with a caulk tool or your finger. This creates a smooth, uniform corner.
Run the tool or your finger from the top of the corner to the bottom in one continuous motion. Don’t stop and start because it will leave a mark in the caulk. Run your finger or the tool over the seam several times to remove excess caulk and clean the tiles.
If you applied too much caulk a lot will come off when you swipe the tool or your finger down the corner. This can be avoided by using a small amount of caulk.
I like to wipe the corner down one last time with a damp finger. A little moisture helps create a clean edge and a smooth surface.
- Caulking tools come with different corner shapes and sizes so you can pick which one works best. I like a tight corner with as little caulk as possible.
- For a cleaner line apply some tape to either side of the corner before you caulk. Tape will keep excess caulk off the tiles and create a sharp edge.
I recommend using either blue painters tape or green Frog tape on either side of the corner. They’re specially made to stop paint from bleeding under the tape and have a good hold. But they come off easily.
Step 7. Let The Caulk Dry
Silicone caulk takes time to fully dry and cure. After caulking, wait 12-24 hours before you use the shower. Using the shower too soon could weaken the bond between the caulk and tile which may cause leaks.
- Allow 12–24 hours for caulk to fully cure before using your shower.
- Using your shower too soon could weaken the caulk and cause leaks.
Silicone caulk is not waterproof right after you apply it. It must dry and fully cure to bond with the tile and create a water tight seal.
Caulk Or Grout First
You should always grout a shower first and then apply caulk. But don’t grout the corners, use caulk instead. Apply grout to all the joints between tiles and any other areas you want it and let it dry completely. Then apply caulk to the corners on the shower and anywhere tile meets a hard edge. Never apply caulk over grout.
Grout and caulk can be used to seal the same shower. But they shouldn’t be used over top one another. Caulk sticks really well to tile but not to grout. When caulk is used on top of grout, it peels off allowing moisture to seep between the caulk and grout. This eventually causes sold and mildew growth.
In areas you plan on using caulk, such as shower corners, where tubs or shower pans meet a wall, around fixtures, shelves, seats or doors, don’t apply grout.
Before you start grouting a shower, have a plan on where you’ll be using grout vs where you’ll use caulk. Make sure in areas you’ll be using caulk that you don’t apply any grout. If grout seeps into an area you’ll later be caulking, you’ll have to remove it before you caulk. This just adds more work to the job.
Summary: Should I Caulk Or Grout Shower Corners?
Shower corners should be caulked instead of grouted. Use a 100% silicone caulk that’s mold resistant. Caulk is flexible and creates a water tight seal between corner shower walls which helps prevent leaks. Grout is also a great material for sealing a shower corner but it’s stiff with zero flexibility. If the shower corner walls move independently of one another, the grout can crack and fall out. This can cause leaks. To use grout in a shower corner you must first frame the two walls together to form a single strong unit. Then use a strong concrete backer board followed by a water proof membrane. Pay special attention to waterproofing the corners because this is where most leaks occur. If the corner walls move together rather than independently there’s less chance the grout will crack.
Caulk is a better material than grout for sealing the corners of a shower. But you need to use the right caulk. Buy 100% silicone waterproof caulk with mold resistance. Normal caulk is prone to mold growth which is common in showers because of their humidity and warmth.
You should never caulk over grout in shower corners. Silicone caulk does not bond well to grout. It peels which allows moisture to rest between the grout and caulk. This eventually causes mold and mildew growth.
If you want to caulk the corners of your shower, remove all the old grout or caulk that’s already there. Then apply new material. Don’t cover up old grout or caulk with new caulk. The same is true of applying new grout. Never grout over old grout or caulk. By applying new material to tile, you’ll achieve a longer-lasting seal with a more professional look.
If you have any questions or comments about the article email any time.