How To Tile Inside Corners
Whether you’re tiling a bathroom, kitchen, laundry or mudroom, eventually you’ll be faced with an inside corner. Inside corners are where two tiled walls meet or where a tiled wall meets a tiled floor. This creates an inside corner that has to be tiled in a specific way for both appearances and to prevent leaks. The tiles should be butted up to one another with the same space you use in between tiles. To accomplish this use a spacer. When tiling an inside floor corner, the floor tile is laid first with the wall tiles on top. This looks better and helps prevent leaks because water is kicked out away from the corner. When tiling a vertical inside shower corner, the back wall is tiled first followed by the side walls. This is also for appearances and to prevent leaks.
The reason why we tile the back wall and floor first is mainly to prevent leaks. It also looks better because the edge is hidden, but the priority is always leak prevention.
Once the tiles are laid in an inside corner, they have to be grouted and sealed. This is an area that’s prone to cracks because the two walls move independently. Grout is applied first into the inside corner just like any other gap between tiles. But then a thin layer of 100% silicone caulk should be applied as a sealant. The caulk layer is important because it flexes as the house moves and won’t crack like grout.
What Is An Inside Corner?
Inside corners are where two adjacent walls or a floor and wall meet. When two flat surfaces that are both tiled meet, it creates an inside corner. You must be very careful when tiling inside corner because this is where most leaks occur.
Tiling the middle of a wall or floor is easy because you’re using mostly whole tiles. But when you get to an edge you’ll have to make precise cuts. The corner gap between tiles should be the same as the gap between tiles. To maintain consistency, use the same spacer for the corner gap as the floor and walls.
In some cases you could have a triple inside corner. This is where two tiled walls meet on top of a tiled floor.
The order in which you lay the tile is very important when tiling an inside corner. Here’s what you need to do:
- Floors are always tiled first. This looks better and prevents leaks. As water runs down the wall it kicks out on top of tile instead of draining down a gap.
- Next, tile the back wall of a shower or backsplash. The back wall is always against water. In a laundry this would be the wall behind the sink or washing machine.
- Finally, tile the walls that butt up to the back wall.
In some rooms you may have multiple inside corners. But the order is the same. Tile the floors first, then the wall behind the splash of water followed by the remaining walls.
Plan Ahead Before Tiling Inside Corners
Before you start measuring or cutting tiles for an inside corner, you need to plan ahead and layout the wall. When tiling walls, floors or ceilings, it’s very uncommon for tiles to install perfectly without cuts along the edges. Since you’ll inevitably have cuts, you want them to be even on both sides of the wall.
Measure the wall and make a mark at the center. Then figure out how many tiles it takes to get from the center of the wall to the edge.
When laying out tile you have two main options:
- Lay a full tile in the middle and work out towards an edge until you need a cut tile.
- Leave a seam in the center and work outward towards the wall until you need a cut. In this case there is not center tile.
Which method you use should be based on the size of the edge tile. Avoid ending with just a tiny sliver of tile in a corner. This looks bad and is hard to cut and install. The edge tile should be as large as possible.
Once you have a plan for tiling the wall, you can start laying tile, measuring and cutting.
Inside areas are always laid first followed by edges and inside corners.
How To Measure Tiles For Inside Corner Cuts
When tiling inside corners you’ll eventually have to make some cuts. Before you can make a cut you have to measure the space and mark your tiles. This is a very important step because accurate cuts are essential to a professional tile job that won’t leak.
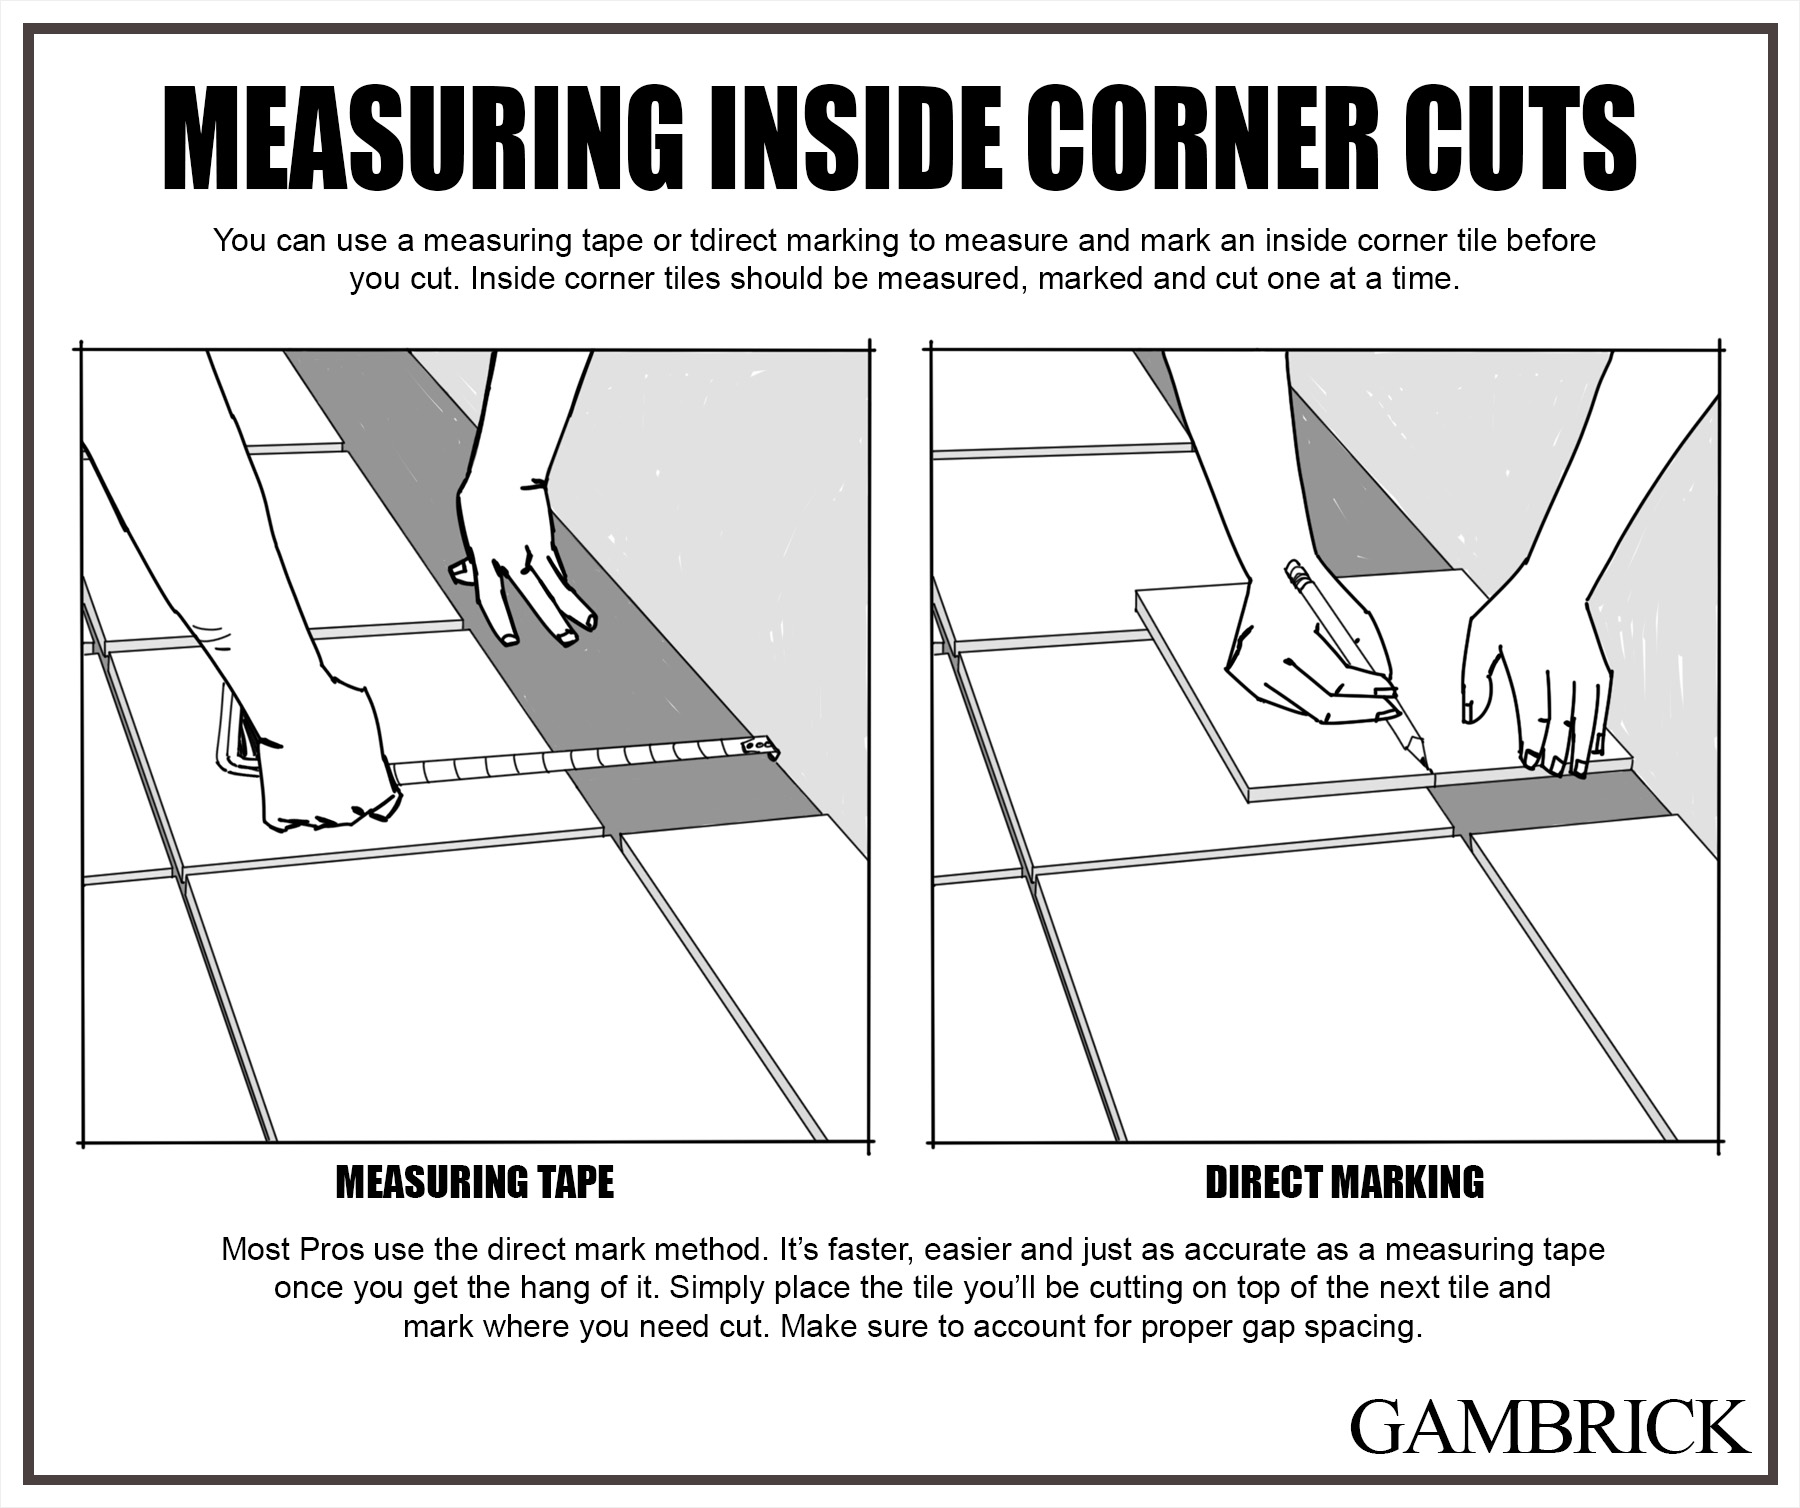
Use A Measuring Tape
Use a measuring tape to measure the space where you’ll be laying your tile. Take the total measurement from the nearest tile to the corner. Then subtract the width of your gap between tile twice. This is because you have two gaps, one between tiles and one between the new tile and the wall. Mark the measurement on your tile in pencil.
Make sure the mark is thin. Don’t use a marker because the line is too thick which prevents an accurate cut. Most Pros will make a small x on the part of the tile that will be cut away.
You can use a straight edge to mark the entire line you’ll be cutting.
Mark By Eye
Most experienced tile installers we hire don’t measure the inside corners. Instead, place the tile you want to cut against the wall and on top of the nearest full tile. The amount the tile sits on top of the nearest tile is the amount you need to cut. Just make sure to subtract for your spacers.
Use a pencil to mark the tile and then cut it.
How To Cut Tiles For Inside Corners
When tiling an inside corner you’ll eventually have to make some cuts. In some cases you may have to cut a tile twice. Once where it hits the adjacent wall and again where it hits the floor, tub or ceiling.
To cut the tile for an inside corner, you can either use a tile cutting board or a wet saw.
- Tile cutting boards are better for ceramic tiles.Use the board to score and snap the tile. Then use tile snips and/or a tile sanding block to smooth the edge a bit. Cutting boards are cheap and easy to use but not as accurate as a wet saw.
- A wet saw can be used for ceramic tiles or natural stone. Wet saws are the best way to cut tiles but they’re large, expensive and splash water around the room.
If you use a wet saw, dry the back of every tile after you cut it. If the back is wet your adhesive won’t stick properly.
Make sure to keep the water in your wet saw clean and use a fresh blade. Muddy water or a dull blade can result in inaccurate cuts.
Both a wet saw and cutting board will have a guide. Before you cut, set the guide based on your tile mark. Lock the guard to prevent inaccurate cuts. Then make your cut.
Save the excess tile after you make a cut. I’ve done dozens of tile jobs where we were able to use the extra tiles somewhere else in the room.
Measure And Cut Tile One Row At A Time
It’s very important to measure and cut tiles for an inside corner a row at a time. This is because many walls, ceiling or floors are not perfectly level. If a tile is 6″ wide at the bottom of a wall it could be 6 1/2″ by the time you reach the top. You need to take this into account when tiling an inside corner. If you don’t the gap at the top will be too large.
This same principle applies to tiling inside corners of ceilings, and floors. If the room is not perfectly level and square, which it rarely is, you need to measure and cut tiles a row at a time. This ensures correct and even gaps throughout the room.
Installing The Inside Corner Tiles
Once your tile is measured, marked and cut, it’s time to install. Lay it in the space as a dry fit to make sure the gaps are all correct. The gap between tiles and the tile and wall should be even.
- Apply a thin layer of adhesive to the floor, wall or ceiling you’re tiling.
- Adhesive should be applied in a thin layer, but thick enough that you can see the trowel lines.
- Apply a thin layer of adhesive to the back of the tile. Applying glue to the surface and tile creates a much tighter bond and helps prevent cracks and popped tiles.
- Press the tile down evenly into the adhesive. Don’t press too hard or the tile will ooze out adhesive from the sides. And don’t press unevenly or the tile won’t sit level with the surrounding tiles.
- Use a notched trowel to apply adhesive.
- Trowel size should match the type of adhesive you use. In general floor tiles use a 1/4″ to 1/2″ square notch trowel while walls use a smaller 1/4″ v-notch trowel.
Use tile spacers to check the gaps between tiles. Leave the spacers in place until the adhesive has fully hardened. If you remove the spacers too soon the tiles could shift because of their own weight.
If any adhesive gets on a tile, wipe it off with a wet sponge.
Once the adhesive is hard, remove the tile spacers. I usually let the adhesive dry for at least 24 hours before removing spacers or grouting.
What Order Do You Tile Inside Corners?
It’s very important to tile inside corners in the correct order. When two tiled walls meet, their tiles butt up and overlap. Which tile sits on top is important for both looks and to prevent leaks.
Floor tiles always go down first with the wall tile placed on top. This both looks better and prevents leaks.
When water hits the wall and runs down, it ends up on top of the floor tile where it can be easily cleaned up. If the wall tile was installed first, there would be a corner gap filled with grout. Grout is porous and absorbs water so this method could cause leaks.
When two tiled walls meet, the back wall is always tiled first. This is also for looks and to prevent leaks.
Which wall is considered the back wall depends on the direction water will hit it. For example, when tiling a shower the wall with the shower head isn’t always considered the back wall. In some cases it’s the adjacent wall because when you stand in the shower, that’s the wall that water splashes on.
Whichever wall water is most likely to hit is the back wall you should tile first.
Getting the tile order correct is more important with floors than walls because they’re more likely to leak.
Grout The Inside Corners
Once the tiles are installed and the adhesive dries, it’s time to grout. Before you starts grouting, check all the tiles to make sure they’re in the correct position. It’s not uncommon for a wall tile to slide a little bit if a spacer moves. This is your last chance to pop the tile and correct it before you grout.
If all the tiles are correct, make sure there’s no dry adhesive on the surface protruding from a gap. All the adhesive should sit below the surface of the tile so it doesn’t interfere with the grout.
Press grout into the gaps using a grout float. Let it rest until it starts to harden. You’ll know this is happening because the surface of the tile starts to get cloudy. This usually takes about 5 minutes.
Using a damp sponge, wipe grout off the surface of the tiles. Don’t press too hard, you don’t want to remove grout from the gaps.
Apply even pressure to the sponge. Run it along the surface of the tiles while holding it flat. If you press harder on an edge of the sponge you could take grout out of the gaps.
Make several passes over tile removing more grout with each pass.
After each pass, flip the sponge and do another pass. Then rinse the sponge in a bucket of warm water.
Make sure to wear gloves when you grout.
Seal The Tiles
After you grout, it’s time to seal the tiles. This isn’t a necessary step if you’ve used ceramic, glass, synthetic or porcelain tiles. But if your tiles are real stone I recommend using a sealant. The sealant will protect the stone, help repel water and bring out a richer color.
- Before applying sealer, make sure the tiles are completely clean and free of grout residue. Any residue still on the tiles will interfere with the sealer.
- Wipe the tiles repeatedly until the rinse water is clear.
- Once the tiles are thoroughly cleaned, apply sealer with a sponge directly over the tile and grout.
- One to two coats of sealer is enough.
Try not to get sealer on a tub, wood or fiberglass shower base if you have them around the tile.
Caulk Inside Tile Corners
Grout is a very stiff cement based product that cracks easily. When you tile adjacent walls they move with the house mainly due to expansion and contraction. This can eventually crack the inside corner grout. But if you also apply a thin layer of 100% silicone caulk on top, it will keep the corner sealed.
Apply a thin bead of caulk along the entire corner. Then wipe with your finger down in a single long stroke. Press the caulk into the corner while removing excess. Try to smooth the entire corner in one pass for an even look.
It helps if you dampen your finger before you smooth the corner.
You can also use a corner caulk tool to shape the caulk. But I prefer using my finger.
Don’t use too much caulk, just a tiny thin bead is enough. Remember, you’ve also got a layer of grout sealing the corner so caulk is just an additional layer of protection in case the grout cracks.
Only use 100% silicone mold resistant caulk in wet areas like a shower or backsplash. But if the inside tiled corner is not wet you can use other types of caulk.
Pro Tips For Tiling Inside Corners
- Measure, cut and lay tiles a course at a time. Most walls, floors and ceilings will not be perfectly level and square. If you make all your cuts at once they could be off by the time you get to the top of a wall or the edge of a room.
- Make sure to lay out the wall before cutting or laying tiles. Start by measuring and finding center on the wall.
- Lay as large a tile in the corners as possible.
- Make sure when you layout the tiles that you don’t end up with a thin sliver in the corners. This is dangerous to cut and hard to install.
- Lay construction adhesive or mortar mix according to the manufacturers specifications.
- Floor tiles require thicker mortar than wall tiles.
- Use the proper trowel shape for the applications. In general floors use a square-notch while wall use a v-notch.
- Use a wet saw outside, especially if you’re cutting real stone. Cutting tile makes lots of dust and splashes water around the room.
- The gap between a corner tile and wall should be the same as the gap between tiles.
- Use a level and a measuring tape along with spacers to keep tiles level and square.
- Use safety equipment when cutting tiles.
Do You Overlap Tile Corners?
Yes, tile corners should always overlap. When tiling an inside floor to wall corner, the floor tile is installed first. It’s then overlapped by the wall tile. When tiling two adjacent walls, the back wall is tiled first and overlapped by the wide walls. The back wall is the wall in which water is most likely to splash.
The corner gap should be the same thickness as the gap between tiles. Use spacers to make sure all your gaps are consistent.
Do You Grout Inside Tile Corners?
Yes, apply the same grout to your inside corners as you do between tiles. However, because walls move independently, tiled corners with grout are prone to cracks. To deal with this issue, apply a very thin layer of silicone caulk on top of the grout. Caulk is flexible and won’t crack if the walls, floor or ceiling moves. Caulk will keep the corner sealed even if the grout cracks.
If your inside tile corner is in a wet area, use 100% silicone with mold resistance.
Do Tiles Start On A Inside Corner?
No, inside areas, called the field, are always installed first. Then the corners are measured, cut and installed. The first step in doing a tile job is finding dead center of a ceiling, wall or floor and then tiling out. Guide marks are typically snapped to ensure the tiles are correctly laid. Spacers are used to make sure the gaps are all consistent. As long as you follow the guide lines and use spacers, when you reach the edges your tiles should be correct.
Corners are usually installed after the inside tiles dry. Measure each corner tile, mark and cut it. Then install. Corner tiles are always measured, marked and cut a tile at a time.
Should The First Row Of Tiles Sit On The Tub?
No, the first row of tiles should not sit directly on the tub. This makes it much harder to create a tight seal. Instead, the first row of tile should have the same gap off the tub as you use between tiles. You can use a spacer to keep the gap consistent. Then once all your tiles are installed and the adhesive is hard, you can remove the spacers and seal the gap with silicone caulk.
Tubs tend to move because of the weight of water. They can also move if the floor or adjacent wall expands or contracts. This can cause the inside corner edge between the tile and tub to crack. To prevent this, use a flexible caulk instead of grout.
Make sure the caulk you use is 100% silicone and mold resistant. Inside tiled corners in bathtubs and showers are prone to mild and mildew growth.
Summary: How To Tile Inside Corners
Whether you’re tiling a bathroom, kitchen, laundry or mudroom, eventually you’ll be faced with an inside corner. Inside corners are where two tiled walls meet or where a tiled wall meets a tiled floor. This creates an inside corner that has to be tiled in a specific way for both appearances and to prevent leaks. The tiles should be butted up to one another with the same space you use in between tiles. To accomplish this use a spacer. When tiling an inside floor corner, the floor tile is laid first with the wall tiles on top. This looks better and helps prevent leaks because water is kicked out away from the corner. When tiling a vertical inside shower corner, the back wall is tiled first followed by the side walls. This is also for appearances and to prevent leaks.
The reason why we tile the back wall and floor first is mainly to prevent leaks. It also looks better because the edge is hidden, but the priority is always leak prevention.
Once the tiles are laid in an inside corner, they have to be grouted and sealed. This is an area that’s prone to cracks because the two walls move independently. Grout is applied first into the inside corner just like any other gap between tiles. But then a thin layer of 100% silicone caulk should be applied as a sealant. The caulk layer is important because it flexes as the house moves and won’t crack like grout.
If you have any questions or comments e-mail us any time.