How To Set Posts In Concrete
Setting a post in concrete isn’t that hard to do. It’s a simple step by step process. Dig the hole, pour in a gravel base, set the post level and pour concrete around it. But as with most things, there is some info you need to know if you want the best results. Things like making sure the hole is deep enough and that your concrete mix is correct.
Whenever you set a post in concrete, a strong foundation is key. Without one, whatever your building won’t stay up for very long. Imagine building a fence and not anchoring the posts. It won’t last very long. The first heavy wind will blow those posts right over. However, if you dig holes and install those posts in concrete, they’ll last for decades. Anchoring your posts strongly in place with concrete is the best way to ensure they’ll stay upright and in place for many years.
Concrete is the anchor that keeps the post strong and in place. Understanding how much concrete weighs per square foot, and per cubic foot is important, because it will help you determine what size footing you need to set the post in.
The weight of your post footing needs to support the fence, mailbox, or whatever else you’re attaching to the post.
How big of a footing you pour also affects how hard it is to alter, remove, or replace the post later should you have to. But there are ways to replace a post without removing concrete, which makes life easier.
Ahead we’ll explain the process in detail along with lots of tips and info.
Step 1: Dig The Hole
When you set posts in concrete, every post needs it’s own hole. The hole not only holds the blower portion of the post but also the concrete and a gravel base.
The size of the hole is directly related to the size of the post your supporting. It’s very simple to calculate.
- Diameter. The total width, or diameter, of the hole should be 3x the size of the post at it’s thickest. For example, if your setting a 4×4 inch fence post then the hole would be 1 foot wide. But if your setting a 4×6 inch fence post the hole would be 18 inches.
- Depth. Take the height of the post that’s above ground and add 1/3-1/2 to it for the base. This means that an 8′ fence post should be about 3′ – 4′ deep. Vary the depth based on how much lateral load will be on the fence, aka wind. If you live somewhere that’s not windy, a shallow base should be fine, but if you live in an area that sees hurricanes, bury the posts deeper.
How you dig the hole is up to you. A shovel, post hole digger or power auger will all do the job.
Pro Tip: Make sure you dig straight down and not on an angle. This supports the post better because concrete around the post will be even on all sides. And keep the bottom of the hole flat. If the bottom is shaped like a point the concrete can drive itself deeper. You want a flat bottom so the concrete sits on earth flat which prevents it from sinking over time. Also pack the bottom of the hole before you pour concrete. Digging can leave loose dirt which can also cause the concrete and post to sink.
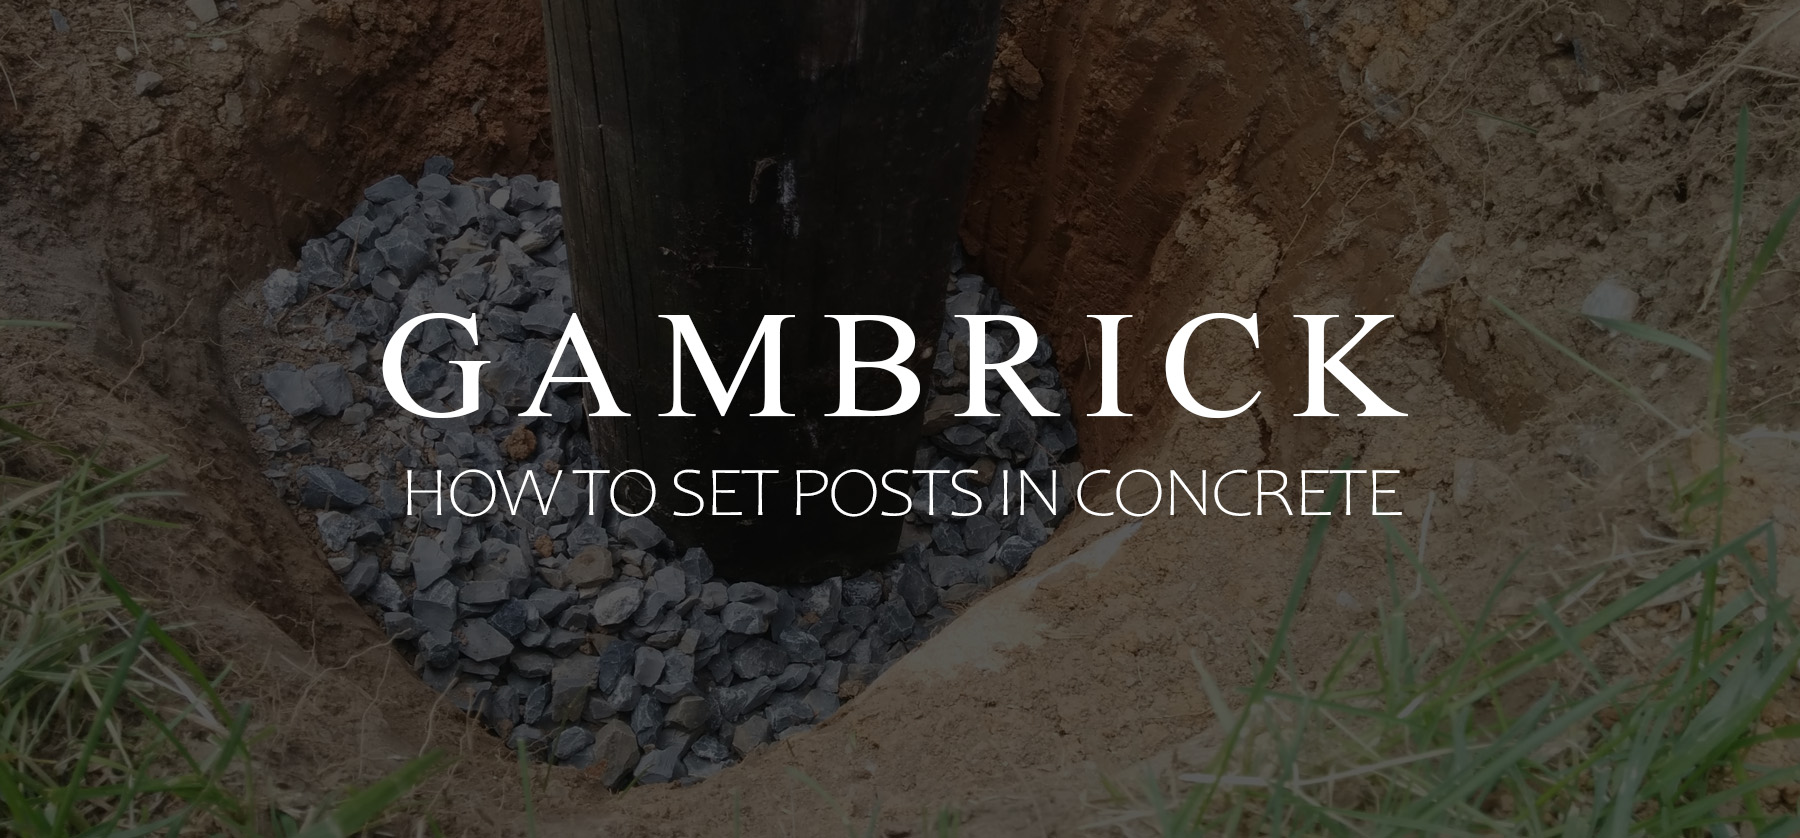
Step 2: Add A Layer Of Gravel
The base of the hole should be filled with 4 to 6 inches of compacted gravel. This creates a barrier between the concrete and the dirt underneath. A gravel base increases the strength of the concrete and most importantly improves drainage.
Water damage is the number one reason most posts fail over time. And that goes for just about any material post your using. Wood, metal, and concrete posts can all be damaged by water. Structural concrete footings, like the ones used to build most homes, all have a gravel base. And so should your posts.
Once the gravel has been poured, tamp it down flat as much as you can and then measure. Don’t take your measurement before tamping because you won’t have enough gravel in the hole. Typically it’ll settle about an inch after you tamp it.
I like to use uneven trap rock as a base material. You can buy it in bags at any Lowes or Home Depot. Generally the bag will say drainage rock. It’s blueish grey in color and about 1/2 inch to an inch in size.
When you set posts in concrete, remember that the most important thing is a strong base. Without it, the fence or whatever else your building will be weak.
Step 3: Temporarily Brace The Post
When you first put the post into the hole, there’s nothing to keep it straight and level. This is why you add some temporary braces. When you set posts in concrete, you have to make sure that they’re level on all sides and in the center of the hole. As you pour concrete it’s very easy for the post to move around.
Insert your post into the hole. Use a level to make sure the post is perfectly level on all sides. Then brace the post so that it will stay completely still while the concrete is being poured. Typically we use 3-4 stakes per fence post.
Remove the stakes once all the concrete is poured and the post is secure. If you’ve mixed your concrete to the right consistency, you can usually remove the stakes after a few minutes. I generally don’t wait until the concrete is completely hard to remove the braces. The weight of the concrete is usually strong enough to hold the post in place even when still wet.
Remove the braces as soon as the concrete is hard enough to support the posts. For most fence jobs we remove the braces in about an hour or two.
Step 4: Mix Your Concrete
You can’t set posts in concrete without mixing some concrete. If your using Quikrete concrete bags or making your own concrete then now’s the time to start mixing. But if your using a concrete truck then set all your posts and braces before starting to fill the holes. Most concrete trucks will charge extra money for the time you use so get all your concrete work done at once.
Some concrete mixes, like Quikrete Fast Setting Mix, can be poured into the hole dry. Some water is added to the top once the hole is filled. If that’s what your using then don’t worry about mixing.
Be sure to use safety equipment like gloves, glasses, and a mask before working with concrete.
I like to mix my concrete in a wheel barrow because it’s easier to dump the concrete into the holes. A mixing try works fine for mixing but it’s not great if you have to move the concrete and isn’t as easy to dump into the hole.
For large jobs I rent a cement mixer. It makes mixing lots of bags at once much easier. But you’ll need a wheel barrow to move the concrete from the mixer to the holes.
How To Mix Concrete
The reason we set posts in concrete is for it’s strength. But you need to mix concrete properly if you want it to be strong. When concrete isn’t mix the right way, it can be weak, brittle and prone to cracks.
The most important part of a good concrete mix is water. When you add water to concrete, a chemical reaction occurs inside the concrete which hardens it and causes it to cure over time. Curing can take up to 28 days to complete. It’s during this process that concrete achieves it’s maximum strength. For example, a 3500 psi concrete isn’t 3500 psi until the 28th day, on day 10 it is probably only around 1500 psi. Strength grows as time goes on and curing happens.
For a typical 80 lb bag of concrete, approximately 3 quarts of water are needed. No more and no less. Too little water won’t thoroughly mix the concrete and you’ll have dry,powdery sections. Too much water and the concrete will be like soup. Both cases make weak and brittle concrete.
The consistency of concrete that’s properly mixed should be like thick oatmeal. You should be able to pick up wet concrete in your hand and form it into a ball just like a snowball. If it’s too dry to form or too wet to hold then you need to either add water or more dry concrete to balance it out.
Step 5: Pour The Concrete
You can’t set posts in concrete without pouring the concrete. This part of the job is pretty easy. Pour your concrete into the hole about a foot at a time. Make sure you pour it evenly around the post. Try not to overload one side with too much concrete, this could make the post bottom shift.
Once you’ve got a foot of concrete all around the post base, check that the post is still level. Jig the concrete a bit with a piece of wood or trowel. Jab into it a bunch of time to release air bubbles and fill voids. Doing this will create a more solid footing.
Repeat these steps a foot at a time until your concrete is at the top.
If you’re adding concrete to the hole dry with a fast setting mix, the directions are the same. Take your time, fill a foot at a time evenly around the post, make sure the post stays level jog the concrete to fill voids.
When the hole is filled with dry concrete, add an appropriate amount of water for the amount of concrete you used. This will vary based on the mix requirements and size of the hole. Check the bag for directions.
Pour the water slowly. Allow it to drain into the concrete. If you pour too quickly it will just run off the sides and into the dirt.
If the hole is very deep you may need to do this in stages. A foot of dry concrete, some water, then another foot of dry,more water, etc. Check the bag for directions.
Pro Tip: Keep checking the posts for level as you go. Even though you’ve got braces to hold it in place you should still check.
Step 6: Shape The Concrete
When all your concrete is poured, a few inches should come up out of the ground and sloped away from the post. It should look like cone. This makes sure that any water hitting the post will drain away.
Water is the leading cause of damage for just about any material including wood, concrete and metal. By including a subtle slope, you keep water away from the post and the concrete. If the top of your concrete footing is flat water can pool on it. But with a slop the water will always drain off.
Even if you used a dry mix like Quikrete Fast Setting Concrete, you can still shape it into a cone.
Drainage is very important if you want your posts to last. Since posts are typically left outside and exposed to the elements, without proper drainage, they’re constantly at risk for water damage.
Step 7: Let The Concrete Cure
Once the concrete is poured it needs to cure. The curing process can take up to 28 days. During this time, a chemical process occurs, the concrete dries and it strengthens.
At 28 days a concrete is at it’s maximum psi. For example, when a Quikrete bag says 4000 psi, it’s really saying 4000 psi when properly mixed and fully cured after 28 days. At 10 days the concrete is around 1500 psi. That’s not strong enough for extremely heavy loads.
For this reason you should wait to put really heavy loads on your posts until the concrete has cured enough to support it. If your building a fence, it’s typically safe to install sections the next day. But if your posts are supporting a structure you should wait a while.
Weather, humidity and temperature all effect how concrete cures.
If it’s extremely hot and dry outside then the concrete can cure too fast. Some masons will cover the top with plastic or some dirt to keep water inside for longer. They’ll also wet the concrete’s surface down to keep it moist. You want concrete to dry but not too fast.
Extremely cold temperatures are a challenge too.
When the ambient temperature drops below 50 degrees Fahrenheit, concrete can freeze and stop curing.Masons will cover concrete in warming blankets to ensure this doesn’t happen.
You should always keep track of the weather whenever your working with concrete.
Relative humidity matters too because it’s a measure of the moisture content in the air. When air is moist, concrete cures easier. But when it’s super dry, curing is a little harder.
Step 8: Seal The Gap
A good finishing step is to use some caulk inside the gaps.
When you set posts in concrete, there’s a gap or seam between the post material and the concrete. Even if your post is also made from concrete there will still be a seam. It’s the point where two different materials meat. In the case of a square post you’ll have 4 areas to seal.
Caulk is a great way to seal these seams but you have to use the right kind. Make sure your caulk is flexible and rated for use with concrete. Outdoor materials expand and contract as temperatures fluctuate. The caulk needs to move with the post and concrete. When caulk is too stiff it can crack and fail.
If you don’t seal the cracks water can potentially get in. If you live in a cold area that water can freeze and slowly start to crack the concrete. It’s necessary to seal the gaps, but it’s a nice finishing touch that helps prevent potential water damage a little bit.
Summary: How To Set Posts In Concrete
Whenever you set a post in concrete, a strong foundation is key. Without one, whatever your building won’t stay up for very long. Imagine building a fence and not anchoring the posts. It won’t last very long. The first heavy wind will blow those posts right over. However, if you dig holes and install those posts in concrete, they’ll last for decades. Anchoring your posts strongly in place with concrete is the best way to ensure they’ll stay upright and in place for many years.
The good news is that setting a post in concrete isn’t that hard to do. It’s a simple step by step process. Dig the hole, pour in a gravel base, set the post level and pour concrete around it. But as with most things, there is some info you need to know if you want the best results. Things like making sure the hole is deep enough and that your concrete mix is correct.
If you have any questions or comments e-mail us any time. We’d love to hear from you.

John Mazzuca | About | More Posts |
Custom Home Builder
John Mazzuca is a custom home designer and builder at Gambrick with over 25 years experience in the construction industry. John has designed, built and/or remodeled hundreds of homes, small buildings, and commercial projects. He writes about business, real estate, home building, and household electronics. His work has been featured in Fox Business, Better Homes & Garden, House Beautiful, and more.