How To Remove Rusted Toilet Tank Bolts
To remove rusted toilet tank bolts, start by turning off the water supply to the toilet tank. To do it, simply turn the valve on the water line clockwise to the closed position. Then, flush the toilet to completely empty the tank. These steps prevent leaks while you remove the bolts. Once the tank is drained, spray the bolts with penetrating oil. Let the oil sink into the rust for 15 minutes. Then start to loosen the bolts with a wrench. Clamp hard and slowly wiggle the bolt back and forth until the rust breaks and the bolt starts to move freely.
If penetrating oil and a wrench don’t work, use a hacksaw, oscillating tool, or reciprocating saw to cut the rusted bolts at the gap between the toilet tank and the bowl. Be careful when cutting toilet bolts so you don’t damage the porcelain. To prevent damage, I usually install some thick duct tape around the bolt to protect the toilet.
- Turn off the water and drain the toilet tank.
- Spray your rusty toilet bolts with penetrating oil.
- Let the oil sink in for 15 minutes.
- Wiggle the bolts free with a wrench.
- If a wrench doesn’t work, cut the bolts with a hacksaw, oscillating tool, or reciprocating saw.
- Protect the toilet from your saw with some thick tape.
Rust is a common problem for toilet bolts because of the interaction between metal, water, and air. In a bathroom environment, where water is constantly present, the metal components of a toilet are especially susceptible to rusting. To prevent rust, always install brass or aluminum toilet bolts. They’re very strong, durable, and resistant to rusting.
Why Do Toilet Tank Bolts Rust?
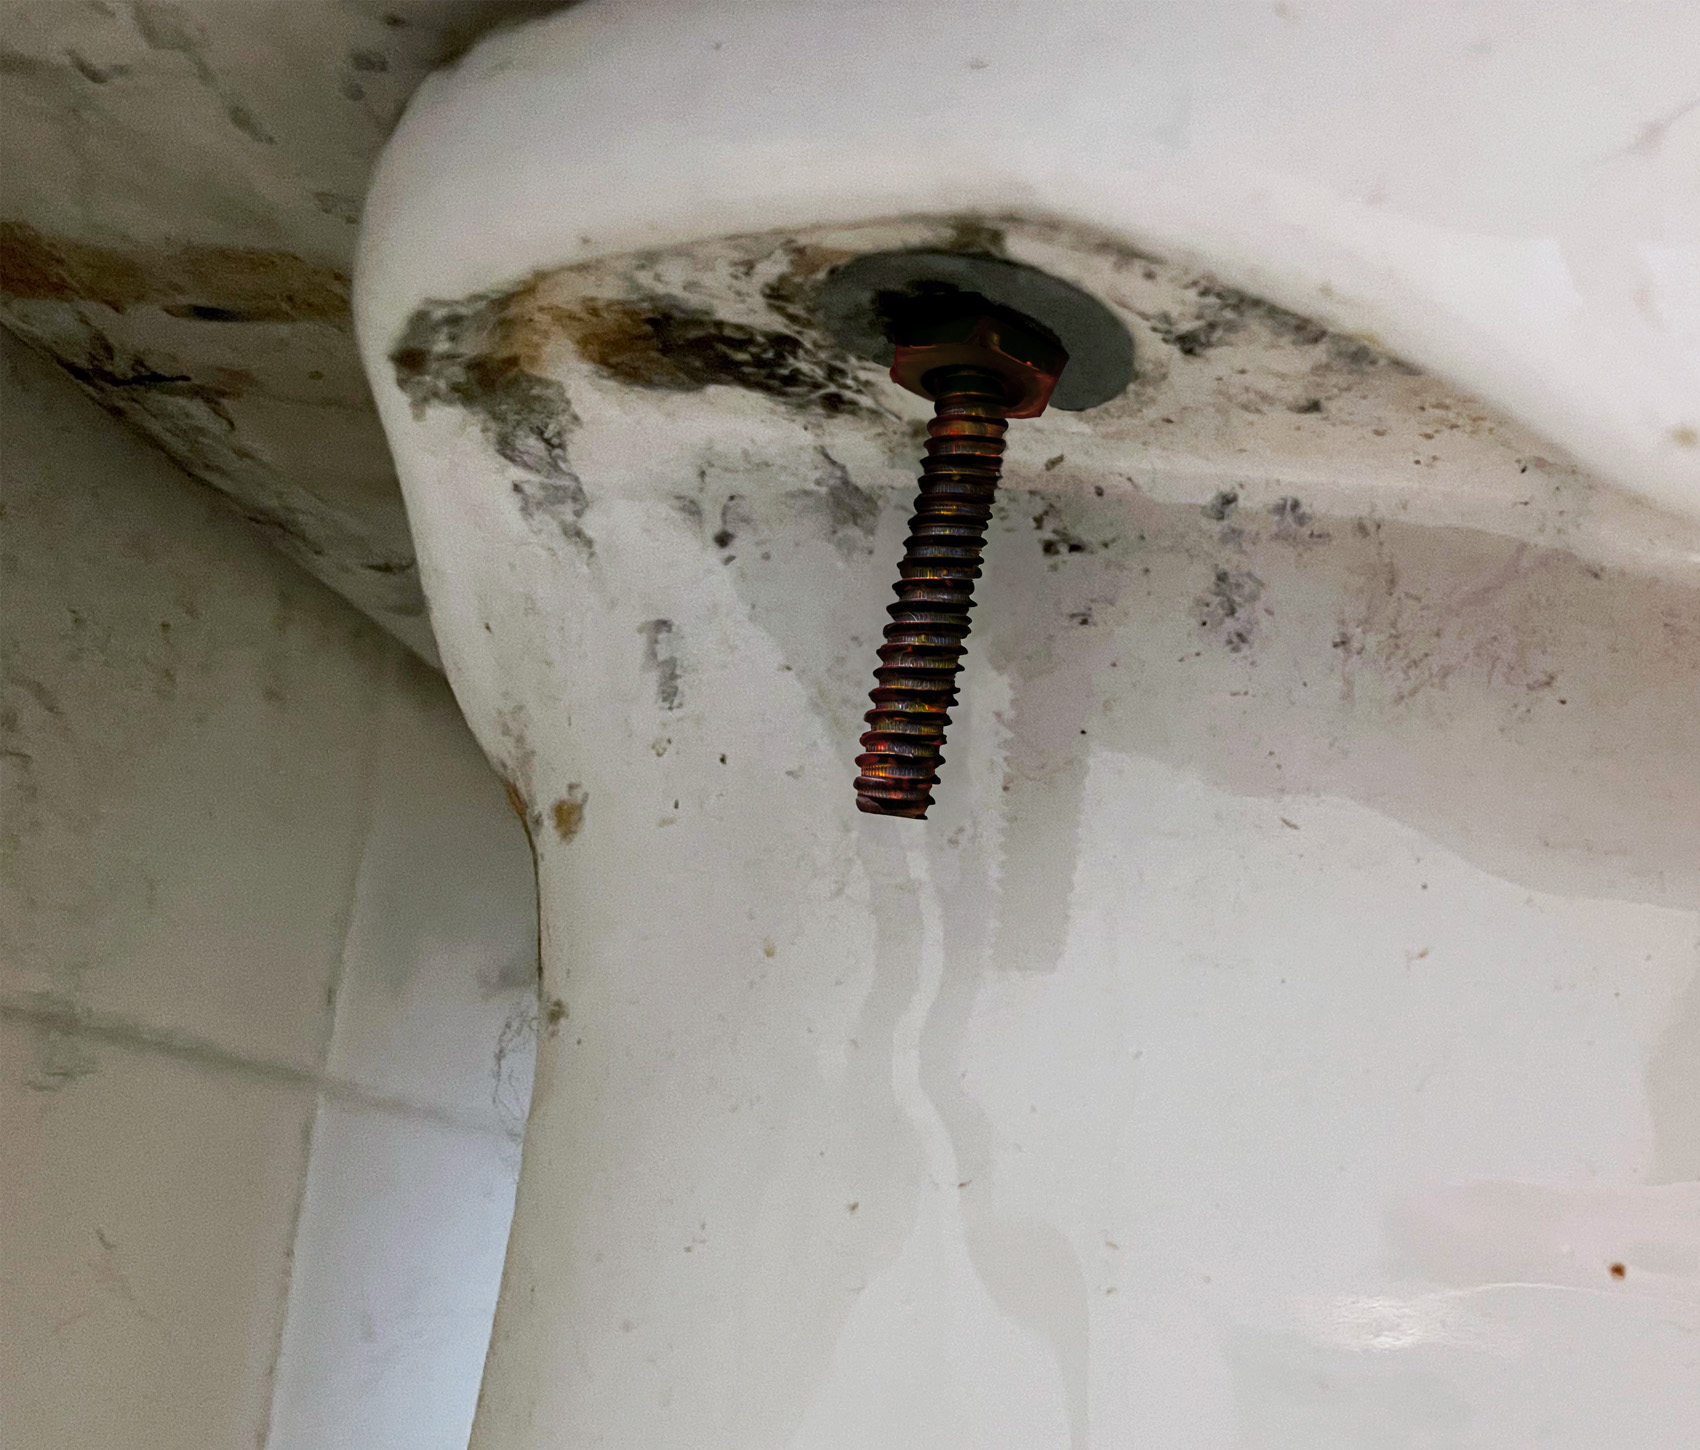
Toilet tank bolts face constant exposure to damp and moist conditions, making them highly susceptible to rusting. Their heads are constantly submerged in water while the threaded rod end is in a damp bathroom for extended periods of time. When these bolts are made of steel, which is very common, ongoing exposure to water can cause rust.
Toilet tank bolts secure the toilet tank to the bowl. They’re made of 3 parts, the head, the threaded rod, and the nut. The head is located inside the tank and constantly submerged in water. The threaded rod and nut are outside the tank and exposed to moisture and air. This is the area where rust usually starts growing.
- Bathrooms are typically areas of high humidity due to frequent showers and baths.
- The resulting moisture in the air can adhere to the bolts, further contributing to the damp conditions that foster rust development.
- Air, water, and metal can oxidize and create rust.
Leaking water from the toilet tank presents another rust-inducing factor. Even minor leaks can maintain constant dampness around the bolt, nut, and threaded portion extending outside the toilet tank. This persistent wetness promotes the corrosion process, accelerating the deterioration of the metal parts.
The threat of rust isn’t limited to just the bolt heads. The entire bolt, including the nut and the threaded portion that extends outside the toilet tank, is susceptible to rust. When water seeps past the washers and the tank’s base, it can reach these parts of the bolt, leading to widespread rust.
Understanding The Basics
The toilet tank is a crucial component of the entire toilet system. It’s a reservoir of water that gets released when the toilet is flushed. Inside the tank, you’ll find several components, including the fill valve, the flapper, and the overflow tube, each performing its specific function. However, from an external perspective, the tank is held to the bowl by a set of bolts. These bolts ensure the tank and bowl maintain a watertight seal and operate together seamlessly.
Toilet tank bolts are typically located on the bottom of the tank. Their primary function is to secure the toilet tank to the bowl, ensuring a tight seal between the two components. This prevents any water from leaking out when the toilet is flushed. Usually, there are two or three bolts, depending on the toilet model. These bolts are covered by caps for aesthetic reasons and to protect against moisture.
The rusting of toilet tank bolts typically results from a combination of moisture, air, and the metal from which the bolts are made. The constant exposure to water when the toilet is flushed accelerates this process. Further, if the bolts are not made from rust-resistant material or lack a protective coating, they are more likely to rust.
Rusted bolts can lead to a range of issues. For starters, they can weaken and potentially break, leading to the toilet tank becoming loose. This could cause water leakage, leading to damage to your bathroom floor or even worse, structural damage over time if left unnoticed. Rusted bolts can also be difficult to remove, which complicates any maintenance or replacement work on the toilet. Moreover, a rusted bolt could potentially lead to rust contamination in your bathroom, an aesthetic concern.
How To Remove Rusty Toilet Tank Bolts
Removing rusty toilet tank bolts is an easy job that requires basic tools. Start by inspecting the extent of the rust on the bolts. Minor surface rust can often be dealt with using a rust dissolver. However, if the bolts are severely corroded and showing signs of deterioration, it may be necessary to use more forceful methods.
Once you decide to remove the bolts, be careful, porcelain toilets are easy to damage.
The following step-by-step method is the best way to remove rusty toilet bolts without damaging the toilet and usually takes just a few minutes to complete.
Step 1. Shut Off The Water & Drain The Tank
Start by shutting off the water supply to the toilet tank. To do it, simply turn the valve on the toilet’s water supply line clockwise until it won’t turn anymore. Then remove the tank lid and flush the toilet to drain the tank. Once the tank is drained, you’ll be able to see the heads of the toilet bolts.
Step 2. Apply Penetrating Oil
Spray a penetrating oil or rust dissolver onto the head of the bolts, the threaded rod, and the nut. Allow it to sit on the rust for 15 minutes. During this time, the oil will penetrate and break up the rust. This will make removing the bolt with a wrench much easier to do.
- Follow the manufacturer’s instructions when using the spray.
- Always use protective gloves and eyewear when handling these substances.
- Spray rust remover onto the bolt head, threaded rod, and nut.
- Allow the solvent to penetrate for 15 minutes.
Spray a generous amount of solvent onto the entire bolt including areas that don’t have rust. It will drip and penetrate where it’s needed. Place a towel under the bolts to prevent solvent from dripping onto your bathroom floor.
The solvent I use to remove rusty toilet bolts is PB Blaster Penetrating Catalyst.
Step 3. Loosen The Nut With A Wrench
Once the rust remover has soaked for at least 15 minutes, use an adjustable wrench to loosen the nut from the bolt. Clamp your wrench hard and wiggle the nut back and forth until the rust starts to break free. Once it starts to loosen, the nut should come off easily. If the rust is stubborn, spray some more PB Blaster onto the entire bolt and let it soak for another 15 minutes.
Make sure when you turn the nut that you’re not turning the entire toilet bolt. If this happens, hold the toilet bolt in place with a screwdriver secured to the bolt head or another wrench clamped onto the threaded rod.
- First, try to loosen the bolt from outside the tank with a wrench.
- If the entire bolt assembly turns, use a second wrench or screwdriver to hold the bolt in place as you twist the nut.
It’s very easy to damage a porcelain toilet. Do not use too much force on the nut. If the area around the toilet bolt cracks, your toilet will leak.
If your toilet bolts are extremely rusted and won’t come off no matter how much PB Blaster you spray on them, you’ll have to cut them.
Step 4. Cut The Toilet Bolts
If your toilet bolts are so rusty that you can’t remove them with a wrench, you’ll have to cut them off. The bolts are only 5/16-inch in diameter, so they’re easy to cut with a thin metal blade. It’s easy to scratch porcelain, so apply some tape around the bolts to protect your toilet. To cut the bolts, slip your blade into the gap between the toilet tank and bowl.
What tool you use doesn’t matter, but I prefer a mini-hacksaw. Cutting the bolts by hand rather than using a power tool gives me more control and makes it less likely that I’ll mess up and damage the toilet.
Here are the tools you can use:
- A mini-hacksaw
- An oscillating tool with a metal-cutting blade
- A Sawzall with a metal-cutting blade
- A small grinder
Work slowly to avoid damaging the toilet. The bolts are only 5/16-inch and rusted, so they’ll cut easily.
When choosing a metal blade, select something with a diamond edge. Metal blades with diamond cut through toilet bolts like butter. Once the bolt is cut, remove it from the tank.
Step 5. Clean & Inspect The Tank
Once you’ve removed the toilet tank bolts, thoroughly clean the areas where the bolts were located to remove any remaining rust or debris from the porcelain. Inspect the tank and bowl for any damage that might have occurred during the bolt removal process. If there are any cracks or other forms of damage, it might be necessary to repair or replace the affected components before reassembling the toilet. This is a general area where toilet tanks can leak.
Step 6. Install New Toilet Bolts
After you’ve removed the old rusty bolts and inspected and cleaned the bolt holes, you’ll have to install new toilet tank bolts. I recommend using aluminum or brass bolts because they’re highly rust-resistant. Insert the bolts from the toilet tank’s inside through to the bowl’s bottom.
Working from the underside of the bowl, secure the nut onto the threaded rod of the bolt. Twist the nut by hand until it becomes firm. Then tighten with a wrench until the toilet tank is tight and sealed to the bowl, but don’t over-tighten. Over-tightening a toilet tank bolt can crack the porcelain and cause a leak.
Step 7. Clean the Area
The final step with any plumbing project is always clean up. Pick up all your towels, rags, tools, and whatever else you used to remove the bolts and wipe the toilet dry. I usually use some regular paper towels for this. Keeping the toilet bolts dry will help prevent rust in the future.
The Tools You’ll Need To Remove Rusty Toilet Bolts
To effectively handle the removal of rusted toilet tank bolts, you will need the following tools:
- Adjustable wrench or pliers: To loosen and remove the bolts. Bring two pairs in case the bolt and nut are extremely rusted together.
- Screwdriver: To hold the bolt in place while turning the nut.
- Rust dissolver: To help loosen the rusted bolts.
- Safety gloves: To protect your hands while working.
- Safety goggles: To protect your eyes from any rust or debris.
- Replacement bolts: To replace the old rusted bolts once removed.
- Bucket and towels: To manage any water that may spill during the process.
- Paper towels: I always bring some to clean up afterwards.
- Mini-hacksaw, Sawzall, oscillating tool, or grinder: In case you have to cut the bolts.
Safety Precautions When Working With Rusted Parts & Toilet Components
Safety should always be your first concern when working on any DIY project. Here are some precautions to take:
- Always wear safety gloves and goggles to protect yourself from sharp edges, rust particles, and any chemicals used in the process.
- Ensure the area is well-ventilated if you’re using a rust dissolver or any other chemical agent.
- To avoid water damage, shut off the water supply to the toilet and flush to empty the tank before starting the removal process.
- Have a bucket and towels ready to handle unexpected water spills.
Tips For Preparation & Cleaning Of The Work Area
- Before starting the bolt removal process, it’s important to prepare the area:
- Clean the toilet area to remove any obstructions that may interfere with your work.
- Lay down towels around the base of the toilet to soak up any water that may escape during the process.
- Have a container or bag ready to discard the old bolts and any debris generated during the process.
- Use a small portable light to ensure adequate work visibility.
Tips to Prevent Toilet Tank Bolt Rust
Once you’ve removed your old rusty tank bolts, install new ones made of stainless steel, aluminum, or brass. These materials are more durable and less likely to rust than standard metal bolts. It might be a bit more expensive, but these materials’ longevity and peace of mind are worth the investment.
- Regular Maintenance and Inspection Routines: Regularly inspect your toilet tank bolts for signs of rust. Early detection can allow you to address the issue before it becomes a bigger problem. Also, consider applying a thin layer of plumber’s grease on the bolts during installation to protect against rust.
- Importance of Addressing Leaks Promptly: Leaks can accelerate the rusting process, so it’s crucial to address them as soon as they are detected. Monitor the toilet regularly for signs of leaks, such as water around the toilet’s base or a constantly running toilet. If you find any, resolve them promptly, which will also help prevent the bolts from rusting.
- Environmental Factors that Can Affect Bolt Longevity: Humidity and salinity can contribute to rust. If you live in a humid climate or near the sea, investing in dehumidifiers or using ventilation to reduce moisture in your bathroom might be beneficial. In addition, using a toilet cleaner that doesn’t contain harsh chemicals can help prevent damage to the bolts and other components of your toilet.
If you use the right bolt material, inspect the bolts every so often, and address issues promptly, you can avoid toilet tank bolt rust and leaks.
How Do You Stop Your Toilet Tank Bolts From Rusting?
Preventing your toilet tank bolts from rusting involves a combination of proactive maintenance, regular inspections, and careful material selection. Here’s a guide on how to stop your toilet tank bolts from rusting:
- Use Rust-Resistant Materials: When installing new bolts, consider using rust-resistant materials such as stainless steel or brass. These materials are less likely to rust compared to ordinary steel bolts.
- Apply a Protective Coating: Consider applying a protective coating to your bolts, such as a thin layer of plumber’s grease. This can add an extra barrier against moisture and help prevent rust.
- Regular Maintenance and Inspection: Make it a habit to inspect your toilet tank bolts regularly for signs of rust. If you catch it early, you can treat the rust before it spreads or replace the bolt before it becomes a bigger problem. Additionally, regular cleaning can also help keep rust at bay.
- Ensure Good Ventilation: Since moisture contributes significantly to rusting, having a well-ventilated bathroom can help reduce moisture levels and slow down the rusting process.
- Address Leaks Promptly: If your toilet tank is leaking, it can contribute to rusting. Ensure any leaks are addressed as soon as possible to keep your bolts dry and prevent rust.
- Use Non-Corrosive Cleaning Agents: Some harsh cleaning agents can accelerate the corrosion process. Using milder, non-corrosive cleaning agents can help keep your toilet tank bolts in good condition for longer.
By incorporating these measures, you can significantly reduce the likelihood of your toilet tank bolts rusting and thereby extend their lifespan, ensuring that your toilet remains sturdy and reliable.
Summary: How To remove Rusty Toilet Tank Bolts
Rust is a common problem for toilet bolts because of the interaction between metal, water, and air. In a bathroom where water is constantly present, the metal components of a toilet are especially susceptible to rusting. One such component is the toilet tank bolts. These bolts are a crucial part of the assembly as they hold the toilet tank securely to the bowl. However, they may succumb to the harsh environment over time and become severely rusted. This can lead to several problems, including leaks, unstable tanks, and difficulty removing the tank for repairs or replacement.
In order to remove rusty toilet bolts, you should:
- Turn off the toilet’s water supply and flush.
- Spray the bolt with solvent and allow it to soak for 15 minutes.
- Use a wrench to loosen the toilet tank bolt’s nut.
- If the rusted bolts won’t loosen, cut them off.
- Use duct tape to prevent damaging the bowl.
- Use a hacksaw, oscillating tool, mini-grinder, or Sawzall with a metal blade.
- Insert the blade into the gap between the toilet tank and bowl and slowly cut.
- Cleanup, inspect for damage and install new bolts.
Understanding how to remove rusted toilet tank bolts is essential for any homeowner or DIY enthusiast. Make sure to replace the old bolts with new aluminum, stainless steel, or brass bolts that are resistant to rusting. They cost more but are worth the extra money.
If you have any questions or comments about how to remove rusted toilet tank bolts, email any time.